
Related Manuals for Microm HM 355 S


Summary of Contents for Microm HM 355 S
- Page 1 (217) 352-9330 | Click HERE Find the Thermo / Microm HM 355 S at our website:...
- Page 2 Rotary Microtome HM 355 S ROTARY MICROTOME HM 355 S INSTRUCTION MANUAL MICROM International GmbH Robert-Bosch-Str. 49 D- 69190 Walldorf...
- Page 3 Rotary Microtome HM 355 S MICROM International GmbH Robert-Bosch-Str. 49 D- 69190 Walldorf...
-
Page 4: Warranty
This MICROM product is warranted against defects in material and workmanship for a period of 1 year. Parts which prove to be defective during the warranty period will be repaired or replaced free of charge by MICROM International GmbH. No other warranty is expressed or implied. - Page 5 Rotary Microtome HM 355 S MICROM International GmbH Robert-Bosch-Str. 49 D- 69190 Walldorf...
-
Page 6: Intended Use
Rotary Microtome HM 355 S INTENDED USE Dear Customer, Before operating the instrument, please read these instructions carefully to familiarize yourself with its proper operation and functions. Only skilled or specially trained personnel must operate the microtome, i.e. clamping the specimen, trimming, sectioning and taking off the sections from the instrument. - Page 7 Intended Use Table of Contents EC Certificate of Conformity Safety precautions Part 1 Introduction Description of the Rotary Microtome HM 355 S Technical specifications HM 355 S Part 2 Operating instructions Setting up the microtome Initial turn-on Cutting movement and retraction...
- Page 8 Rotary Microtome HM 355 S 2-11 Adapters for specimen clamping 2-11-1 Adapter, non-orienting 2-11-2 Adapter, orienting, specimen orientation 2-11-3 Changing and/or clamping specimen clamps 2-11-4 Readjusting specimen clamps 2-12 Knife carriers 2-12-1 Standard knife carrier N 2-12-2 Disposable blade carrier E...
- Page 9 Rotary Microtome HM 355 S 4-3-1 Condition of the knife edge 4-3-2 Clean knife surfaces MICROM Internatio nal GmbH Robert-Bosch-Str. 49 D- 69190 Walldorf...
- Page 10 Rotary Microtome HM 355 S How to avoid malfunctions 4-4-1 Preparation of the specimen 4-4-2 Temperature of the specimen 4-4-3 Tightening the clamping screws 4-4-4 Selection of the knife 4-4-5 Adjustment of the knife 4-4-6 Cutting speed 4-4-7 Trimming Part 5...
- Page 11 VDE 0843 Teil 20/A1:1999-05 The VDE Prüf- und Zertifizierungsinstitut (EU reference no. 0366), Merianstr. 28, D-63069 Offenbach has checked and certified the product. The marks licences entitle MICROM International GmbH to use the VDE labels opposite. Marks licence no.: 95308 G Marks licence no.: 95093 F...
- Page 12 Rotary Microtome HM 355 S MICROM International GmbH Robert-Bosch-Str. 49 D- 69190 Walldorf...
- Page 13 Please observe the following general precautions during operation of this instrument. Failure to comply with these precautions violates safety standards and the intended use of the instrument. MICROM International GmbH is not liable for misuse of the instruments and failure to comply with basic safety requirements.
- Page 14 Rotary Microtome HM 355 S HAZARD OF RADIOACTIVE RADIATION When working with radioactive specimens observe all applicable radiation safety procedures. HAZARD OF INFECTION Use the appropriate safety and disinfection measures when working with infectious specimens. HAZARD OF MALFUNCTION To avoid the hazard of malfunction of an instrument, it must only be operated in a controlled electromagnetic environment.
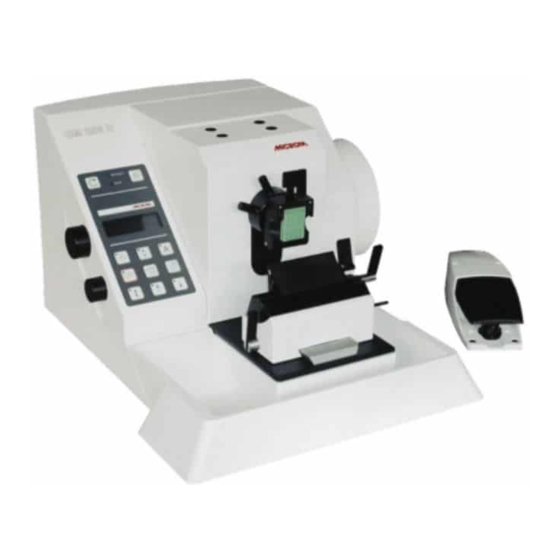
- Page 15 Rotary Microtome HM 355 S Fig. 1 MICROM International GmbH Robert-Bosch-Str. 49 D- 69190 Walldorf...
- Page 16 The HM 355 S will cut sections in a range from 0,5 up to 100 microns. For the protection of knife and specimen, the instrument retracts the specimen at the end of the cut. If desired, the function <retraction> can be turned off.
- Page 17 Rotary Microtome HM 355 S The knife carriers are designed so the knives can be easily clamped in place and adjusted. For the user's safety, the instrument is equipped with two emergency stop devices. An electro-mechanical handwheel brake as well as a handwheel handle, which can be pushed in, are installed for further safety.
- Page 18 Rotary Microtome HM 355 S 1 - 2 TECHNICAL SPECIFICATIONS HM 355 S Microtome: Section thickness range .............. 0,5 - 100 µm Resolution: ..............0,5 µm for 0,5 - 5 µm ....................1 µm for 5 - 20 µm ..................... 2 µm for 20 - 30 µm .....................
-
Page 19: Setting Up The Microtome
Rotary Microtome HM 355 S As above-mentioned, the operating panel can be PART 2 OPERATING INSTRUCTIONS used freestanding. It can be p laced on the left as well as on the right side of the microtome. For this, SETTING UP THE the operating knobs (fig. -
Page 20: Cutting Movement And Retraction
Rotary Microtome HM 355 S CUTTING MOVEMENT AND RETRACTION To start the cutting movement of the microtome, turn the handwheel (or use the motorized cutting drive). As the specimen moves down, sectioning is carried out (cutting movement, fig. 3.2). Continue turning the handwheel to bring the specimen back up. - Page 21 Rotary Microtome HM 355 S Fig. 4 If the trimming thickness is chosen, the LED in SETTING SECTION THICKNESS button (fig. 5.14) lights up in addition to the marking AND TRIMMING THICKNESS on the display. The required section and trimming thicknesses are set by means of the control knob (fig.
- Page 22 Rotary Microtome HM 355 S The graduation of the trimming thicknesses is divided into 4 ranges: range graduation up to 10µm 5µm from 10µm to 100µm 10µm from 100µm to 200µm 20µm from 200µm to 500µm 50µm SPECIMEN FEED 2-5-1 COARSE FEED AND SPEED...
-
Page 23: Trimming And First Cuts
Rotary Microtome HM 355 S RETRACT STOP MICROM FEED = 3 TRIM = 20 CONT. V = 25 COUNTER = 12 MODE START 1,2,3 STOP Fig. 5 The <permanent function> is used to get faster to the desired sectioning level. - Page 24 Rotary Microtome HM 355 S 2-5-3 FINE FEED After having adjusted specimen and knife as well as having trimmed the specimen, sectioning can be started. Press the control knob (fig. 4.3) to select the section thickness setting. Turn the handwheel continuously in one direction to feed the specimen at the selected section thickness.
-
Page 25: Motorized Cutting Drive
Rotary Microtome HM 355 S MOTORIZED CUTTING DRIVE 2-6-2 SELECTION OF OPERATING MODES Sectioning can be carried out either manually by turning the handwheel or by means of a motorized For the motorized cutting movement of the cutting drive. The cutting movement can either be microtome, the following operating modes are released by pressing the button START/STOP (fig. - Page 26 Rotary Microtome HM 355 S Fig. 6 SINGLE STROKE Press button (fig. 5.11) until the operating mode single stroke (fig. 5.6) is shown on the display (fig. 5.7). Press the button (fig. 5.12) or the foot pedal once, to release a single cutting cycle. The movement stops in the upper reversal point.
-
Page 27: Setting Cutting Speed
Rotary Microtome HM 355 S 2-6-3 SETTING CUTTING SPEED 2-6-5 START AND STOP OF CUTTING DRIVE The desired cutting speed is set continuously on the control knob (fig. 4.4) and shown in the middle of The cutting drive can be turned on and off by the third line on the display (fig. -
Page 28: Emergency Stop
Rotary Microtome HM 355 S 2-6-7 EMERGENCY STOP To quickly eliminate danger, the microtome has two <emergency stop> devices. CAUTION! In case danger arises from cutting drive, push the <emergency stop>! The hand emergency stop button is placed on the right side of the microtome below the handwheel. -
Page 29: Section Counter
Rotary Microtome HM 355 S INDICATION OF CUTTING 2-7-3 REMAINING TRAVEL TO PROCESSES FRONT END POSITION In the lower line of the display (fig. 5.7) information This value shows the distance in microns, which is about the sectioning status can be seen. Press the left for sectioning. - Page 30 Rotary Microtome HM 355 S TURNING OFF THE FUNCTION SELECTING THE INDICATED <RETRACTION> LANGUAGE If desired, the function <retraction> can be turned The sectioning information on the display can be off. This can be achieved by pressing the buttons shown alternatively in three languages. English, (fig.
-
Page 31: Specimen Clamping
Rotary Microtome HM 355 S 2-10 SPECIMEN CLAMPING 2-10-2 STANDARD SPECIMEN CLAMP To clamp specimens, different specimen clamping The standard specimen clamp (fig. 8) is used for systems are available. With the orienting adapter it rectangular and square paraffin and plastic blocks. -
Page 32: Insert For Round Specimens, V-Insert And V-Distance Piece
Fig. 10 knob (fig. 8.3) on the spindle. According to the various specimens, it might be helpful to use in addition MICROM's sandwich supporting material (cat. no. 176010) on the right and left side between specimen and clamping jaw. MICROM International GmbH Robert-Bosch-Str. -
Page 33: Segment Arc And Universal Specimen Holder
Rotary Microtome HM 355 S 2-10-5 SEGMENT ARC AND UNIVERSAL SPECIMEN HOLDER The segment arc and universal specimen holder are highly suitable for the clamping of small specimens embedded in plastic (fig. 11). Fig. 11 The specimen is inserted in the holder (fig. 11.1) and clamped by means of the screw (fig. -
Page 34: Adapters For Specimen Clamping
Rotary Microtome HM 355 S 2-11 ADAPTERS FOR SPECIMEN CLAMPING 2-11-1 ADAPTER, NON-ORIENTING This adapter replaces the specimen holder and NOTE! To avoid undesirable movement while serves for the non-orienting fastening of the adjusting the specimen, press the eccentric lever specimen clamps directly on the feed cylinder. -
Page 35: Readjusting Specimen Clamps
Rotary Microtome HM 355 S 2-11-4 READJUSTING SPECIMEN CLAMPS Frequent use of the clamping lever (fig. 12.1) can lead to the fact that the specimen clamps cannot be clamped optimally anymore. If the necessary readjustments are not carried out, it might even be... - Page 36 Rotary Microtome HM 355 S 2-12 KNIFE CARRIERS The knife carriers of the microtome are easy to use, can be moved sideways and are equipped with knife guards for user safety while adjusting knife and specimen. A dovetail guide is screwed on the base plate. It is designed universally so that the different knife carriers can be clamped and moved to the front and the back.
- Page 37 Rotary Microtome HM 355 S Fig. 14 MICROM International GmbH Robert-Bosch-Str. 49 D- 69190 Walldorf...
-
Page 38: Disposable Blade Carrier E
Rotary Microtome HM 355 S 2-12-2 DISPOSABLE BLADE CARRIER E Inserting the blade The disposable blade carrier E is designed to take NOTE! By experience, usable cuts are only all commercially available high and low profile achieved at a clearance angle of 10° or more. - Page 39 Rotary Microtome HM 355 S Fig. 15 MICROM International GmbH Robert-Bosch-Str. 49 D- 69190 Walldorf...
-
Page 40: Knife Carrier C
Rotary Microtome HM 355 S 2-12-3 KNIFE CARRIER C Inserting the knife Moving the knife carrier on the dovetail guide To insert the knife, the clamping screws (fig. 16.10) must be unscrewed slightly so the knife can Loosen the clamping lever (fig. 16.5) on the left be pushed in from the side. - Page 41 Rotary Microtome HM 355 S Fig. 16 Fig. 17 shows schematically the angles on the cutting edge profiles of c- and d-knives. Fig. 17 MICROM International GmbH Robert-Bosch-Str. 49 D- 69190 Walldorf...
- Page 42 Rotary Microtome HM 355 S 2-12-4 KNIFE CARRIER S Inserting the knife Turning the carrier The knife carrier S is designed to take triangular Loosen the clamping screw (fig. 18.4) to move the glass knives, diamond and sapphire knives. These carrier to the left or right side on the socket up to knives are put into the knife insert (fig.
- Page 43 Rotary Microtome HM 355 S Fig. 18 MICROM International GmbH Robert-Bosch-Str. 49 D- 69190 Walldorf...
- Page 44 Rotary Microtome HM 355 S 2-12-5 READJUSTING KNIFE CARRIERS N, E AND C Frequent use of the clamping levers can lead to the fact that the knife carriers cannot be clamped optimally anymore. If the necessary readjustments are not carried out, it might even be possible that the knife carriers cannot be clamped anymore.
-
Page 45: Section Waste Tray With Integrated Arm Rest
Rotary Microtome HM 355 S 2-13 SECTION WASTE TRAY WITH 2-15 BACKLIGHTING SYSTEM INTEGRATED ARM REST The section waste tray with integrated arm rest The adjustment between specimen and cutting surrounds the knife carrier area. It can easily be edge is facilitated considerably by the backlighting cleaned and allows non-tiring working with the system. -
Page 46: Memory Function
To facilitate routine work for the user, the rotary When the first-cut-position as well as the safety microtome HM 355 S is equipped with two distance have been stored, please proceed as functions for the fast and exact approach of knife follows: edge and specimen. - Page 47 Rotary Microtome HM 355 S 2-16-2 AUTOMATIC APPROACH SYSTEM The automatic approach system is used for the fast After this process, turn the handwheel and thus the and exact approach of the specimen (fig. 24.2) specimen holder into the upper position. Then the towards the knife edge (fig.
- Page 48 Rotary Microtome HM 355 S CAUTION! The permanent functionality of the automatic approach system is only guaranteed when the working process is not disturbed by section waste. Therefore, keep the automatic approach system itself as well as the direct surrounding area clean.
-
Page 49: Large Field Magnifier
Rotary Microtome HM 355 S 2-17 LARGE FIELD MAGNIFIER The large field magnifier (fig. 25) is for looking at CAUTION! Before using the large field section production. magnifier for the first time, please check if the voltage conditions at the installation site comply... - Page 50 Rotary Microtome HM 355 S Installing the magnifier on the microtome Please use the enclosed fastening elements to attach the magnifier to the microtome. Remove the front plastic caps from the upper side of the front panel. If there are no drilled holes in the front panel, it must be replaced with a new one with drilled holes.
-
Page 51: Standard Equipment
Rotary Microtome HM 355 S 2-18 STANDARD EQUIPMENT The Rotary Microtome HM 355 S is supplied with the following accessories: 1 Hex head wrench 6 mm 1 Cover 1 Para Gard, 100 ml 1 Instruction manual The knife carriers and specimen clamps are not included in the standard equipment. -
Page 52: Optical Accessories
Rotary Microtome HM 355 S Insert for round specimens, ø 6 mm 715070 Insert for round specimens, ø 15 mm 715080 Insert for round specimens, ø 19 mm 715280 Insert for round specimens, ø 25 mm 715090 V-Insert 715100 V-distance piece... - Page 53 Rotary Microtome HM 355 S MICROM International GmbH Robert-Bosch-Str. 49 D- 69190 Walldorf...
-
Page 54: Additional Accessories
Rotary Microtome HM 355 S Knife cases 12 cm 152220 16 cm 152230 18,5 cm 152280 22 cm 152240 Disposable blades for paraffin S 35, 50 pieces in dispenser 152170 R 35, 50 pieces in dispenser 152370 Superlap blades, 10 pieces... -
Page 55: Theory Of Operation
The rotary movement of the handwheel of the After changing the specimen or moving the knife or HM 355 S results in the vertical movement of the knife carrier, it is necessary to adjust the specimen specimen clamp. This rotary movement is carried to the knife edge again. - Page 56 Rotary Microtome HM 355 S KNIFE CARRIERS The knife carriers are easy to use. They allow the microtome knives to be clamped and adjusted as needed. Depending on application, special knife carriers are available. MICROTOME WITH FREEZING UNIT The freezing unit K 300 allows frozen sectioning with the specimen temperature as low as -45°C.
- Page 57 Rotary Microtome HM 355 S PART 4 WORKING WITH THE MICROTOME PREPARATION AND SECTIONING INSTRUCTIONS ORIENTATION Before sectioning, the specimens must be prepared To cut usable sections, the following points are of appropriately and embedded in suitable media. The utmost importance:...
- Page 58 Rotary Microtome HM 355 S HOW TO AVOID MALFUNCTIONS 4-4-1 PREPARATION OF THE 4-4-5 ADJUSTMENT OF THE KNIFE SPECIMEN When preparing specimens, be sure that a suitable Take care to adjust the proper clearance angle of embedding medium, fixation, dehydration and the knife: 5 - 7°...
-
Page 59: Maintenance
Rotary Microtome HM 355 S PART 5 MAINTENANCE Annual routine maintenance To secure section quality and functioning of the microtome, it is recommended that a routine maintenance be performed by a trained service technician once a year. Service contract MICROM offers a service contract which Fig. -
Page 60: Cleaning And Care
Rotary Microtome HM 355 S PART 6 CLEANING AND CARE Cleaning intervals Care Cleaning of the microtome depends on how Remove the knife from the knife carrier. Clean it frequently the microtome is used. The more it is and keep it in a knife case.
Need help?
Do you have a question about the HM 355 S and is the answer not in the manual?
Questions and answers