
Related Manuals for Levoit LV600HH


Summary of Contents for Levoit LV600HH
- Page 1 U SE R MANUAL Hybrid Ultrasonic Humidifier Model: LV600HH Questions or Concerns? Please contact us Mon–Fri, 9:00 am–5:00 pm PST/PDT at support@levoit.com or at (888) 726-8520.
- Page 2 H U M I D I F I E R BY L E V O I T. If you have any questions or concerns, please reach out to us at support@levoit.com. We hope you enjoy your new humidifier! Share the Levoit Love Find @LevoitLifestyle on social media for wellness + style inspiration.
-
Page 3: Table Of Contents
Table of Contents Package Contents Package Contents Hybrid Ultrasonic Humidifier Specifications Remote Control Safety Information 3V CR2025 Battery (Pre-Installed) Getting to Know Your Humidifier Aroma Pads (1 Pre-Installed) Controls Absorption Pads (1 Pre-Installed) Getting Started Cleaning Brush Using Your Humidifier User Manual Preventing Water Leaks Keeping Things Clean... -
Page 4: Safety Information
• Do not place the humidifier directly on floors, carpets, or rugs. Only place the humidifier on water-resistant surfaces. • Do not use attachments that are not recommended by Levoit for the humidifier. - Page 5 Power and Cord • Do not handle the power cord or plug with wet hands. Keep the plug and power cord away from liquids. • This humidifier has a polarized plug (one prong is wider than the other), which fits into a polarized outlet only one way. This is a safety feature to reduce the risk of electric shock.
-
Page 6: Getting To Know Your Humidifier
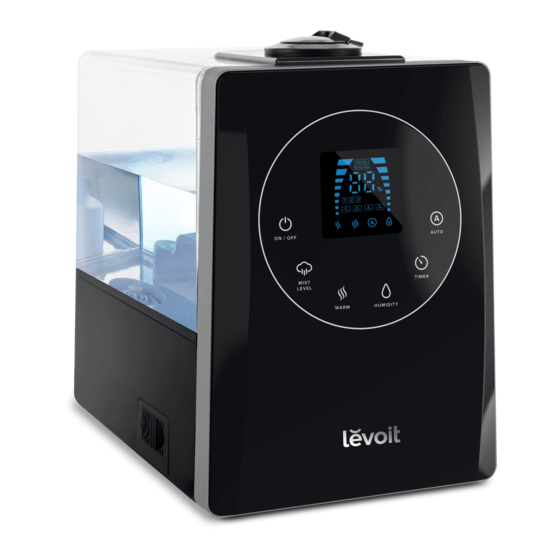
G E T T I N G TO K N O W YO U R H U M I D I F I E R Function Diagram Nozzle Cap Mist Tube Nozzles Mist Channel Handle Absorption Pad Water Tank Air Vent Top view of Base Inner Chamber... - Page 7 GETTING TO KNOW YOUR HUMIDIFIER (CONT.) Display Control Panel High Temperature Warning On/Off Button Humidity Setting Indicator Mist Level Button Relative Humidity (RH) Percentage Warm Mist Button Mist Level Humidity Level Button Timer Timer Button Warm Mist Setting Auto Mode Button Auto Mode Indicator Low Water Indicator ON / OFF...
-
Page 8: Controls
C O N T R O L S Note: The same controls are also on the included remote control. On/Off Button Timer Button Turns the humidifier Sets or cancels a timer • • on/off. (see page 12). Mist Level Button Auto Mode Button •... -
Page 9: Getting Started
G E T T I N G S TA R T E D Direct the nozzles away from walls and appliances. Place the humidifier on a flat, level, elevated, and water-resistant surface, such as a table or nightstand. Make sure the room is well-ventilated. -
Page 10: Using Your Humidifier
U S I N G YO U R GETTING STARTED (CONT.) H U M I D I F I E R Replace the water tank cap. Twist the cap clockwise to secure it tightly to the water General Operation [Figure 2.4] tank. - Page 11 USING YOUR HUMIDIFIER (CONT.) Warm Mist Humidity Level You can customize the humidity level that • Press to turn on warm mist. Keep the humidifier will maintain. pressing to increase the heat setting for the mist, and to turn warm mist off. Press once.
- Page 12 USING YOUR HUMIDIFIER (CONT.) Timer Memory Function You can set a timer between 1 and 12 hours. While the humidifier is plugged in, it will remember your settings (except Timer) when turned off, and will resume these • Press repeatedly to choose a time settings when turned back on.
- Page 13 USING YOUR HUMIDIFIER (CONT.) Using the Aroma Box The humidifier can be used as an aroma diffuser. Turn off the humidifier. Pull out the aroma box on the left side of the humidifier. [Figures 4.1] Put 2-3 drops of essential oil on the aroma pad.
-
Page 14: Preventing Water Leaks
P R E V E N T I N G WAT E R L E A K S The water tank may leak if not placed properly on the base. • Make sure the silicone ring around the water tank cap is secured at all times. [Figure 5.1] •... -
Page 15: Keeping Things Clean
K E E P I N G T H I N G S C L E A N Note: Remove the water tank from the base and pour out any water from the inner • Always make sure the humidifier is chamber. - Page 16 Cleaning the Aroma Pad KEEPING THINGS CLEAN (CONT.) Use the included cleaning brush to Pull out the aroma box. remove any scale buildup inside the Remove the aroma pad and rinse under water tank or in the inner chamber. warm, running water. [Figure 6.3] Dry with a clean cloth and place it back Pour out the vinegar from the water tank...
- Page 17 Extra pads are included with the humidifier. To maintain the performance of your humidifier, only use official Levoit aroma pads and absorption pads. To buy replacement pads, visit Levoit’s online store. Go to levoit.com...
-
Page 18: Troubleshooting
T R O U B L E S H O OT I N G Problem Possible Solution No mist comes out of Plug in the humidifier and turn it on. the nozzles. Add at least 2 US cups / 475 mL of purified or distilled water to the water tank. - Page 19 TROUBLESHOOTING (CONT.) Problem Possible Solution White dust appears This is caused by minerals in the water. Use purified or distilled around or in the water to fill the humidifier. Avoid using water with high mineral humidifier. content. Clean the humidifier every 3 days (see Keeping Things Clean, page 15).
- Page 20 TROUBLESHOOTING (CONT.) Problem Possible Solution Incorrect humidity The room may be larger than the humidifier’s effective range. percentage is Move to a room smaller than 430–753 ft² / 40–70 m². displayed. Moisture may have built up inside of the humidity sensor. Turn off the humidifier and allow the sensor to air dry.
-
Page 21: Warranty Information
You can extend your 1-year warranty by an end of the warranty period. additional year. Log onto www.levoit.com/warranty to register your new Arovast Corporation will replace any product product for the extended warranty. found to be defective due to manufacturer flaws based on eligibility. -
Page 22: Customer Support
Customer Support Team. Customer Support Arovast Corporation 1202 N. Miller St., Suite A Anaheim, CA 92806 Email: support@levoit.com Toll-Free: (888) 726-8520 Support Hours Mon–Fri, 9:00 am–5:00 pm PST/PDT *Please have your order invoice and order ID ready before contacting Customer Support. - Page 23 Connect with us @LevoitLifestyle...
- Page 24 JJ0919AL-M1.2_0419LV600HH...
Need help?
Do you have a question about the LV600HH and is the answer not in the manual?
Questions and answers