Table of Contents
Advertisement
Available languages
Available languages
Quick Links
Advertisement
Chapters
Table of Contents

Related Manuals for iFootage Shark Slider Nano


Summary of Contents for iFootage Shark Slider Nano
- Page 1 Shark Slider Nano Bedienungsanleitung | Instruction Manual...
-
Page 3: Table Of Contents
Zeitraffer, Stop-Motion und Kamerafahrten im Innen- oder Außenbereich. Um das Beste aus Ihrem Shark Slider Nano herauszuholen, lesen Sie bitte die folgenden Anweisungen sorgfältig durch, bevor Sie das Gerät in Betrieb nehmen. -
Page 4: Technische Informationen
Schäden. Sollten Teile fehlen oder defekt sein, wenden Sie sich bitte so schnell wie möglich an Ihren Distributor. 4. Für die erstmalige Benutzung von Shark Slider Nano lesen Sie bitte den Abschnitt „Vorsichtsmassnahmen”. 5. Bitte installieren Sie die Batterie, bevor Sie dieses Gerät benutzen. Wenn der Batteriestand niedrig ist, kann die Stromversorgung über den... -
Page 5: Eigenschaften
3 . Zuverlässige, drahtlose Steuerung über Bluetooth BLE 5,0 und 2,4 GHz . 4 . Sofortige automatische Konnektivität über Smartphone Bluetooth BLE 5 .0 . 5 . iFootage Moco App mit kostenlosen Firmware-Updates, mit denen Sie die neuesten Funktionen nutzen können . -
Page 6: Vorsichtsmassnahmen
2. Es wird empfohlen, nur F750-Batterien zu verwenden. 3. Aufgrund der Entladungseigenschaften von Lithium-Batterien und des Gesamtstrom- bedarfs für den Betrieb des Shark Slider Nano kann sich die Betriebszeit auf weniger als 10 Minuten verkürzen, wenn die Batterieleistung 20% oder weniger beträgt. -
Page 7: Beschreibung Der Komponenten
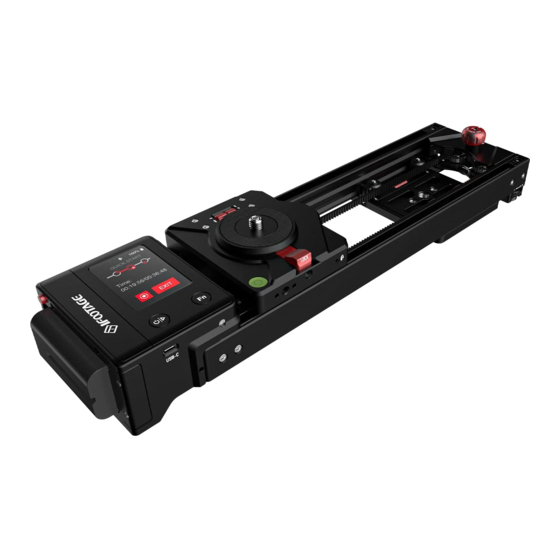
BESCHREIBUNG DER KOMPONENTEN Shark Slider Nano Taste zur Wagenverriegelung 1/4"-Switch-Anschluss 1/4"- und 3/8"-Anschlussschraube Schaltfläche zum Sperren der Schwenkachse Taste zur Einstellung der Schlittendichtheit 2,5 mm Verschlussöffnung Schaltfläche zur Steuerung von Fn-Gesten Steuerung der Höheneinstellung auf der linken Seite Ein/Aus-Schalter und Bestätigungstaste Steuerung der Höheneinstellung... -
Page 8: App Herunterladen
APP HERUNTERLADEN Scannen Sie den QR-Code oder suchen Sie direkt nach „iFootage Moco” im Apple App Store bzw . im Google Play Store . Bitte besuchen Sie www.ifootagegear.com für weitere Informationen . – 8 – - 05 -... -
Page 9: Installationsanleitung Und Funktionen
Schlitten in der entriegelten Position befindet. Hinweis: Es ist wichtig, dass sich der Schlitten vor dem Betrieb des Shark Slider Nano in 1. Wenn sich der Schlitten in der Verriegelungsposition befindet, drücken Sie bitte den Knopf, drehen ihn in Richtung der Entriegelungsmarkierung und lassen ihn los. - Page 10 INSTALLATIONSANLEITUNG UND FUNKTIONEN Hinweis: 1. Bitte stellen Sie sicher, dass die Strecke vor dem Start frei von Hindernissen ist. 2. Bitte prüfen Sie, ob die Wagenbewegung "fest" ist. Sie können den Schlitten mit dem Knopf zur Einstellung der Schlittenfestigkeit einstellen. Hinweis: Nicht zu fest anziehen.
- Page 11 INSTALLATIONSANLEITUNG UND FUNKTIONEN Ein- und Ausbau der Batterie Bitte installieren Sie die Batterie vor dem Start. Installation: Setzen Sie die Batterie vorsichtig in die Aufnahmeöffnung ein und schieben sie vorsichtig nach rechts. Ein hörbares Klicken zeigt an, dass die Batterie korrekt eingesetzt ist. Entfernung: Um den Akku zu entfernen, drücken Sie den Akku-Entriege- lungsknopf, schieben den Akku nach links und heben ihn heraus.
- Page 12 INSTALLATIONSANLEITUNG UND FUNKTIONEN Inbetriebnahme Schritt 1: Bitte befolgen Sie das folgende Verfahren. Ein/Aus-Schalter Zum Einschalten halten Sie bitte den „ON”-Schalter 3 Sekunden lang gedrückt, bis die Boot-Animation erscheint. Vor dem Anbringen jeglicher Ausrüstung Installieren Sie das Gerät und platzieren den Schieber nivellieren und den Sie das Kameraobjektiv senkrecht zur „dynamischen Kalibrierungsprozess”...
- Page 13 INSTALLATIONSANLEITUNG UND FUNKTIONEN Inbetriebnahme Schritt 2: Wenn Sie den iFootage Shark Slider Nano auf einer Tischplatte oder auf dem Boden verwenden, können Sie die Beine auf die erforderliche Höhe einstellen. USB-C-Anschluss: ermöglicht das Aufladen der Batterie, während der iFootage Shark Slider Drehen Sie hier, um die Höhe...
- Page 14 INSTALLATIONSANLEITUNG UND FUNKTIONEN Installation von Telefonhalter und Kopf Installieren des Telefonhalters Installieren des Kopfes Bei der Installation des Kopfes oder des Telefonhalters drücken Sie bitte zuerst die Verriegelungstaste für die Schwenk- achse und ziehen Sie dann den Kopf oder den Telefonhalter fest . –...
-
Page 15: Einrichtung
. und drücken Sie erneut, um den Lauf zu starten . Für weitere Informationen zu den Funktionen laden Sie bitte die iFootage Moco App herunter oder besuchen Sie die Website: www.ifootagegear.com für den Zugriff auf das Software-Benutzerhandbuch. – 15 –... -
Page 16: Szenarien
SZENARIEN Verwendung in horizontaler Position Wenn Sie den Nano auf dem Boden oder auf einer Tischplatte verwenden, stellen Sie bitte sicher, dass die Bahn vor dem Start frei von Hindernissen ist . – 16 – - 13 -... - Page 17 SZENARIEN Montage des Nano auf einem Stativ für bidirektionale Bewegung. Wenn Sie den Nano-Slider auf einem Stativ verwenden, stellen Sie bitte sicher, dass die Stativbeine ausreichend gespreizt sind, um den Schlitten und die Kamerabewegung vollständig zu unterstützen . – 17 – - 14 -...
- Page 18 SZENARIEN Verwendung in vertikaler Position Sicherheitshinweis: Wenn Sie den Nano in vertikaler Position verwenden, achten Sie bitte darauf, dass Sie zuerst den Schlitten am Stativ montieren, dann die Batterie einsetzen und zuletzt, nachdem Sie den Schlitten in die Startposition gebracht haben, die Kamera anbringen . Führen Sie zunächst einen Probelauf durch, um sicherzustellen, dass die L-Platte frei ist .
-
Page 19: Entsorgung
ENTSORGUNG Entsorgen Sie die Verpackung sortenrein. Nutzen Sie dafür die örtlichen Möglichkeiten zum Sammeln von Papier, Pappe und leichten Verpackungen. (Anwendbar in der Europäischen Union und anderen europäischen Staaten mit Systemen zur getrennten Sammlung von Wertstoffen). Geräte, die mit diesem Symbol gekennzeichnet sind, dürfen nicht mit dem Hausmüll entsorgt werden! Sie sind gesetzlich dazu verpflichtet, Altgeräte getrennt vom Hausmüll zu entsorgen. -
Page 20: Konformität
KONFORMITÄT Hiermit erklärt Rollei, dass der Funkanlagentyp „Shark Slider Nano” der Richtlinie 2014/53/EU entspricht: 2011/65/EU RoHS-Richtlinie 2014/53/EU RED-Richtlinie Der vollständige Text der EU-Konformitätserklärung steht unter der folgenden Internetadresse zur Verfügung: https://www .rollei .de/egk/sharkslidernano Rollei GmbH & Co . KG, In de Tarpen 42, D-22848 Norderstedt, Deutschland ERKLÄRUNG... - Page 21 – 21 –...
- Page 22 Thank you for purchasing this iFootage product . The Shark Slider Nano is compact, lightweight, easy to carry and is ideal for time-lapse, stop-motion and interior or exterior location camera movement . To get the most from your Shark Slider Nano, please read the following instructions carefully before operating the equipment .
-
Page 23: Technical Information
4. For Shark Slider Nano first time use, please read the 'precautions' section. 5. Please install the battery prior to using this equipment. When the battery level is low, power can be supplied via the Micro USB port whilst simultaneously charging the battery during operation. -
Page 24: Features
3. Reliable, wireless control using Bluetooth BLE 5.0 and 2.4 GHz. 4. Instant automatic connectivity via Smartphone Bluetooth BLE 5.0. 5. iFootage motion control App with free firmware updates allowing you to experience the very latest functionalility. 6. Ultra silent, brushless, servo drive technology providing accurate positioning: super smooth and super quiet. -
Page 25: Precautions
8. Any disassembly or modi cation without authorization or improper use of the equipment may result in damage and a ect the warranty. 9. In order to operate the Nano via the iFootage Moco App please follow the download instructions below: IOS users: search “iFootage Moco”... -
Page 26: Component Description
COMPONENT DESCRIPTION Shark Slider Nano Carriage lock button USB-C port 1/4” and 3/8” connection screw Spirit level Carriage tightness adjustment button 1/4” switch port Fn gesture control button Pan axis lock button On/Off switch & Confirm button 2.5 mm Shutter port... -
Page 27: App Download
APP DOWNLOAD Scan the QR code or search for ”iFootage Moco“ directly in the Apple App Store or in the Google Play Store . Please visit www.ifootagegear.com for more information . – 27 – - 0 5 -... -
Page 28: Installation Guide And Functions
. Note: It is important that prior to operating the Shark Slider Nano the carriage must be in the 'unlocked' position. 1 . If the carriage is in the locked position, please press the button and rotate towards the unlock mark and release . - Page 29 INSTALLATION GUIDE AND FUNCTIONS Note: 1. Please ensure that the track is clear of obstacles prior to starting. 2. Please check that the carriage movement is 'firm' . You can adjust the carriage using the carriage tightness adjustment button. Note: Do not overtighten. 1.
- Page 30 INSTALLATION GUIDE AND FUNCTIONS Installation and removal of the battery Please install the battery prior to starting . Installation: Carefully place the battery in the receiving port and gently push to the right . An audible click indicates that the battery is correctly installed . Removal: To remove the battery, press the battery release button, slide the battery left and lift out .
- Page 31 INSTALLATION GUIDE AND FUNCTIONS Start up Step 1: Please follow the procedure below. On/Off switch To turn on, please press and hold the 'ON' switch for 3 seconds until the boot animation appears. Prior to attaching any equipment, level Install the device and place the camera the slider and await the 'dynamic lens perpendicular to the track.
- Page 32 INSTALLATION GUIDE AND FUNCTIONS Start up Step 2: When using the iFootage Shark Slider Nano on a table top or on the ground, you can adjust the legs to required height. USB-C QC port: allows for battery to be charged whilst iFootage Shark Slider Nano Rotate here to adjust the is in operation.
- Page 33 INSTALLATION GUIDE AND FUNCTIONS Installation of phone holder and head Installing the phone holder Installing the head When installing the head or phone holder, please press the Pan Axis Lock button first, then tighten the head or phone holder. – 33 – - 11 -...
-
Page 34: Set Up
Press to set key frames. location and press again to start run. For more information on functions please download the iFootage Moco App or visit the website: www.ifootagegear.com for access to the software user manual. – 34 – -12 -... -
Page 35: Scenarios
SCENARIOS Use in horizontal position When using the Nano on the ground or on a table top please ensure that the track is free from any obstacle prior to start up . – 35 – -1 3 -... - Page 36 SCENARIOS Mounting the Nano on a tripod for bi-directional movement. When using the Nano slider on a tripod please ensure that the tripod legs are spread sufficiently to fully support the carriage and camera movement. – 36 – -1 4 -...
- Page 37 SCENARIOS Use in vertical position Safety note: When using the Nano in the vertical position please ensure that you initially mount the slider to the tripod, then install the battery and lastly, after setting the carriage in the start position, attach the camera. Carry out a trial run first to ensure L plate clearance.
-
Page 38: Disposal
DISPOSAL Dispose of the packaging according to its type. Use the local possibilities for collecting paper, cardboard and other materials . (Applicable in the European Union and other European countries with systems for the separate collection of recyclable materials) . Devices that are marked with this symbol must not be disposed of with household waste! You are legally obliged to dispose of old devices separately from to dispose of household waste . -
Page 39: Conformity
CONFORMITY Conformity Rollei hereby declares that the "Shark Slider Nano" type of radio equipment is subject to the 2014/53/EU: 2011/65/EU RoHS Directive 2014/53/EU RED Directive The full text of the EU Declaration of Conformity is available at the following Internet address: https://www.rollei.de/egk/sharkslidernano... - Page 40 Rollei GmbH & Co. KG In de Tarpen 42 D-22848 Norderstedt Germany www .rollei .de Service Hotline: +49 40 270750277...
Need help?
Do you have a question about the Shark Slider Nano and is the answer not in the manual?
Questions and answers