Kaya Instruments JetCam Manual
Flat field correction
Hide thumbs
Also See for JetCam:
- Quick start manual (15 pages) ,
- Quick troubleshooting manual (9 pages) ,
- User manual (58 pages)
Table of Contents
Advertisement
Quick Links
January
International Distributors
Flat Field Correction
In
JetCam
201
9
Sky Blue Microsystems GmbH
Geisenhausenerstr. 18
81379 Munich, Germany
+49 89 780 2970, info@skyblue.de
www.skyblue.de
Cameras
In Great Britain:
Zerif Technologies Ltd.
Winnington House, 2 Woodberry Grove
Finchley, London N12 0DR
+44 115 855 7883, info@zerif.co.uk
www.zerif.co.uk
Advertisement
Table of Contents

Related Manuals for Kaya Instruments JetCam


Summary of Contents for Kaya Instruments JetCam
- Page 1 Flat Field Correction JetCam Cameras January International Distributors In Great Britain: Sky Blue Microsystems GmbH Zerif Technologies Ltd. Winnington House, 2 Woodberry Grove Geisenhausenerstr. 18 81379 Munich, Germany Finchley, London N12 0DR +49 89 780 2970, info@skyblue.de +44 115 855 7883, info@zerif.co.uk www.skyblue.de...
-
Page 2: Table Of Contents
1 Contents and Figures Contents Contents and Figures ........................... 1 Introduction ..............................2 Overview .............................. 2 Requirements ............................2 System connection ..........................3 Using the DSNU and PRNU corrections ....................4 Dark field calibration process ....................... 4 Flat field calibration process ........................ 5 User Set Control category ........................ -
Page 3: Introduction
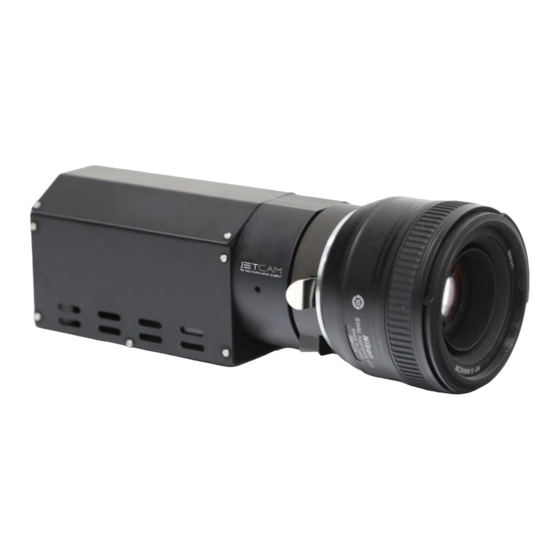
(PRNU) and/or artifacts caused by the illumination and illumination optics. These application notes describe how to calibrate the flat field functions and how to use them to improve the quality of the image. These functions are available in all JetCam series cameras. Figure 1 : JetCam Camera front view with lens 2.2 Requirements... -
Page 4: System Connection
4. Connect the Power Adaptor to the JetCam power supply connector. 5. Turn the camera and the computer on and start your Vision Point software application. An example of JetCam system connection is described in the image below: Komodo Fiber... -
Page 5: Using The Dsnu And Prnu Corrections
40%. These two separate steps in the flat field correction are therefore referred to as dark field calibration and bright field calibration, respectively. Figure 3 : JetCam Camera side view w/o lens 3.1 Dark field calibration process The dark field correction is the easiest one to calibrate. -
Page 6: Flat Field Calibration Process
Using the DSNU and PRNU corrections Figure 4 : Dark field calibration steps 3.2 Flat field calibration process The choice of which light intensity to use for the bright field calibration requires a little bit more thought. If you perform the calibration with a light intensity too close to camera saturation you might compensate the camera too much and actually introduce more PRNU for low light intensities. -
Page 7: Figure 5 : Flat Field Calibration Steps
Using the DSNU and PRNU corrections Figure 5 : Flat field calibration steps Notes: 1. Errors might show up when a sudden peak in intensity is present in the reference scene as the correction is a low frequency correction. 2. There might be limits to the total difference that you will be able to correct for. The correction is often achieved by applying a gain per pixel or pixel segment. -
Page 8: User Set Control Category
Using the DSNU and PRNU corrections Note: The PRNU and DSNU depends on exposure, gain, temperature and number of active fiber links. In case the above conditions might change during camera operation, it is advised to pre calibrate the system on several conditions and save them as different user sets. Load the user set if the conditions have been changed. -
Page 9: Userset - Save And Load Camera Configuration
Using the DSNU and PRNU corrections Characteristics and restrictions: 1. Up to 65536 bytes can be saved into camera's non-volatile memory. 2. All data will be erased in 1 burst. 3. Data can be saved in bursts of 256 bytes each time. All 256 should be filled either with valid or padding data. - Page 10 Using the DSNU and PRNU corrections The following function call sequence should be performed to achieve successful User Non-Volatile new memory save: KYFG_ExecuteCommand(camHandle, UserMemoryBulkErase ) KYFG_SetGrabberValueInt(camHandle, UserMemoryPageSelector , <page[255..0]>) uint8_t buffer[256]; uint32_t bufferSize = sizeof(buffer); KYFG_CameraReadReg(camHandle, 0x30300, buffer, &bufferSize); uint8_t buffer[256]={0,1,2,3/*...*/}; uint32_t bufferSize = sizeof(buffer); KYFG_CameraWriteReg(camHandle, 0x30300, buffer, &bufferSize);...
Need help?
Do you have a question about the JetCam and is the answer not in the manual?
Questions and answers