
Related Manuals for Siemens ET8..LMV1

Summary of Contents for Siemens ET8..LMV1
- Page 1 ET8..LMV1. User manual Register your product on My Siemens and discover exclusive ser- vices and offers. siemens-home.bsh-group.com/welcome The future moving in. Siemens Home Appliances...
- Page 2 ET8..LMV1. Ø 14,5 Ø 23/18 Ø 14,5 Ø 18/12 Ø 21/12 18x27 18x37 Ø = cm...
-
Page 3: Table Of Contents
Safety en ¡ In private households and in enclosed Table of contents spaces in a domestic environment. ¡ Up to an altitude of max. 2000 m above Safety .............. 3 sea level. Preventing material damage ....... 4 Do not use the appliance: Environmental protection and saving en- ¡... -
Page 4: Preventing Material Damage
en Preventing material damage ▶ If the surface is cracked, you must switch Food may catch fire. off the appliance in order to prevent a pos- ▶ The cooking process must be monitored. A sible electrical shock. To do this, switch off short process must be monitored continu- the appliance via the fuse in the fuse box ously. -
Page 5: Environmental Protection And Saving En- Ergy
Environmental protection and saving energy en Damage Cause Measure Damage Cause Measure Scratch Rough pot or Check your cookware. Discol- Pan abrasion, Lift pots and pans to pan bases ouration e.g. aluminium move on the hob. Discol- Unsuitable Only use cleaning Blisters Sugar or food Remove boiled-over food... -
Page 6: Familiarising Yourself With Your Appliance
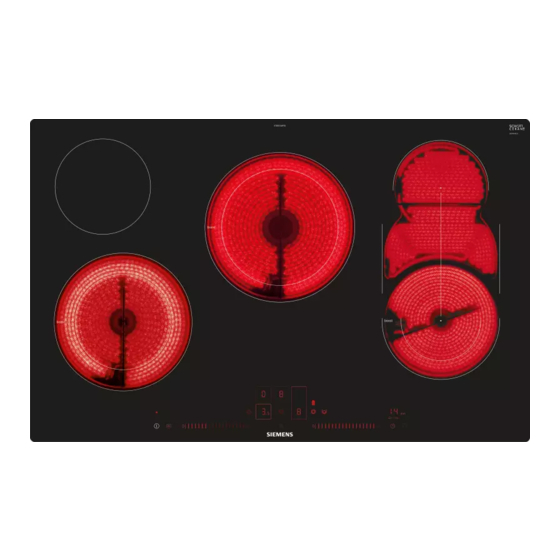
en Familiarising yourself with your appliance 4 Familiarising yourself with your appliance The instruction manual is the same for various different hobs. You can find the hob dimensions in the overview of models. → Page 2 4.1 Control panel You can use the control panel to configure all functions of your appliance and to obtain information about the operating status. - Page 7 Basic operation en Notes Combination Activation Suitabil- ¡ Dark areas in the glow pattern of the hotplate are part of the technical design. They do not affect the Small extended to activate Small functionality of the hotplate. cooking zone: com- the bridge heating roaster ¡...
- Page 8 en Basic operation To select a hotplate, touch the heat setting indicator Defrosting and heating . Spinach, frozen 2.5-3.5 10–20 lights up brightly on the heat setting display. Goulash, frozen 2.5-3.5 20–30 Select the required heat setting on the control panel. Poaching or simmering 1, 2 Dumplings...
- Page 9 PowerBoost function en Pancakes 6–7 one by Frozen products, e.g. chips or 8–9 chicken nuggets Omelette 3.5-4.5 one by Croquettes, frozen 7–8 Meat, e.g. chicken 6–7 Fried eggs 5–6 3–6 Fish, breaded or battered 5–6 Turn the dish several times. Vegetables or mushrooms, 5–6 breaded or battered Deep-frying...
- Page 10 en Sensor frying system 7.3 Setting the sensor frying system 7.4 Switching off the sensor frying system Once you have selected an appropriate frying setting Touch . ▶ from the recommended settings, you can set the sensor frying system. The outer filament circuit on the 7.5 Recommended setting for frying with dual-circuit hotplate is activated automatically when the sensor frying system...
- Page 11 Childproof lock en Potatoes Gyros, kebab 10–15 Fish fillet, plain or breaded 10–20 Fried potatoes, boiled in their 6–12 skin Fish fingers 8–12 Fried potatoes from raw pota- 15–25 Chips 4–6 toes Stir-fries, stir-fried vegetables 8–15 Potato pancakes 2.5–3.5 per Spring rolls 10–30 batch Camembert, cheese...
- Page 12 en Time-setting options 9 Time-setting options Your appliance has different time-setting options which Automatically setting the cooking time can be used to set a cooking time, a kitchen timer or a Requirement: The hotplate is selected and set. The stopwatch. cooking time setting is activated. → Page 12 Touch the settings 1 to 5 on the control panel for 9.1 Cooking time longer.
- Page 13 Automatic switch-off en 9.3 Stopwatch function a Time measurement begins. a Seconds are displayed during the first minute, then The stopwatch function displays the time which has minutes. passed since activating the function. Note: If you select another time-setting option in addi- The stopwatch function only works when the hob is tion to the stopwatch function, the setting appears on switched on.
-
Page 14: Energy Consumption Display
en Basic settings 14 Basic settings You can configure the appliance to meet your needs. 14.2 Changing basic settings Requirement: The hob is switched off. 14.1 Overview of the basic settings Switch on the hob. You can find an overview of the basic settings and the Within the next 10 seconds press and hold default factory settings here. -
Page 15: Home Connect
Home Connect en 15 Home Connect This appliance is network-capable. Connecting your ap- 15.1 Setting up Home Connect pliance to a mobile device lets you control its functions Requirements via the Home Connect app, adjust its basic settings ¡ The appliance is connected to the power supply and and monitor its operating status. - Page 16 en Home Connect Setting Selection or display Additional information Controlling remote access by after- is only displayed if after-sales service is attempting sales service to connect to the hob. After granting access, you can ter- – Not authorised minate this at any time. –...
-
Page 17: Hob-Based Hood Control
2.4 GHz band: 100 mW max. Directive 2014/53/EU. 5 GHz band: 100 mW max. A detailed RED Declaration of Conformity can be found online at www.siemens-home.bsh-group.com among the additional documents on the product page for your appliance. 5 GHz WLAN (Wi-Fi): For indoor use only. - Page 18 en Hob-based hood control You now have two minutes to start the connection Setting the fan process on the extractor hood. Touch . Select a fan setting on the control panel. a Once the connection has been established, lights up on the cooking zone display. You can choose between the levels 1, 2 and 3.
- Page 19 Cleaning and servicing en Setting Selection Description Switch light off automatically The display shows this setting only when the appli- – Switched off ance has been connected to the extractor hood. – The light switches itself off when the hob is switched off.
- Page 20 en Troubleshooting 18.1 Information on display panel Fault Cause and troubleshooting None There has been a power cut. Check the household fuse for the appliance. Check whether there has been a power failure by trying other electrical appli- ances. All displays flash The control panel is wet or objects are lying on it.
- Page 21 Disposal en 19 Disposal Find out here how to dispose of old appliances cor- This appliance is labelled in accord- rectly. ance with European Directive 2012/19/EU concerning used elec- 19.1 Disposing of old appliance trical and electronic appliances (waste electrical and electronic equip- Valuable raw materials can be reused by recycling.
- Page 24 Valid within Great Britain: Imported to Great Britain by BSH Home Appliances Ltd. Grand Union House Old Wolverton Road Wolverton, Milton Keynes MK12 5PT United Kingdom Manufactured by BSH Hausgeräte GmbH under the trademark licence of Siemens AG *9001565425* 9001565425 (010305)
Need help?
Do you have a question about the ET8..LMV1 and is the answer not in the manual?
Questions and answers