
Related Manuals for CUOGHI SP32


Summary of Contents for CUOGHI SP32
- Page 1 SP32 SP46 SP72 I - DEUMIDIFICATORE PER PISCINE GB - SWIMMING POOL DEHUMIDIFIER F - DÉSHUMIDIFICATEURS POUR PISCINES D - SCHWIMMBADENTFEUCHTER...
-
Page 4: Schema Elettrico
ITALIANO Schema elettrico Fig.1 – Schema elettrico, macchina standard Fig.2 – Schema elettrico, accessori di riscaldamento Riferimenti 1. Scheda di potenza 2. Ponte riscaldamento 2a. Ponte, macchina standard 2b. Ponte, macchina con accessori di riscaldamento 3. Scheda di comando 4. Sensore umidità e temperatura ambiente 5. -
Page 5: Caratteristiche Tecniche
ITALIANO Caratteristiche tecniche SP-32 SP-46 SP-72 Capacità di condensazione a 25°C, 65%U.R. [L/24ore] Capacità di condensazione a 28°C, 60%U.R. [L/24ore] Capacità di condensazione a 30°C, 80%U.R. [L/24ore] Alimentazione elettrica 230 V, 50 Hz 230 V, 50 Hz 230 V, 50 Hz Potenza assorbita a 28°C, 60%U.R. -
Page 6: Installazione
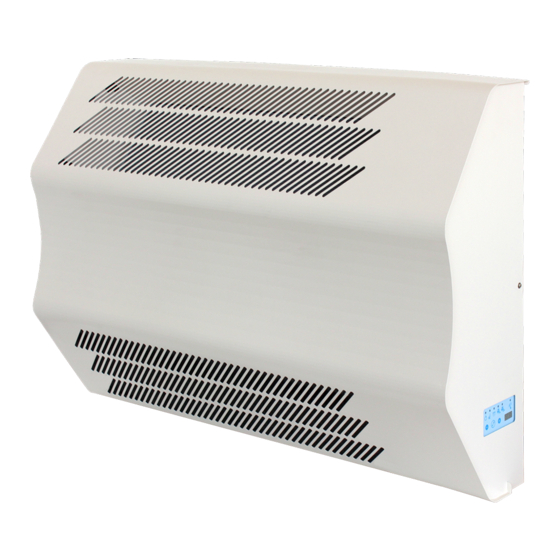
ITALIANO ferente da quello per cui è stato concepito. Qualsiasi utilizzo diverso da quello descritto in questo manuale è da intendersi improprio, potenzialmente dannoso e pericoloso. ATTENZIONE: qualsiasi operazione di manutenzione sul circuito frigorifero o sul circuito elettrico dev’essere eff ettuata solo da personale esperto e qualifi cato. Custodire accuratamente le presenti istruzioni per riferimenti futuri. - Page 7 ITALIANO Installazione staff a a muro Utilizzare la staff a in dotazione come maschera per segnare i fori sul muro come mostrato in Fig.4. Assicurarsi che il muro sia in grado di sostenere l’apparecchio in condizioni operative. • eseguire sul muro n.4 fori Ø8 profondi 45mm come indicato in Fig.4; •...
- Page 8 ITALIANO • togliere le due viti laterali V che bloccano la carrozzeria; • tirare dal basso in modo da sganciare i due bloccaggi inferiori del mantello; • sollevare il cofano e appoggiare a terra. A questo punto è possibile accedere alla parte interna della macchina per eseguire le operazioni richieste. Quando si apre il cofano bisogna staccare il cavo di terra che si trova vicino al pannello comandi (vedi Fig.5) e che risulta raggiungibile solo quando la carrozzeria viene inclinato di qualche grado verso l’alto dopo lo sgancio.
-
Page 9: Installazione A Parete
ITALIANO Installazione a parete • sollevare la macchina come mostrato in Fig.7 e appoggiare sulla staff a a muro come mostrato in Fig.8. La macchina dev’essere sollevata da almeno due persone. Per sollevare la macchina non toccare in alcun modo i tubi del circuito frigorifero ma utilizzare la maniglia posta sul lato sinistro della macchina e la piastra del compressore sul lato destro (vedi Fig.7). -
Page 10: Collegamenti Elettrici
ITALIANO Scarico della condensa Fig.9 – Scarico della condensa Per il drenaggio dell’acqua utilizzare un tubo di gomma A, diametro 10mm interno. Il tubo A deve essere montato come mo- strato in Fig.9 con una pendenza minima di 10°, in modo da garantire il corretto scarico dell’acqua. Un eventuale sifone deve trovarsi sullo scarico principale B e non sul tubo di scarico A collegato alla macchina. - Page 11 ITALIANO • collegare i fi li ai morsetti L e N • serrare il pressacavo P Se è prevista l’installazione di accessori di riscaldamento attenersi alle istruzioni fornite insieme ad essi. Il fi lo dev’essere fatto entrare nella scatola Sp attraverso il pressacavo Pr posizionato sul coperchio (vedi Fig.10). Per facilitare l’installazione il colle- gamento viene fatto su una spina che andrà...
-
Page 12: Il Pannello Di Comando
ITALIANO Il pannello di comando Fig.12 – Il pannello di comando S1 Spia ON T1 Tasto decremento S2 Spia deumidifi cazione T2 Tasto funzione S3 Spia riscaldamento T3 Tasto incremento S4 Spie velocità ventilatore D Display a 3 cifre S5 Spia sbrinamento Modi di funzionamento Fig.13 –... - Page 13 ITALIANO visibili solo con il ponte 2b posizionato come mostrato in Fig.2. Quando si passa da una modalità a quella successiva sul display lampeggia per qualche secondo la scritta che identifica il modo di funzionamento che si sta attivando: d.r. ->...
-
Page 14: Manutenzione
ITALIANO Manutenzione Questi deumidifi catori non richiedono particolari cure. Bisogna prevedere la pulizia periodica del fi ltro dell’aria F la cui frequen- za dipende dall’ambiente in cui il deumidifi catore sta lavorando. Pulizia del fi ltro La pulizia o la sostituzione del fi ltro dell’aria F sono operazioni che richiedono lo smontaggio del cofano e devono essere quindi eff ettuate da personale specializzato. - Page 15 ITALIANO it-15 M1051-1...
-
Page 16: Electrical Wiring Diagram
ENGLISH Electrical Wiring Diagram Pic.1 – Electrical Wiring Diagram, standard machine Pic.2 – Electrical Wiring Diagram, heating accessories References 1. Power supply board 2. Heating bridge 2a. Bridge, standard machine 2b. Bridge, machine with heating accessories 3. Control board 4. Room Humidity and temperature probe 5. -
Page 17: Technical Features
ENGLISH Technical Features SP-32 SP-46 SP-72 Condensation Capacity at 25°C, 65%R.H. [L/24ore] Condensation Capacity at 28°C, 60% R.H. [L/24ore] Condensation Capacity at 30°C, 80% R.H. [L/24ore] Power Supply 230 V, 50 Hz 230 V, 50 Hz 230 V, 50 Hz Absorbed Power at 28°C, 60%R.H. -
Page 18: Installation
ENGLISH formed by skilled and qualifi ed personnel. Keep these instructions carefully for future reference. Introduction The dehumidifi ers of the series SP were conceived and designed to operate in environments containing chlorine, such as swim- ming pools, rooms with hydromassage and small saunas. These dehumidifi ers are equipped with a sophisticated electronic Board that handles all the diff erent operations of the machine: using the control panel you can easily set the operating param- eters. -
Page 19: Removing The Hood
ENGLISH Make sure that the wall is capable of supporting the appliance in working condition. • Make on the wall nr. 4 x Ø8 holes deep 45 mm as indicated in pic. 4; • clean the inside of the holes; •... - Page 20 ENGLISH At this point you can access the inside of the machine to perform the required operations. When you open the hood you have to disconnect the ground wire that is located close to the control panel (see pic. 5) and which is accessible only when the body is tilted a few degrees upwards aft er release. Removing the bodywork gives access to potentially dangerous parts: this operation should only be car- ried out by qualifi ed personnel (see pic.
-
Page 21: Wall Mounting
ENGLISH Wall-mounting • lift the machine as shown in Pic. 7 and put on the wall bracket as shown in Pic. 8. Th e machine must be lift ed by at least two persons. To lift the machine do not touch in any way the tubes of the refrigerating circuit, instead use the handle on the left side of the unit and the compressor plate on the right side (see pic. -
Page 22: Condensate Drain
ENGLISH Condensate drain Pic.9 – Condensate drain For water drainage use a rubber tube, 10 mm inside diameter. The tube must be fi tted as shown in pic. 9 with a minimum gradi- ent of 10°, in order to ensure proper water drainage. A possible siphon must be along the main exhaust B and not on the drain pipe, connected to the machine. -
Page 23: Closing The Hood
ENGLISH • connect the wires to the terminals L and N • tighten the cable gland P If installing the optional heating accessories, follow the instructions supplied with them. The wire must enter the Sp box through the cable gland Pr located on the lid (see pic. 10). For easy installation the connection is done on a plug that will be then inserted in the terminals marked in pic. -
Page 24: The Control Panel
ENGLISH Th e control panel Pic.12 – Th e control panel S1 ON Light T1 Decrement key S2 dehumidifi cation on light T2 function key S3 heating Lamp T3 increment Key S4 fan speed lights D 3 digit Display S5 defrost light Operating modes Pic.13 –... - Page 25 ENGLISH bridge 2b positioned as shown in pic. 2. When you switch from one mode to the next, the display flashes for a few seconds the inscription identifying the operating mode that you are activating: d.r. -> -> -> -> By pressing T1 and T3 in modes from 2 to 5 it is possible to vary the fan speed: 1 speed corresponds to the setting ideal for drying, 2 speeds can be greater than or less than the 1 speed depending on the model.
-
Page 26: Maintenance
ENGLISH Maintenance These dehumidifi ers do not require particular maintenance. Periodic cleaning of the air fi lter (F) is required, and the frequency depends on the environment where the dehumidifi er is working. Cleaning the fi lter Cleaning or replacing of the air fi lter F are operations requiring disassembly of the hood and must be carried out by qualifi ed personnel. - Page 27 ENGLISH gb-27 M1051-1...
-
Page 28: Schéma Électrique
FRANÇAIS Schéma électrique Fig.1 – Schéma électrique, machine standard Fig.2 – Schéma électrique, accessoires de chauffage Références 1. Carte de puissance 2. Pont chauffage 2a. Pont, machine standard 2b. Pont, machine avec accessoires de chauffage 3. Carte de commande 4. Capteur d’humidité et température ambiante 5. -
Page 29: Caractéristiques Techniques
FRANÇAIS Caractéristiques techniques SP-32 SP-46 SP-72 Capacité de condensation à 25°C, 65%U.R. [L/24heures] Capacité de condensation à 28°C, 60%U.R. [L/24heures] Capacité de condensation à 30°C, 80%U.R. [L/24heures] Alimentation électrique 230 V, 50 Hz 230 V, 50 Hz 230 V, 50 Hz Puissance absorbée à... -
Page 30: Transport Et Manutention
FRANÇAIS pour laquelle il a été réalisé. Toute utilisation diff érente de celle décrite dans ce manuel est considérée comme impropre, potentiellement nuisible et dangereuse. ATTENTION : toute opération d’entretien sur le circuit frigorifi que ou sur le circuit électrique ne doit être eff ectuée que par du personnel qualifi é. - Page 31 FRANÇAIS Utiliser l’étrier fourni comme un masque pour marquer les trous sur le mur comme indiqué sur la fi gure 4. Contrôler si le mur est en état de soutenir l’appareil en exercice. • faire 4 trous Ø8 de 45mm de profondeur comme indiqué sur la Figure 4 ; •...
- Page 32 FRANÇAIS • soulever le capot et le déposer au sol. Il est possible à présent d’accéder à l’intérieur de la machine pour eff ectuer les opérations demandées. Quand on ouvre le capot il faut débrancher le câble de la terre qui se trouve près du panneau de com- mande (voir Fig.5) et que l’on peut atteindre seulement en inclinant la carrosserie de quelques degrés vers le haut après le décrochage.
-
Page 33: Installation Murale
FRANÇAIS Installation murale • soulever la machine de la manière indiquée sur la fi gure 7 et la poser sur l’étrier mural de la manière indiquée sur la fi gure La machine doit être soulevée par deux personnes au moins. Pour soulever la machine ne jamais toucher les tuyaux du circuit frigorifi que mais utiliser la poignée qui se trouve sur la gauche de la machine et la plaque du compresseur à... -
Page 34: Raccordements Électriques
FRANÇAIS Évacuation des condensats Fig.9 – Évacuation des condensats Pour le drainage de l’eau utiliser un tuyau en caoutchouc A, avec 10mm de diamètre interne. Le tuyau A doit être monté de la manière indiquée sur la fi gure 9 avec une pente de 10° au minimum, pour permettre à l’eau de s’écouler correctement. Un éventuel siphon doit se trouver sur le tuyau d’évacuation principal B et non sur le tuyau d’évacuation A relié... - Page 35 FRANÇAIS • raccorder les fi ls aux borniers L et N • serrer le presse-fi l P S’il est prévu d’installer des accessoires de chauff age suivre les instructions fournies avec ceux-ci. Il faut faire entrer le fi l dans le boîtier Sp par le passe-fi l Pr positionné...
-
Page 36: Le Panneau De Commande
FRANÇAIS Le panneau de commande Fig.12 – Le panneau de commande S1 Voyant ON T1 Touche diminution S2 Voyant déshumidifi cation T2 Touche fonction S3 Voyant chauff age T3 Touche augmentation S4 Voyants vitesse ventilateur D Écran à 3 numéros S5 Voyant dégivrage Modes de fonctionnement Fig.13 –... - Page 37 FRANÇAIS ront visibles qu’avec le pont 2b positionné de la manière indiquée sur la Fig.2. Quand on passe d’une modalité à la suivante, sur l’écran les mots qui identifient le mode de fonctionnement que l’on est en train d’activer clignote : d.r.
-
Page 38: Entretien
FRANÇAIS Ces erreurs entraînent l’extinction automatique du déshumidifi cateur : dans tous les cas il faut de- mander l’intervention de personnel spécialisé en mesure d’ouvrir le déshumidifi cateur et éventuelle- ment d’identifi er et remplacer les composants défectueux : Entretien Ces déshumidifi cateurs ne demandent aucun entretien particulier. Il faut nettoyer régulièrement le fi ltre de l’air F, la fréquence du nettoyage dépend du milieu dans lequel travaille le déshumidifi cateur. - Page 40 DEUTSCH Schaltplan, Standardausführung Abb.1 – Schaltplan, Standardausführung Abb.2 – Schaltplan, mit Heizfunktion Legende 1. Leistungsplatine 2. Brücke Heizung 2a. Brücke, Standardausführung 2b. Brücke, mit Heizfunktion 3. Steuerkarte 4. Sensor Luftfeuchtigkeit und Raumtemperatur 5. Sonde Abtautemperatur 6. Kompressor 7. Gebläse 8. Ventil Heizung Wasser (Optional) 9.
-
Page 41: Technische Daten
DEUTSCH Technische Daten SP-32 SP-46 SP-72 Kondensationsleistung bei 25°C, 65%rel.LF [L/24ore] Kondensationsleistung bei 28°C, 60%rel.LF [L/24ore] Kondensationsleistung bei 30°C, 80%rel.LF [L/24ore] Stromspeisung 230 V, 50 Hz 230 V, 50 Hz 230 V, 50 Hz Leistungsaufnahme bei 28°C, 60%rel.LF [W] 1670 * Maximale Leistungsaufnahme [kW] 2,7 / 2,0 / 0,67 3,03 / 2,06 / 1,12... -
Page 42: Allgemeine Informationen
DEUTSCH verboten. ACHTUNG! Wartungseingriff e am Kühlkreislauf und an der Elektrik vom Gerät dürfen nur von qualifi - ziertem und erfahrenem Fachpersonal durchgeführt werden. Das Handbuch muss zum Nachschlagen aufb ewahrt werden. Allgemeine Informationen Die Luftentfeuchter der Serie SP wurden für den Gebrauch an Standorten mit Chlor haltiger Atmosphäre konstruiert und gebaut, wie Schwimmbäder, Hydromassagebereiche und kleine Saunen. - Page 43 DEUTSCH Installation mit Wandhalterung Die mitgelieferten Halterungen als Schablone benutzen, um die Löcher an der Wand anzuzeichnen (siehe Abb. 4). Sicherstellen, dass die Wand ausreichend stabil für die Befestigung des Geräts und den Gerätebetrieb ist. • 4 Löcher Ø 8 mm mit einer Tiefe von 45 in die Wand bohren (siehe Abb. 4). •...
- Page 44 DEUTSCH • Die beiden seitlichen Schrauben V lösen, mit denen das Gehäuse am Gestell blockiert ist. • Das Gehäuse nach unten ziehen, um die beiden unteren Blockierungen zu lösen. • Das Gehäuse anheben und auf dem Boden ablegen. Jetzt hat man Zugriff auf das Geräteinnere, um die erforderlichen Arbeiten durchzuführen. Wenn das Gehäuse abgenommen wird, muss das Erdungskabel abgenommen werden, das sich neben dem Bedienpanel befi ndet (siehe Abb.
- Page 45 DEUTSCH Installation an der Wand • Das Gerät anheben (siehe Abb. 7) und auf die Wandhalterung setzen (siehe Abb. 8). Zum Anheben vom Gerät sind mindestens zwei Personen erforderlich. Beim Anheben vom Gerät muss darauf geachtet werden, dass keine Leitungen vom Kühlkreislauf zu berühren. Zum Anheben den Griff an der linken Seite vom Gerät und die Kompressorplatte an der rechten Seite (siehe Abb.
- Page 46 DEUTSCH Ablassen vom Kondenswasser Abb.9 – Ablassen vom Kondenswasser Zum Ablassen vom Wasser einen Gummischlauch (A) mit einem Innendurchmesser von 10 mm verwenden. Der Schlauch (A) muss mit einer Neigung nach unten von mindestens 10° angebracht werden (siehe Abb. 9), damit das Wasser korrekt ablaufen kann.
- Page 47 DEUTSCH • Das Erdungskabel an die lose Erdungsklemme anschließen. • Die Leiter an die Klemmen L und N anschließen. • Die Kabelklemme (P) anziehen. Wenn das optionale Heizaggregat installiert werden soll, müssen die Anweisungen beachtet werden, die zusammen mit dem Heizaggregat geliefert werden. Die Stromleitung muss über die Kabelklemme (Pr) in der Abdeckung in die Dose geführt werden (siehe Abb.
- Page 48 DEUTSCH Bedienpanel Abb.12 – Bedienpanel S1 Kontrollleuchte ON T1 Taste Abnahme S2 Kontrollleuchte Luftentfeuchter T2 Taste Betriebsart S3 Kontrollleuchte Heizung T3 Taste Zunahme S4 Kontrollleuchten Geschwindigkeit Gebläse D Display mit 3 Zeichen S5 Kontrollleuchte Abtauen Betriebsarten Abb.13 – Sequenz Betriebsarten 1.
- Page 49 DEUTSCH Durch Drücken der Taste Betriebsart werden die Betriebsarten durchgeblättert. Die Betriebsarten mit Heizfunktion werden nur dann angezeigt, wenn die Brücke (2b) wie auf Abbildung 2 positioniert ist. Beim Umschalten von einer Betriebsart auf die nächste blinkt die Bezeichnung der Betriebsart, die aktiviert wird, einige Sekunden lang auf dem Display: d.r.
-
Page 50: Wartung
DEUTSCH Fehlermeldungen Folgende Fehlermeldungen können am Display angezeigt werden. Zusammen mit der Anzeige können auch die Kontrollleuch- ten blinken. Temperaturfühler nicht korrekt angeschlossen oder defekt Feuchtigkeits- und Temperatursonde nicht korrekt angeschlossen oder defekt Sicherheitsthermostat Heizaggregat off en Tabelle 3 – Fehlerliste Die Fehler führen dazu, dass sich der Luft entfeuchter automatisch abschaltet. - Page 51 DEUTSCH Entsorgung vom Gerät INFORMATION FÜR DIE BENUTZER Nur für EU-Mitgliedsstaaten Das Symbol mit der durchgestrichenen Abfalltonne bedeutet, dass das Produkt nach seiner Aussonderung vom restlichen Müll getrennt entsorgt werden muss. Der Benutzer muss daher das Gerät an einer Sammelstelle für Elektro- und Elektronikgeräte oder beim Kauf eines gleichwertigen Neugerätes beim Händler abgeben.
- Page 52 CUOGHI s.r.l. via Garibaldi, 15 35020 Albignasego (PD) - Italia Tel. +39 049 862.90.99 Fax +39 049 862.91.35 www.cuoghi-luigi.it...
Need help?
Do you have a question about the SP32 and is the answer not in the manual?
Questions and answers