Advertisement
Available languages
Available languages
Advertisement
Table of Contents

Subscribe to Our Youtube Channel
Related Manuals for ADAMEX Massimo


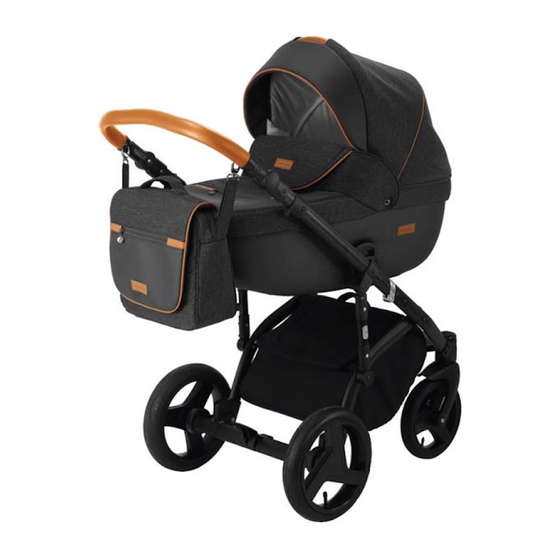
Summary of Contents for ADAMEX Massimo
- Page 5 OPCJE DODATKOWE / ДОПОЛНИТЕЛЬНЫЕ ФУНКЦИИ / ADDITIONAL OPTIONS ON/OFF ADJUSTMENT SUSPENSION...
- Page 6 Aby wymienić dętkę w przednim kole In order to change the inner tube in Для того чтобы заменить камеру в należy: front wheel do the following: переднем колесе, необходимо: - odkręcić nakrętkę z osi i zdjąć koło z - undo the nut on the axle and remove - открутить...
- Page 7 element został uszkodzony. 2. Przed przystąpieniem do montażu upewnić się czy wyrób i wszystkie jego elementy składowe są sprawne jeśli są uszkodzone. Wyrób nie powinien być używany. 3. Podczas składania i rozkładania wózka upewnić się, WAŻNE – ZATRZYMAĆ TĘ INSTRUKCJĘ DO czy dziecko znajduje się...
- Page 8 z dzieckiem w pobliżu basenów, schodów i ognia. osoby prowadzącej wózek. W tym celu należy OSTRZEŻENIE: Plastikowe części opakowania równocześnie wcisnąć przyciski znajdujące się po obu przechowywać z daleka od dziecka aby zapobiec stronach uchwytu, a następnie przytrzymując je, uduszeniu. dokonać...
- Page 9 ł ą c z n i k a ( r y s . 1 2 i 4 5 ) . po obu stronach siedziska wcisnąć znajdujące się tam Nie występuje w modelach: Massimo (rys.12) podłużne przyciski i trzymając je, pociągnąć siedzisko do góry (rys.
- Page 10 UWAGA! Maksymalne obciążenie koszyka wynosi WARUNKI GWARANCJI 2kg. 1. P.P.H. „ADAMEX” udziela gwarancji na zakupiony TORBA przez Państwa wózek na okres 12 miesięcy od daty Wózek wyposażony jest w torbę na akcesoria. zakupu, pod warunkiem, że będzie on użytkowany Zapinamy ją...
-
Page 11: Очистка И Техобслуживание
4. Во время выполнения действий по регулировке необходимо обратить внимание, не соприкасаются ли подвижные элементы коляски с частями тела ребенка. ВАЖНО – СОХРАНИТЬ ЭТУ ИНСТРУКЦИЮ ДЛЯ 5. Во время каждой стоянки, вкладывания и вынимания ИСПОЛЬЗОВАНИЯ В БУДУЩЕМ. р е б е н к а и з к ол я с к и н е о бх од и м о п ол ь з о в ат ь с я устройством... - Page 12 переключателя (рис. 12, 45). РЕГУЛИРОВАНИЕ ВЫСОТЫ РУЧКИ На следующих моделях: Massimo (рис. 12). Высоту ручки можно приспособить к росту лица, о б с л у ж и в а ю щ е г о к о л я с к у. Д л я э т о г о с л е д у ет...
- Page 13 люльки с помощью молнии. Будка оснащена ручкой, обеих сторон сидения (рис. 29). Для того чтобы снять поручень, необходимо нажать красные кнопки на внешней к оторая слу жит для переноса люльки, а также стороне боковых частей сидения и вынуть поручень из солнцезащитным...
- Page 14 автокреслу. ДОПОЛНИТЕЛЬНЫЕ ФУНКЦИИ КОЛЯСКИ Вентиляция люльки: открыта (рис. 43), закрыта (рис.44) Б л о к а д а а м о р т и з а т о р а ( р и с . 4 5 ) : заблокирован/облокирован. Перчатки (46). Окно (47). УСЛОВИЯ...
-
Page 15: Cleaning And Maintenance
front suspension. Hitting the obstacle strongly may cause the curvature of the construction. You must not push the pram downstairs. Carrying IMPORTANT - KEEP THESE INSTRUCTIONS FOR the child in the pram over the stairs is dangerous. FUTURE USE. You must not carry the pram by holding its handle and bumper or canopy. -
Page 16: Handle Height Adjustment
(fig. 12, (fig. 5). 45). Not available in models: Massimo.(fig. 12) CAUTION! Before proceeding with the folding of the chassis, dismount the carry cot/sport seat and release the lock of the AIR WHEELS front swivel wheels - if necessary dismount the wheels. -
Page 17: Safety Belts
mass up to 11 kg. locking is automatic. In order to dismount the sport seat, get hold of the hitches on both sides of the sport seat, press the MOUNTING AND DISMOUNTING OF THE CAR SEAT longitudinal push buttons located there and while still holding ADAPTERS them, pull the sport seat up (fig. -
Page 18: Guarantee Terms
GUARANTEE TERMS 1. P.P.H. „ADAMEX” shall grant the guarantee for the pram purchased by you for a period of 12 months from the date of purchase, provided that it will be used in accordance with the purpose for which it is intended. - Page 19 2. Vor der Montage vergewissern Sie sich, ob das Produkt und all seine Bestandteile funktionsfähig sind. WICHTIG - DIESE BEDIENUNGSANLEITUNG Wenn sie beschädigt sind, sollte das Produkt nicht mehr BITTE FÜR SPÄTERE ANWENDUNG genutzt werden. AUFBEWAHREN 3. Halten Sie Ihr Kind außerhalb des Bereichs D E R U N I V E R S A L K I N D E R W A G E N I S T F Ü...
- Page 20 Feuer ab. Seiten des Griffes befinden, gleichzeitig gedrückt halten WARNUNG: Verpackungsmaterial aus Kunststoff darf und die Höhe verstellen (Abb. 6). nicht in die Hände von Kindern gelangen; es besteht MONTAGE UND ABNAHME DER HINTERRÄDER sonst Erstickungsgefahr. WARNUNG: Die maximale Belastung des Netzkorbes Um die Hinterräder aufzusetzen, soll man den beträgt 2 kg.
- Page 21 Der Kinderwagen besitzt eine Federstoßdämpfung, deren Härte mithilfe eines speziellen Knopfs verstellt REGULIERUNG DER RÜCKENLEHNE - werden kann (Abb. 12 und 45). Bei folgenden Modellen nicht vorhanden: Massimo (Abb. 12). KINDERWAGENAUFSATZ Die Rückenlehne ist in vier diversen Positionen LUFTGEPUMPTE RÄDER verstellbar.
- Page 22 WICHTIG! Benutzen Sie immer den Sicherheitsgurt, VERSTELLUNG DES TRAGEGRIFFES DES wenn sich in dem Kinderwagenaufsatz ein Kind befindet. KINDERAUTOSITZES Der Kinderwagen ist mit einem 5-Punkt-Sicherheitsgurt Die Verstellung erfolgt, indem die roten Knöpfe an ausgestattet. Sobald sich das Kind in dem Kinderwagen beiden Seiten des Kinderautositzes gedrückt werden befindet, schnallen Sie den Sicherheitsgurt an, indem und der Griff in die entsprechende Position gebracht wird...
-
Page 23: Curăţarea Şi Păstrarea
În timpul fiecărei opriri, scoaterii sau punerii copilul în cărucior neapărat trebuie să folosiţi sistemul de frânare. IMPORTANT – PĂSTRAŢI ACESTE INSTRUCŢIUNII În cărucior ar trebui să se folosească numai piese PENTRU UTILIZAREA VIITOARE. originale, confirmate de către producător. ANUNŢ: orice echipament suplimentar care nu este CĂRUCIORUL UNIVERSAL PENTRU... - Page 24 (fig. 12, 45). Nu apare în sus şi ţinând cu mâna trageţi în acelaşi timp de manete în modelele: Massimo (fig. 12). care se află pe ambele părţi ale mânerului (fig.5). ATENŢIE! Înainte de începerea plierii şasiului, demontaţi ROŢI UMFLATE...
- Page 25 MONTAREA ŞI DEMONTAREA SCAUNULUI PENTRU 33 şi 34) PLIMBARE GEANTA ATENŢIE! Înainte de a începe utilizarea căruciorului asiguraţi-vă, că scaunul este bine montat şi blocat pe ambele Căruciorul este echipat în geantă pentru accesorii. O prindem părţi ale căruciorului. pe ghidajul căruciorului cu ajutorul capselor (fig. 35). ATENŢIE! Nu pliaţi şasiul căruciorului când este montat pe el scaunul.
- Page 26 CONDIŢIILE DE GARANŢIE 1. P.P.H. "ADAMEX" acordă garanţie pentru cărucior pe o durată de 12 luni din ziua achiziţionării, cu condiţia că va fi utilizat în conformitate cu destinaţia sa. 2. Toate reclamaţiile din titlul defectului produsului trebuie raportat la punctul de cumpărare.
- Page 28 A. Haberkorn & Co GmbH 4240 Freistadt, AUSTRIA Werndlstrasse 3, Verkauf Spiel & Baby: +43 (0) 79 42 707- 0 Reklamation +43 (0) 79 42 707-23 Buchhaltung +43 (0) 79 42 707-156 Telefax: +43 (0) 79 42 707-44 E-Mail: vk-spiel@a-haberkorn.at Internet: www.a-haberkorn.at ARA-Lizenznummer: 4857 UID-Nr.
Need help?
Do you have a question about the Massimo and is the answer not in the manual?
Questions and answers