Table of Contents
Advertisement
Quick Links
Please read and save these instructions
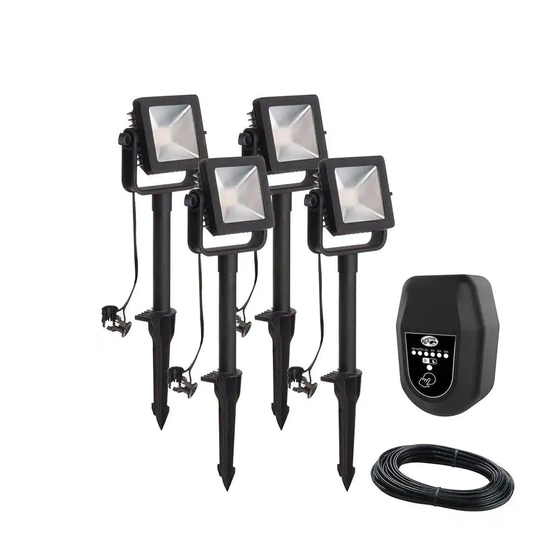
PACKAGE CONTENTS
Assembly and Installation
INSTRUCTIONS PERTAINING TO A RISK OF FIRE, OR INJURY TO PERSONS
IMPORTANT SAFETY INSTRUCTIONS
Lighted lamp is HOT!
CAUTION: Safe for outdoor operation.
WARNING: To reduce the risk of FIRE OR INJURY TO PERSONS:
WARNING: Do not operate the luminaire fitting with a missing or damaged lens
or bulb protector.
WARNING: Install in accordance with all local codes and ordinances.
WARNING: Do not submerge the transformer.
WARNING: Do not use with a dimmer.
WARNING: Do not use an extension cord.
WARNING: There are no serviceable parts inside the power supply unit. DO NOT
DISASSEMBLE.
WARNING: Do not connect two or more transformers in parallel.
CAUTION: Plug the power supply unit directly into a GFCI outlet that is marked "wet
location". The maximum output of this transformer is 45 watts. Do not overload the
transformer. Be sure that the total cumulative wattage of all 12 volt fixtures connected
to the transformer is equal to or less than 45 watts. This garden light system must be
installed in accordance with all local codes and ordinances. If you are experiencing
problems, contact a qualified electrician.
WARNING: For use with 12 volt low voltage outdoor landscape lighting system only.
Not for use with submersible light or pool/spa equipment.
Only for use with low voltage power units with a maximum output rating of 15V,
300W per secondary.
FOR LANDSCAPE LIGHTING SYSTEMS ONLY. OUTDOOR USE ONLY. THE DEVICE IS
ACCEPTED AS A COMPONENT OF A LANDSCAPE LIGHTING SYSTEM WHERE THE
SUITABILITY OF THE COMBINATION SHALL BE DETERMINED BY CSA OR LOCAL
INSPECTION AUTHORITIES HAVING JURISDICTION.
FLOODLIGHT ETL LISTED UNDER MODEL # U000-1998
A
B
E
C
G
D
Use and Care Guide
LOW VOLTAGE FLOODLIGHT KIT
Part
F
A
B
C
D
E
F
H
G
H
I
I
1
Attaching and installing the pathlight
WARNING: Never push the fixture into the ground by the head or use a hammer
to insert the spike (D) into the ground.
□
Carefully remove the fixture from its protective packaging.
□
Screw the post (C), the spike (D) and the floodlight's head (A)
together.
A
B
E
2
Connecting the wires
WARNING: The wire connector (E) contacts have sharp edges for piercing the
main low voltage cable. To avoid injury, do not touch the metal contacts.
WARNING: Risk of Electric Shock. Install all luminaires 10 ft. (3.05 m) or more
from a pool, spa or fountain.
CAUTION: The wire from the low voltage power unit shall be 12-18 AWG type
underground low Energy Circuit Cable or SPT2W.
IMPORTANT:
• Protect the wiring by routing it in close proximity to the light fitting, or next to a
building structure such as a house or deck.
• The landscape wire and connector can also be hidden under stone or buried
under grass at a maximum depth of 6 in. (15.24 cm).
• Do not submerge the fixture in water.
Item #1001 000 000
Model #HD33679
Description
Quantity
Heads
Adjustment screw
Posts
Spikes
Connectors
45W transformer
Cable
Screw
Plastic anchor
C
D
4
8
4
4
4
1
1
1
1
Advertisement
Table of Contents

Related Manuals for HAMPTON BAY HD33679


Summary of Contents for HAMPTON BAY HD33679
- Page 1 Item #1001 000 000 Model #HD33679 Use and Care Guide Please read and save these instructions LOW VOLTAGE FLOODLIGHT KIT PACKAGE CONTENTS Part Description Quantity Heads Adjustment screw Posts Spikes Connectors 45W transformer Cable Screw Plastic anchor Assembly and Installation...
- Page 2 Assembly and Installation (Continued) □ Place the wire connector (E) on opposite sides of the low Connecting the cable to the transformer voltage cable (G) where the fixture will be located. □ Align and fit the main low voltage cable (G) vertically to the Note: Prior to installing and powering the transformer, a safety approved GFCI receptacle slot of the wire connector (E) as shown.
- Page 3 Care and Cleaning □ Clean the fixture with a soft, dry cloth. □ Do not use any cleaners with chemicals, solvents or harsh abrasives. Troubleshooting Problem Possible cause Solution The fixture will not • There is no power. • Check that the power is on. light. • There is a disconnection or break in • Check if there is a loose connection at the transformer screw terminal.
Need help?
Do you have a question about the HD33679 and is the answer not in the manual?
Questions and answers