Advertisement
Available languages
Available languages
Please read and save these instructions
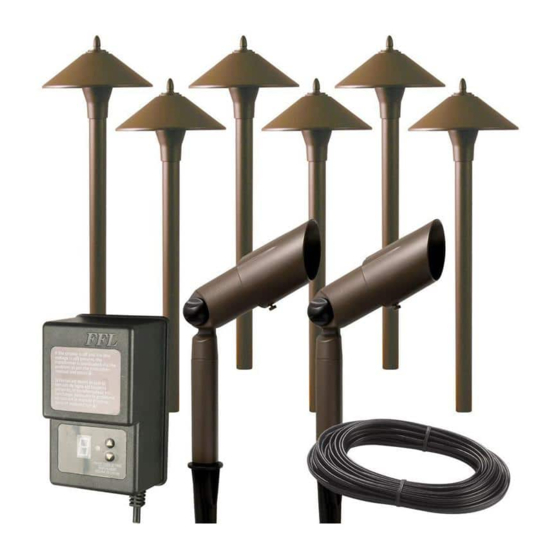
PACKAGE CONTENTS
A
C
E
D
F
H
Assembly and Installation
INSTRUCTIONS PERTAINING TO A RISK OF FIRE, OR INJURY TO PERSONS
IMPORTANT SAFETY INSTRUCTIONS
Lighted lamp is HOT!
CAUTION: Safe for outdoor operation
WARNING: To reduce the risk of FIRE OR INJURY TO PERSONS:
WARNING: Turn off/unplug and allow to cool before replacing lamp.
WARNING: Lamp gets HOT quickly! Contact only switch/plug when turning on.
Do not touch hot lens, guard or enclosure.
WARNING: Keep the lamp away from materials that may burn.
WARNING: Do not touch the lamp at any time. Use a soft cloth. Oil from skin may
damage the lamp.
WARNING: Do not operate the luminaire fitting with a missing or damaged lens
or bulb protector.
WARNING: Install in accordance with all local codes and ordinances.
Only for use with low voltage power units with a maximum output rating of 15V,
300W per secondary.
FOR LANDSCAPE LIGHTING SYSTEMS ONLY. OUTDOOR USE ONLY. THE DEVICE IS
ACCEPTED AS A COMPONENT OF A LANDSCAPE LIGHTING SYSTEM WHERE THE
SUITABILITY OF THE COMBINATION SHALL BE DETERMINED BY CSA OR LOCAL
INSPECTION AUTHORITIES HAVING JURISDICTION.
PATHLIGHT UL LISTED UNDER MODEL # U201159
SPOTLIGHT UL LISTED UNDER MODEL # U201167
1
Attaching and installing the floodlight
WARNING: Never push the fixture into the ground by the lamp body (D) or use a
hammer to insert the spike (H) into the ground.
□
Carefully remove the fixture from its protective packaging.
□
Run the wire through the notch in the top of the spike (H) and attach
the spike to the post (F) by turning clockwise.
□
Loosen the set screw (1) and slide off the light cap (A).
□
Remove the lens cover (B) by turning counterclockwise.
□
Do not remove the lens from the lens cover.
□
Insert the bulb (C) into the bulb socket.
Use a soft cloth, as oil from skin may
damage the lamp bulb.
□
Replace the lens cover (B) and the light cap
(A) over the body (D). Adjust the light's beam
by sliding the cap back and forth (back = wide
beam, front = narrow beam) and screw the set
screw (1) in place once the proper light beam
is found.
□
Attach the body (D) and the post (F) using the
adjustment screw (E) and rotating clockwise.
□
Adjust the fixture's angle by loosening the
adjustment screw (E) and retightening it.
□
Ensure the lens points up and never towards
the ground.
J
I
K
B
L
O
M
G
N
C
E
F
H
LOW VOLTAGE PATHLIGHT AND FLOODLIGHT KIT
Part
Description
A
Lens cover
B
Lens
C
20W Halogen MR11 Bulb
D
Body
E
Adjustment screw
F
Post
R
P
G
Connector
H
Spike
Q
2
Attaching and installing the pathlight
WARNING: Never push the fixture into the ground by the lens cover (I) or use a
hammer to insert the spike (N) into the ground.
□
Carefully remove the fixture from its protective packaging.
□
Pass the wire through the notch in the top of the spike (N) and
attach the spike and post (L) by pressing them together.
□
Insert the bulb (J) into the bulb socket (K). Use a soft cloth, as oil
from skin may damage the lamp bulb.
□
Attach the cover (I) and the post (L) together by turning clockwise.
IMPORTANT: We recommend to apply petroleum grease (not included) around the
post threading when replacing the head after you change the light bulb. Do not
overtighten the head onto the post.
3
Connecting the wires
WARNING: The wire connector (G) & (M) contacts have sharp edges for piercing
the main low voltage cable. To avoid injury, do not touch the metal contacts.
A
WARNING: Risk of Electric Shock. Install all luminaires 10 ft. (3.05 m) or more
from a pool, spa or fountain.
CAUTION: The wire from the low voltage power unit shall be 12-16 AWG type
B
1
D
underground low Energy Circuit Cable or SPT2W.
IMPORTANT:
• Protect the wiring by routing it in close proximity to the light fitting, or next to a
building structure such as a house or deck.
• The landscape wire and connector can also be hidden under stone or buried
under grass at a maximum depth of 6" (15.24 cm).
• Do not submerge fixture in water.
Item #1001 492 705
Model #HD28906
Use and Care Guide
Quantity
Top Cover
I
J
10W Halogen T3 Bulb
2
2
K
Bulb socket
L
Post
2
2
M
Connector
N
Spike
2
2
O
120W Transformer
P
Wire AWG14 SPT2W 75'
2
2
Q
Plastic anchors
R
Screws
J
K
L
M
N
!
6
6
6
6
6
6
1
1
2
2
I
Advertisement
Table of Contents

Related Manuals for HAMPTON BAY HD28906


Summary of Contents for HAMPTON BAY HD28906
- Page 1 Item #1001 492 705 Model #HD28906 Use and Care Guide Please read and save these instructions LOW VOLTAGE PATHLIGHT AND FLOODLIGHT KIT PACKAGE CONTENTS Part Description Quantity Top Cover 10W Halogen T3 Bulb Lens cover Lens Bulb socket Post 20W Halogen MR11 Bulb...
- Page 2 Assembly and Installation (Continued) How to operate the transformer controls □ Place the wire connector (G) on opposite sides of the low voltage cable (P) where the fixture will be located. *The channels will only turn on at the exact start time selected for Timer and dusk for Sunwise. □...
-
Page 3: Care And Cleaning
Care and Cleaning □ Clean the fixture with a soft, dry cloth. □ Do not use any cleaners with chemicals, solvents or harsh abrasives. Troubleshooting Problem Possible cause Solution The fixture will not • There is no power. • Check that the power is on. light •... -
Page 4: Guía De Uso Y Cuidado
Núm. de artículo 1001 492 705 Núm. de modelo HD28906 Guía de uso y cuidado Por favor, lea y guarde estas instrucciones. JUEGO DE LUZ DE PASILLO DE BAJO VOLTAJE Y REFLECTOR CONTENIDO DEL PAQUETE Pieza Descripción Cantidad Cubierta superior Cubierta de los lentes Bombilla T3 de halógeno de 10 vatios... - Page 5 Ensamblaje y Instalación (continuado) Cómo operar los controles de transformadores □ Coloque el conector del cable (G) en los lados opuestos del cable de baja tensión (P) en la que se encuentra el aparato. *Para los modos con minuteros, las luces se encienden sólo al principio (inicio) de su ciclo (minutero y al atardecer para Sunwise).
-
Page 6: Cuidado Y Limpieza
Cuidado y limpieza □ Limpie el aparato con un paño suave y seco. □ No utilice productos de limpieza con productos químicos, disolventes o abrasivos. Resolución de fallas Problema Causa posible Solución El dispositivo no se • No hay energia •...
Need help?
Do you have a question about the HD28906 and is the answer not in the manual?
Questions and answers