
Related Manuals for Wellis CLARICE


Summary of Contents for Wellis CLARICE
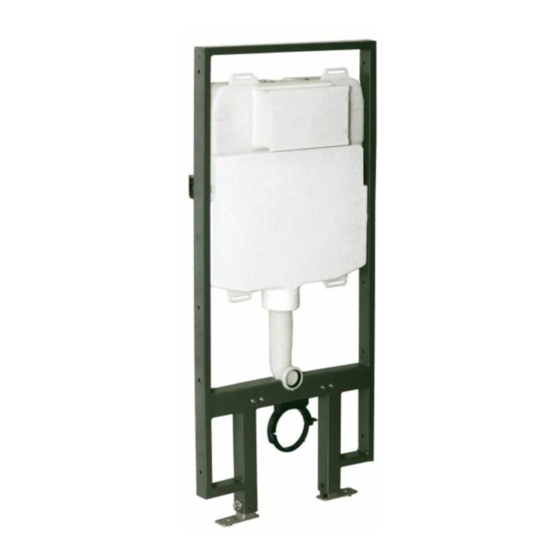
- Page 1 Clarice built in cistern INSTALLATION MANUAL Clarice falsík mögötti WC tartály SZERELÉSI ÚTMUTATÓ Clarice in Zisterne gebaut INSTALLATIONSANLEITUNG Réservoir encastré Clarice MANUEL D’INSTALLATION EE00273...
- Page 2 Installation Instruction (CJ708) 1、Dimenesions : 150~200 2 "MALE A=45/65 Ø110 2、Installation of flush bend :...
- Page 3 3、Installation of the cistern : 3、Installation of the cistern : 360.5 360.5 Positioning Positioning 4、Adjust the frame 4、Adjust the frame Position on wall Position on wall Position on floor Position on floor...
- Page 4 5、Installation of the stop valve : 6、Installation of the threaded rod kits and flexible sheath : 7、Installation of protective case :...
- Page 5 8、Installation of bend plug : 9、Build the partition wall : keep the space no less than 3mm between the plug and wall ,as well as between the sheath and the wall...
- Page 6 10、Installation of the toilet : Draw on the supply pipe and ush pipe L1+ 6 mm L2+3 mm Reduce the supply pipe and ush pipe burnish a chamfer Burnish a chamfer on the head face of Apply silicon oil the supply pipe and ush pipe...
- Page 7 Fixing of the toilet Gradienter After removing exible sheath,adjust the threaded rod exposed outside .Then x the supply pipe onto toilet Fix the threaded rod kits and and the ush pipe onto wall adjust the toilet to right position 11、Installation of control plate :...
- Page 8 Wash the ll valve if the water lling gets slow or unstoppable Installation & remove the ush valve Adjust the water level of the ush valve Seal Maintenance of the seal...
- Page 9 13、Spare parts : STOP VALVE FILL VALVE 84mm CISTERN BRACKETT FOR LEVER CISTERN'S PLATE CONTROL PLATE FLUSH VALVE SUPPLY BEND PLUG FLUSH BEND PLUG FRAME FLEXIIBLE SHEATH(X2) ATTACHMENT KITS FLUSH PIPE THREADED ROD KITS(X2) FLUSH BEND ATTACHING SCREW(X10)
-
Page 10: Szerelési Útmutató
Clarice falsík mögötti WC tartály SZERELÉSI ÚTMUTATÓ... - Page 11 Installation Instruction (CJ708) 1. Méretek 1、Dimenesions : 150~200 2 "MALE A=45/65 Ø110 2. Az öblítőcső könyökének felszerelése 2、Installation of flush bend :...
- Page 12 3. A víztároló felszerelése Pozicionálás 4. A keret igazítása Elhelyezés a Elhelyezés a falon padlón...
- Page 13 5. A zárószelep felszerelése 5、Installation of the stop valve : 6. A menetes szárak és a rugalmas szorító hüvely felszerelése 6、Installation of the threaded rod kits and flexible sheath : 7. A védőburkolat felszerelése 7、Installation of protective case :...
- Page 14 8. A könyökdugó felszerelése 8、Installation of bend plug : 9. A válaszfal építése 9、Build the partition wall : Hagyjon helyet legalább 3 mm-re a keep the space no less than 3mm csatlakozó és a fal között, valamint a between the plug and wall ,as well as hüvely és a fal között between the sheath and the wall...
- Page 15 10. A WC felszerelése 10、Installation of the toilet : A vízellátás csővezetékét és az öblítőcsövet jelölje fel Draw on the supply pipe and ush pipe L1+ 6 mm L2+3 mm A vízellátás csővezetékét és az öblítőcsövet vágja le Reduce the supply pipe and ush pipe burnish a chamfer Burnish a chamfer on the head face of Csiszolja le a vízellátás...
- Page 16 A WC rögzítése Fixing of the toilet vízszintmérő Gradienter A rugalmas hüvely eltávolítása után állítsa be a After removing exible sheath,adjust menetes szár, amely kívülről elérhető. the threaded rod exposed outside Ezután rögzítse a vízellátás csővezetékét a .Then x the supply pipe onto toilet Fix the threaded rod kits and Rögzítse a menetes szárat, és igazítsa WC-re, az öblítőcsövet padig a falra.
- Page 17 13、 Mossa le a töltőszelepet, ha a Wash the ll valve if the water lling víztöltés lassú vagy nem zár gets slow or unstoppable megfelelően Installation & remove the ush valve Az öblítőszelep felszerelése és eltávolítása Állítsa be Adjust the water level a víz szintjét az of the ush valve öblítőszelepen...
- Page 18 13. Pótalkatrészek 13、Spare parts : Zárószelep töltőszelep STOP VALVE 84mm tartály FILL VALVE 84mm CISTERN a kar tartója BRACKETT FOR LEVER a tartálylemez CISTERN'S PLATE vezérlőpanel CONTROL PLATE öblítőszelep FLUSH VALVE ellátócsőkönyök dugója SUPPLY BEND PLUG öblítőcsőkönyök dugója FLUSH BEND PLUG keret FRAME rugalmas hüvely (2x)
- Page 19 Clarice in Zisterne gebaut INSTALLATIONSANLEITUNG...
- Page 20 Installation Instruction (CJ708) 1. Dimensionen 1、Dimenesions : 150~200 Externer Thread 2 "MALE A=45/65 Ø110 2. Montage des Spülrohrbogens 2、Installation of flush bend :...
- Page 21 3. Installation der Zisterne 3、Installation of the cistern : 360.5 Positioning Positionierung 4、Adjust the frame 4. Rahmen ausrichten Platzierung an Platzierung auf der Wand dem Boden Position on wall Position on floor...
- Page 22 5. Einbau des Schließventils 5、Installation of the stop valve : 6. Montage der Gewindezapfen und der flexiblen Klemmhülse 6、Installation of the threaded rod kits and flexible sheath : 7. Installation der Schutzabdeckung 7、Installation of protective case :...
- Page 23 8. Einbau des Winkelsteckers 8、Installation of bend plug : 9、Build the partition wall : 9. Aufbau der Trennwand Lassen Sie mindestens 3 mm zwischen keep the space no less than 3mm dem Verbinder und der Wand, sowie between the plug and wall ,as well as zwischen der Hülse und der Wand.
- Page 24 10. Montage des WC 10、Installation of the toilet : Markieren Sie die Wasserzufuhr- und die Spülleitung. Draw on the supply pipe and ush pipe L1+ 6 mm L2+3 mm Schließen Sie die Wasserzufuhr- und die Spülleitung. Reduce the supply pipe and ush pipe burnish a chamfer Burnish a chamfer on the head face of Schleifen Sie die Öffnung der...
- Page 25 Befestigung des WC Fixing of the toilet Wasserstandsanzeig Gradienter Nachdem Sie die elastische Hülse entfernt haben, schrauben Sie den von außen zugänglichen Gewindestift ein. After removing exible sheath,adjust Befestigen Sie dann das Wasserzulaufrohr an the threaded rod exposed outside der Toilette und das Spülrohr an der Wand. .Then x the supply pipe onto toilet Fix the threaded rod kits and Befestigen Sie den Gewindestift und richten...
- Page 26 Reinigen Sie das Füllventil, wenn Wash the ll valve if the water lling der Wassereinlauf langsam ist oder gets slow or unstoppable nicht richtig einrastet! Installation & remove the ush valve Montage des Spülventils! Stellen Sie den Adjust the water level Wasserstand am of the ush valve Spülventil ein...
- Page 27 13. Ersatzteile 13、Spare parts : Ventil schließen 84mm Spülkasten Füllventil STOP VALVE FILL VALVE 84mm CISTERN Halter des Griffs BRACKETT FOR LEVER Spülkastenplatte CISTERN'S PLATE Schalttafel CONTROL PLATE Spülkastenplatte FLUSH VALVE Stecker des Versorgungsrohr- bogens SUPPLY BEND PLUG Stopfen des FLUSH BEND PLUG Spülrohrbogens Rahmen...
-
Page 28: Manuel D'installation
Réservoir encastré Clarice MANUEL D’INSTALLATION... - Page 29 Installation Instruction (CJ708) 1. Dimensions 1、Dimenesions : 150~200 filetage extérieur 2 "MALE A=45/65 Ø110 2. Montage du raccord coudé du tuyau d'évacuation 2、Installation of flush bend :...
- Page 30 3. Installation du réservoir Positionnement 4. Aligner le cadre Montage au mur Montage au sol...
- Page 31 5. Installation de la vanne de fermeture 5、Installation of the stop valve : 6. Montage des tiges filetées et du manchon de serrage flexible 6、Installation of the threaded rod kits and flexible sheath : 7. Installation du couvercle de protection 7、Installation of protective case :...
- Page 32 8. Installation du bouchon du raccord coudé 8、Installation of bend plug : 9. Construction de la cloison de séparation 9、Build the partition wall : keep the space no less than 3mm Laissez au moins 3 mm entre le between the plug and wall ,as well as connecteur et le mur, et entre le between the sheath and the wall manchon et le mur...
- Page 33 10. Montage du WC 10、Installation of the toilet : Marquez le tuyau d'arrivée d'eau et le tuyau d'évacuation d'eau Draw on the supply pipe and ush pipe L1+ 6 mm L2+3 mm Coupez les tuyaux d'arrivée et d'évacuation d'eau Reduce the supply pipe and ush pipe burnish a chamfer Burnish a chamfer on the head face of Limez l'extrémité...
- Page 34 Fixation du WC Fixing of the toilet Indicateur de niveau d'eau Gradienter Après voir enlevé le manchon élastique, ajustez les tiges filetées qui sont accessibles de l'extérieur. After removing exible sheath,adjust the threaded rod exposed outside Attachez ensuite le tuyau d'arrivée d'eau au .Then x the supply pipe onto toilet WC et le tuyau d'évacuation d'eau au mur.
- Page 35 13、 Nettoyez la vanne de remplissage si Wash the ll valve if the water lling elle ne se ferme pas correctement gets slow or unstoppable ou si l'arrivée d'eau est lente Installation & remove the ush valve Installation et extraction de la soupape de la chasse Réglez le niveau d'eau Adjust the water level sur la soupape de la...
- Page 36 13. Pièces détachées 13、Spare parts : Vanne de fermeture Vanne de remplissage STOP VALVE Réservoir de 84 mm FILL VALVE 84mm CISTERN Support de la poignée BRACKETT FOR LEVER Plaque du réservoir CISTERN'S PLATE Panneau de commande CONTROL PLATE Soupape de FLUSH VALVE la chasse Bouchon du raccord...
- Page 39 min 1138 Ø90 min 380 0-200 Ø110...
Need help?
Do you have a question about the CLARICE and is the answer not in the manual?
Questions and answers