Table of Contents
Advertisement
Available languages
Available languages
Quick Links
Advertisement
Table of Contents

Related Manuals for Exsys EX-1348HMV


Summary of Contents for Exsys EX-1348HMV
- Page 1 Anleitung EX-1348HMV 8x RS-232/422/485 zu USB 2.0 Vers. 1.0 / 20.10.15 Manual...
-
Page 2: Table Of Contents
EX-1348HMV Inhaltsverzeichnis Beschreibung ······················································································ 3 Lieferumfang ······················································································ 3 Aufbau und Anschlüsse ······································································ 4-6 3.1 Aufbau ······································································································ 4 3.2 Anschlüsse ······························································································ 5-6 Jumper-Einstellungen ······································································ 7-12 Hardware Installation ··········································································· 12 Treiber Installation ·············································································· 13 Technische Daten ··············································································· 14 Technische Zeichnung ········································································· 14 Index Description ························································································... -
Page 3: Beschreibung
Deutsch 1. Beschreibung Die EX-1348HMV ist ein Modul zur Umsetzung von USB 2.0 auf acht RS-232/422/485 Schnittstellen mit FIFO 16C550 Ports für den Anschluss von High Speed Seriellen Peri- pherie Geräten (z.B. Modem, Plotter usw.). Das USB Modul ist Hot Plug & Play fähig. -
Page 4: Aufbau Und Anschlüsse
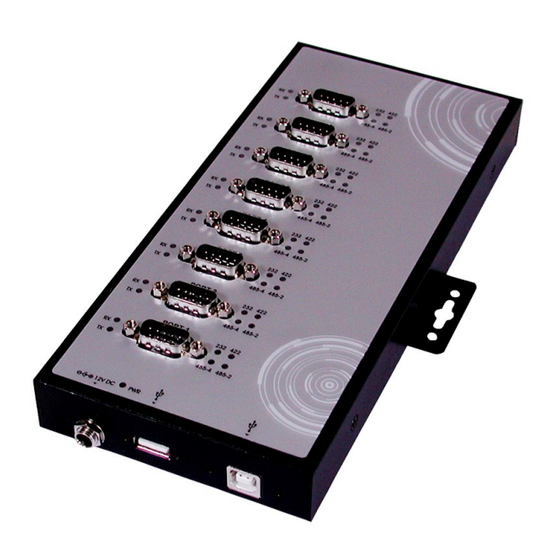
8 x 9 Pin Stecker Seriell RS-232/422/485 Betriebs LED USB B-Buchse PC-Anschluss (verschraubbar) 12V Buchse für externes Netzteil (verschraubbar) USB A-Buchse zur Erweiterung einer zweiten EX-1348HMV LED‘s zur Anzeige des Modi LED Name Farbe LED Funktion Grün Blinkend: Empfängt Daten Grün... -
Page 5: Anschlüsse
EX-1348HMV Deutsch 3. Aufbau und Anschlüsse 3.2 Anschlüsse 12 Volt Buchse: ACHTUNG!!! Nur zur Verwendung mit optionalem Netzteil! USB B-Buchse: USB 2.0 B-Buchse Signal Signal DATA+ DATA- DB 9M: DB9 (EX-1344HMV) DB9 (Endgerät) DB9 (EX-1344HMV) DB9 (Endgerät) 1 DCD 1 DCD... - Page 6 Deutsch EX-1348HMV 3. Aufbau und Anschlüsse 3.2 Anschlüsse DB 9M: DB9 (EX-1344HMV) DB9 (Endgerät) 1 DATA- 1 DATA- 2 DATA+ 2 DATA+ 3 NC 3 NC 4 NC 4 NC 5 GND 5 GND...
-
Page 7: Jumper-Einstellungen
Deutsch 4. Jumper-Einstellungen Es gibt 24 Jumper im inneren der EX-1348HMV. Davon sind 8 Jumper für den Mode (JP1-JP8), 8 Jumper (JP9-JP16) sind zur Einstellung der Power auf den Pin 9 des DB9 Stecker und die restlichen 8 Jumper für die Terminierung (JP17-JP24) (siehe nachfol- gendes Bild). - Page 8 Deutsch EX-1348HMV 4. Jumper-Einstellungen Mode Jumper (JP1-JP8) Jumper Beschreibung RS-232 (Werkseinstellung) RS-422 Mode RS-485 4-Draht Mode RS-485 2-Draht Mode...
- Page 9 EX-1348HMV Deutsch 4. Jumper-Einstellungen Power auf 9 Pin Jumper (JP9-JP16) Jumper Beschreibung Keine Power auf Pin 9 (Werkseinstellung) +5V DC auf Pin 9 Power des Netzteils auf Pin 9...
- Page 10 Deutsch EX-1348HMV 4. Jumper-Einstellungen Termination Jumper (JP17-JP24) ON OFF Jumper Beschreibung Beide Terminatoren für RX+/RX- und TX+/TX- sind inaktiv (Werkseinstellung) ON OFF RX+/RX- Terminator ist aktiv ON OFF TX+/TX- Terminator ist aktiv (Terminators für DATA+/DATA– für den RS-485 2-Draht Mode) ON OFF Beide Terminatoren für RX+/RX- und...
- Page 11 EX-1348HMV Deutsch 4. Jumper-Einstellungen Terminator für RS-422 und RS-485 4-Draht Mode ON OFF ON OFF...
-
Page 12: Hardware Installation
Deutsch EX-1348HMV 4. Jumper-Einstellungen Terminator für RS-485 2-Draht Mode ON OFF 5. Hardware Installation Beachten Sie bitte die folgenden Installationshinweise. Da es große Unterschiede zwi- schen PC‘s gibt, können wir Ihnen nur eine generelle Anleitung zum Einbau geben. Bei Unklarheiten halten Sie sich bitte an die Bedienungsanleitung Ihres Computersystems. -
Page 13: Treiber Installation
EX-1348HMV Deutsch 6. Treiber Installation Windows 9.x/ ME/ 2000/ XP/ Vista/ 7/ 8.x/ 10/ Server 20xx Windows erkennt automatisch einen neuen „FT232R USB UART“. Legen Sie die Treiber CD in Ihr CD-ROM Laufwerk ein (z.B. Laufwerk D:). Lassen Sie nicht automatisch nach dem Treiber suchen. -
Page 14: Technische Daten
Deutsch EX-1348HMV 7. Technische Daten Leistungsaufnahme: 5V/0.7A (USB) oder 12V/0.3A (Netzteil) Betriebstemperatur: 0 bis 55°C (32 bis 132°F) Lagertemperatur: -20 bis 85°C (-4 bis 185°F) Luftfeuchtigkeit: 5 bis 95% RH Baud Rate: 110bps bis 921.6Kbps Data Bits: 5, 6, 7, 8, 9 Stop Bits: 1, 1.5, 2... -
Page 15: Description
Support Windows 9.x ME/ 2000/ XP/ Vista/ 7/ 8.x/ 10/ Server 20xx/ Linux/ MAC Certificates for CE / FCC / RoHS / WEEE DE97424562 2. Extent of Delivery Before you connect the EX-1348HMV to your PC, you should first check the contents of the delivery: EX-1348HMV ... -
Page 16: Layout And Connections
8 x 9 Pin serial connector RS-232/422/485 Power LED USB B-Port for PC (screw lock) 12V connector for external power supply (screw lock) USB A-Port to extend a second EX-1348HMV LED‘s for Display the Mode LED Name Color LED Function Green... -
Page 17: Connections
EX-1348HMV English 3. Layout and Connections 3.2 Connections 12 Volt Connector: ATTENTION!!! Only use with optional power supply! USB B-Port: USB 2.0 B-Port Signal Signal DATA+ DATA- DB 9M: DB9 (EX-1344HMV) DB9 (Device) DB9 (EX-1344HMV) DB9 (Device) 1 DCD 1 DCD... - Page 18 English EX-1348HMV 3. Layout and Connections 3.2 Connections DB 9M: DB9 (EX-1344HMV) DB9 (Device) 1 DATA- 1 DATA- 2 DATA+ 2 DATA+ 3 NC 3 NC 4 NC 4 NC 5 GND 5 GND...
-
Page 19: Jumper-Settings
English 4. Jumper-Settings There are 24 jumper at the inside of the EX-1348HMV. Of thes, 8 jumper are for the mode (JP1-JP8), 8 jumper (JP9-JP16) are for setting the power on 9 pin at the DB9 connector and the other 8 jumper are for termination (JP17-JP24) (see picture below). - Page 20 English EX-1348HMV 4. Jumper-Settings Mode Jumper (JP1-JP8) Jumper Description RS-232 (Factory Setting) RS-422 Mode RS-485 4-wire Mode RS-485 2-wire Mode...
- Page 21 EX-1348HMV English 4. Jumper-Settings Power to 9 Pin Jumper (JP9-JP16) Jumper Description Keine Power auf Pin 9 (Factory Setting) +5V DC to Pin 9 Power of the Power Supply to Pin 9...
- Page 22 English EX-1348HMV 4. Jumper-Settings Termination Jumper (JP17-JP24) ON OFF Jumper Description Both Terminator for RX+/RX- and TX+/TX- are disable (Factory Setting) ON OFF RX+/RX- Terminator are enable ON OFF TX+/TX- Terminator are enable (Terminator for DATA+/DATA– for RS-485 2-wire Mode)
- Page 23 EX-1348HMV English 4. Jumper-Settings Terminator for RS-422 and RS-485 4-wire Mode ON OFF ON OFF...
-
Page 24: Hardware Installation
1. Connect the USB cable (B-Plug) to the USB B-Port at the EX-1348HMV. 2. Now connect the power supply to the 12V conector at the EX-1348HMV, and then connect the power plug of the power supply with a electrical socket. -
Page 25: Driver Installation
EX-1348HMV English 6. Driver Installation Windows 9.x/ ME/ 2000/ XP/ Vista/ 7/ 8.x/ 10/ Server 20xx Windows will recognize a new „FT232R USB UART“ and open the hardware assistant. Please choose manual installation and put the driver CD into your CD-ROM drive. Do not start the automatically search for the driver. -
Page 26: Technical Data
English EX-1348HMV 7. Technical Information Power Consumption: 5V/0.7A (USB) or 12V/0.3A (Power Supply) Operating Temperature: 0 bis 55°C (32 bis 132°F) Storage Temperature: -20 bis 85°C (-4 bis 185°F) Operating Humidity: 5 bis 95% RH Baud Rate: 110bps bis 921.6Kbps...
Need help?
Do you have a question about the EX-1348HMV and is the answer not in the manual?
Questions and answers