Table of Contents
Advertisement
Quick Links
Advertisement
Table of Contents

Related Manuals for dymax ACCU-CAL 50-LED


Summary of Contents for dymax ACCU-CAL 50-LED
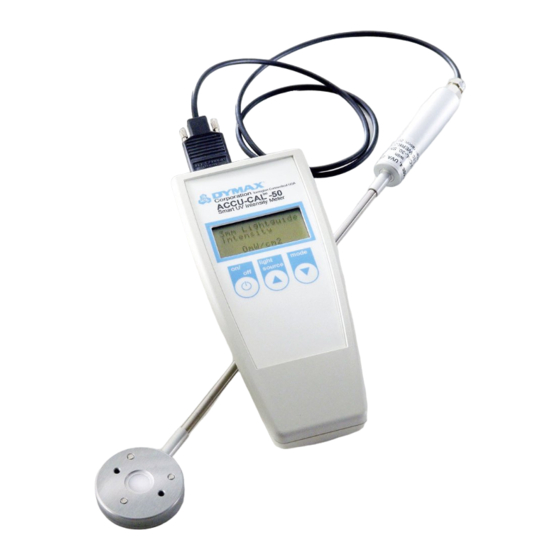
- Page 1 ACCU-CAL 50-LED ™ LED Radiometer User Guide...
- Page 2 Please note that most dispensing and curing system applications are unique. Dymax does not warrant the fitness of the product for the intended application. Any warranty applicable to the product, its application, and use is strictly limited to that contained in the Dymax standard Conditions of Sale.
-
Page 3: Table Of Contents
Contents Introduction ................4 Safety ..................4 General Safety ..................4 Safety ......................4 Product Overview ..............5 Installation ..................6 Unpacking and Inspecting Your Shipment..........6 Parts List - Spot & Line Array Configuration ......... 6 Parts List - Flood Configuration .............. 6 Operation..................7 Testing a Flood Lamp System .............. -
Page 4: Introduction
Bitte beachten Sie immer die recommendations, please contact our Technical or Sicherheitshinweise! Customer Service Departments at 860-482-1010. Trained Dymax professionals are standing by to serve Safety you. The ACCU-CAL™ 50-LED Radiometer is designed to be Par conséquent, nous vous encouragez a lire, used in conjunction with Dymax LED curing equipment comprend, et suivre tout sécurité... -
Page 5: Product Overview
Do not use the ACCU-CAL™ 50-LED Radiometer Handschuhe. in powerful magnetic, electromagnetic, or electrostatic fields. These disturbances may influence measurement results. Figure 1. ACCU-CAL™ 50-LED Spectral Response Curve Accu-Cal 50-LED Spectral Response Curve 120.0 100.0 80.0 60.0 40.0 20.0 Wavelength [nm] U S E R G U I D E A C C U - C A L ™... -
Page 6: Installation
Contact Dymax so that new parts can be shipped to you immediately. Check that the parts included in your order match those listed below. If parts are missing, contact your local Dymax representative or Dymax Customer Support to resolve the problem. -
Page 7: Operation
Operation Figure 4. Attach Detector to Radiometer The ACCU-CAL™ 50-LED Radiometer may be used to measure intensity from LED-type flood, line array, or spot sources. Instructions for use with each system type are below. Testing a Flood Lamp System Attach the detector to the radiometer (Figure 4). Do not attach any lightguide adapters to the detector. -
Page 8: Testing Spot Lamp Systems
Testing Spot Lamp Systems Figure 6. Attach Detector to Radiometer Attach the detector to the radiometer (Figure 6). Select the lightguide adapter that matches the size of the spot lamp’s lightguide. 3, 5, and 8-mm lightguide adapters are supplied with the radiometer. Install the lightguide adapter on the end of the detector using the two 2-mm adapter screws provided (Figure 7). - Page 9 Figure 10. Attach Detector to Radiometer Testing a Line Array System Attach the detector to the radiometer (Figure 10). Select the line array adapter. Install the line array adapter onto the detector face using the two 2-mm screws provided (Figure 12). Note: Do not over-tighten the set screw, as damage to the lightguide may occur.
-
Page 10: Testing The Bluewave ® Qx4
2. Select the measurement mode appropriate for the data Figure 14. Adapter Alignment required and take readings. To improve accuracy, it is suggested that multiple measurements be taken and averaged. • Direct readings at 0-mm working distance for repeatable measurements: With the adapter installed, align the radiometer sensor by nesting the emitter faceplate onto the adapter tabs to ensure precise engagement (Figure 14). - Page 11 Press and release the Light Source Button to select the light source being measured. For the BlueWave QX4, use the “spot” setting. Repeatedly press the Light Source Button until the correct focus lens size appears on the top line. The options are: •...
-
Page 12: Maintenance
The ACCU-CAL™ 50-LED was designed to operate with minimum maintenance. Follow the schedule below to assure top unit performance. • Calibrate the instrument at least annually. Calibration service is available through Dymax Customer Service or Dymax Product Repair. • Change the batteries when a low battery warning is received. The ACCU-CAL™ 50-LED uses two AA-type batteries. -
Page 13: Spare Parts And Accessories
Spare Parts and Accessories Item Part Number BlueWave QX4 Optic Adapter Upgrade Kit 42218 Includes optometer calibration update Adapter Kit – Flood to Spot Model (includes parts listed below) 39554 Line Array Adapter Upgrade Kit 43383 Includes optometer firmware, calibration update, and Line Array Adapter Lightguide Simulator 38408 8-mm Lightguide Adapter... - Page 14 Warranty From date of purchase, Dymax Corporation offers a one- year warranty against defects in material and workmanship on all system components with proof of purchase date. Unauthorized repair, modification, or improper use of equipment may void your warranty benefits. The use of aftermarket replacement parts not...
- Page 15 U S E R G U I D E A C C U - C A L ™ 5 0 - L E D R A D I O M E T E R...
- Page 16 © 2019-2021 Dymax Corporation. All rights reserved. All trademarks in this guide, except where noted, are the property of, or used under license by Dymax Corporation, U.S.A. The data contained in this bulletin is of a general nature and is based on laboratory test conditions. Dymax Europe GmbH does not warrant the data contained in this bulletin. Any warranty applicable to products, its application and use is strictly limited to that contained in Dymax Europe GmbH’s General Terms and Conditions of Sale published on our website.
Need help?
Do you have a question about the ACCU-CAL 50-LED and is the answer not in the manual?
Questions and answers