Table of Contents
Advertisement
Quick Links
Advertisement
Table of Contents

Related Manuals for Planika Lighthouse


Summary of Contents for Planika Lighthouse
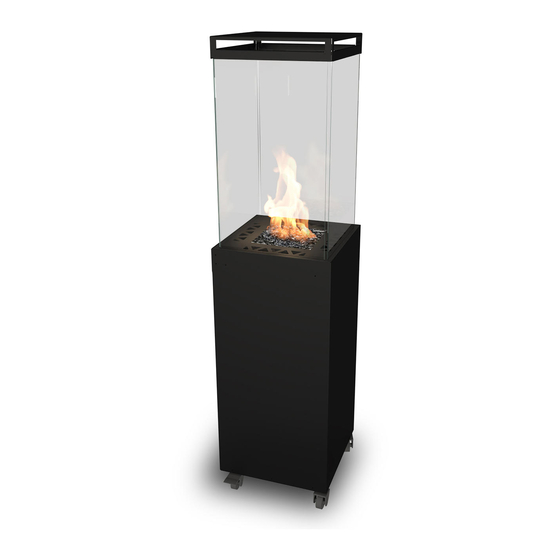
- Page 1 INSTALLATION and USER’S MANUAL LIGHTHOUSE G30/G31 (Propane-Butane/Propane) [mm] 1560 Manufactured by Planika Sp. z o.o. ul. Bydgoska 38 86-061 Brzoza Poland Copyright Planika Sp. z o.o. www.planikafires.com IG0222#03 03.10.2019...
-
Page 2: Table Of Contents
Checking the flame appearance........................20 MAINTENANCE AND UPKEEP ..........................21 6.1. Testing and cleaning ............................21 6.2. Glass screens cleaning............................. 21 WARRANTY ................................22 TROUBLESHOOTING ..............................22 TECHNICAL SPECIFICATION ............................. 23 MANUFACTURER’S CONTACT DETAILS ....................... 23 Copyright Planika Sp. z o.o. www.planikafires.com IG0222#03 03.10.2019... -
Page 3: Introduction
It is obligatory to acquaint oneself with the below installation manual and user’s manual before committing to the installation and use of the Lighthouse fireplace. This manual is to be kept safely for the lifetime of the device. CE Declaration of conformity We hereby declare that both the design and construction of a gas heating device manufactured by Planika Sp. -
Page 4: Safety Instructions
A CO2 or a powder fire extinguisher needs to be placed near the device. During the first ignition the Lighthouse fireplace needs to be burnt on maximum level for a few hours in order for the elements to acquire correct temperature and for the remains of paint, lacquer and lubricant to evaporate. - Page 5 If the Lighthouse is not in use for a longer period of time (e.g. winter time), we advise you to store it inside. All parts of the Lighthouse fireplace are made of stain resistant material.
-
Page 6: Safety Instruction Regarding The Use Of The Gas Cylinders
The gas cylinder needs to be shut if the fireplace is not being used. Filling the gas cylinders is to be commissioned to certified gas filling stations. Replacement of empty cylinders for full ones is to be conducted only in authorised locations. Copyright Planika Sp. z o.o. www.planikafires.com IG0222#03 03.10.2019... -
Page 7: Installation
Make sure that the device nor its elements weren’t damaged during the transportation (if they were, notify the supplier). Place Lighthouse on a flat, paved surface outside of the building, preferably on the place of final installation. Leave sufficient space on the side of the appliance where control panel is located (minimum 1 m). ... -
Page 8: Twin Wheels Installation
Large washer Nuts (2 pieces) Wheel 2 wheels with brakes should be installed on the gas cylinder compartment door side 2 wheels without brakes should be installed on the opposite side Copyright Planika Sp. z o.o. www.planikafires.com IG0222#03 03.10.2019... -
Page 9: Installation Of The Glass Screen
Carefully remove cardboard and foam foil from the glass screens. Remove all contaminations from the glass shields which could burn out on the glass during operation of the Lighthouse (in particular fingerprints). Install glass shields in the corresponding slots on the top of appliance. -
Page 10: Gas Cylinder Montage
(of an area min 1/100 of the area of the base of the housing) and a lower ventilation slot (of an area min 1/50 of the area of the base of the housing). WARNING!!! Before gas cylinder replacement, please block the wheels of the device. Copyright Planika Sp. z o.o. www.planikafires.com IG0222#03 03.10.2019... -
Page 11: Installation Of The Gas Linkage And Gas Cylinder Replacement
The Lighthouse is delivered together with an elastic gas linkage which, on one end is connected to the valve of the device and one the other end to the 37mbar regulator (in the twist-on version) ready to be connected to the gas cylinder. - Page 12 After removing the leak one may open the gas bottle valve again. Copyright Planika Sp. z o.o. www.planikafires.com IG0222#03 03.10.2019...
-
Page 13: Adapter For The Gas Cylinder Connection
Disconnection of the gas cylinder Twist-on connection Quick-release Turn off the Lighthouse – put it into the OFF position. The main burner need to be turned off. 2. Turn the bottle valve into the OFF position 2. Turn the switch into the OFF position. -
Page 14: Regulator Replacement
5 years. Allowed pressures: 30 mbar, 37 mbar (recommended), 50 mbar. Use only the redactors that comply with the EN16129 European Norm. 2. Turn off the Lighthouse – the „OFF” position. The main burner needs to be turned off. 3. Disconnect the regulator from the gas bottle (description above). - Page 15 Lighthouse is equipped with the anti-tilt valve which shuts the device down in case if the fireplace is tilted or collapsed. The valve automatically cuts off the gas supply to the controller and this extinguishes the flame.
-
Page 16: User's Manual
4. USER’S MANUAL The Lighthouse fireplace has a control valve with a built-in ignition for the main burner (without pilot flame). The flame height of the main burner may be appropriately regulated with by turning the knob. Next to the knob is placed electric ignition button (powered by AAA battery). - Page 17 If the installed gas bottle is new or the fireplace has not been used for a longer period the first thing that needs to be done is to release air from the gas linkage. In this case conducting a few attempts will be needed until the flame is ignited. Copyright Planika Sp. z o.o. www.planikafires.com IG0222#03...
-
Page 18: Regulation Of The Flame Size
To turn off the device, simultaneously press and turn the knob all the way clockwise (Photo 8). The gas supply will be cut and the flame on burner will be turned off. Photo 8 Additionally, close also the valve on the gas cylinder. Copyright Planika Sp. z o.o. www.planikafires.com IG0222#03 03.10.2019... -
Page 19: Replacing The Battery
Unscrew the ignition button Remove the battery and place the new one into the container. WARNING! Remember about proper polarization of the battery. Screw the cover of the battery container. Copyright Planika Sp. z o.o. www.planikafires.com IG0222#03 03.10.2019... -
Page 20: Testing
If the problem happens again please contact the dealer. 5.2 Checking the flame appearance. Burn the Lighthouse on max flame height and check the appearance of the flame. The flame should be evenly placed on the whole surface of the main burner. -
Page 21: Maintenance And Upkeep
Always dry the glass screen to avoid damp patches which could irreversibly embed into the glass. WARNING!!! Avoid leaving fingerprints on the glass. They will be embedded into the glass and you will not be able to clean them. Copyright Planika Sp. z o.o. www.planikafires.com IG0222#03 03.10.2019... -
Page 22: Warranty
WARRANTY Planika Sp. z o.o. grants the Client guarantee of quality for the smooth operation of the goods specified on the sales document. The warranty is determined for a given period from the date of purchase (based on the warranty card together with the receipt of purchase). -
Page 23: Technical Specification
Flexible hose (2 m) Ø9mm 10. MANUFACTURER’S CONTACT DETAILS Company Name: Planika Sp. z o.o. Address: Bydgoska 38 86-061 Brzoza Poland Telephone: + 48 52 364 11 60 Fax: + 48 52 364 11 70 Copyright Planika Sp. z o.o. www.planikafires.com IG0222#03 03.10.2019...
Need help?
Do you have a question about the Lighthouse and is the answer not in the manual?
Questions and answers