Table of Contents
Advertisement
Electrical and electronic equipment and batteries
should be recycled at a facility capable of handling
these items. Contact your local authority for details
of disposal rules.
Manufacture:
ALINCO, INC.
Y odoyabashi Dai-bldg 13F
4-4-9 Koraibashi, Chuo-ku, Osaka 541-0043 Japan
Phone: +81-6-7636-2362 Fax: +81-6-6208-3802
http://www.alinco.com
E-mail:export@alinco.co.jp
Copyright Alinco, lnc. PS1001A / FNFN-EE
Printed in China
Advertisement
Table of Contents

Related Manuals for Alinco DR-MD500


Summary of Contents for Alinco DR-MD500
- Page 1 Phone: +81-6-7636-2362 Fax: +81-6-6208-3802 http://www.alinco.com E-mail:export@alinco.co.jp Electrical and electronic equipment and batteries should be recycled at a facility capable of handling Copyright Alinco, lnc. PS1001A / FNFN-EE these items. Contact your local authority for details of disposal rules. Printed in China...
- Page 2 NOTE: DR-MD500 may be delivered to you after dealer- programming. In such cases, please ask your dealer about the available features in your unit and how to operate this unit.
- Page 3 It may vary drastically depending on the type and location of antenna system. Please consult your dealer for details as DR-MD500 requires an external antenna. Lightning ■...
- Page 4 Alinco. INFORMATION TO THE DIGITAL DEVICE USER REQUIRED BY THE FCC Inc, Osaka, Japan, English Edition Printed in China.
- Page 5 RADIO FREQUENCY ENERGY SAFETY INFORMATION FOR HOME OR OFFICE USE ■ This Alinco transceiver has been tested and complies with the Information in this document is subject to change without notice or standards listed below, in regards to Radio Frequency (RF) energy and obligation.
- Page 6 This transceiver is NOT ATEX approved and NOT intended for the use time. in hazardous explosive atmospheres. • Use only Alinco authorized accessories The use of other than recommended or approved body- worn accessories may result in RF exposure levels which exceed the FCC's occupational/ controlled...
- Page 7 WARNING To prevent any hazard during operation of Alinco’s radio product, in this Do not use this product in close proximity to other electronics manual and on the product you may find symbols shown below. Please devices, especially medical ones. It may cause interference read and understand the meanings of these symbols before starting to to those devices.
- Page 8 WARNING Handling this product: Do not plug the power-supply into the wall outlet if the contacts are dirty and/or dusty. Be sure to reduce the audio output level to minimum before Short circuiting and/or overheating may result in fire, electric using a headset.
- Page 9 WARNING About power-supply CAUTION Use only reliable power supply of specific DC output range and Environment and condition of use: be mindful of the polarity of the cables and DC jack. Do not use the product in proximity to a TV or a radio. It may Always turn off the power supply when connecting or cause interference or receive interference.
-
Page 10: Table Of Contents
CONTENTS Supplied Accessories ............1 Supplied Accessories ............... 1 Initial Installation ..............2 Mobile installation ................2 Taken Off Mobile From Car .............. 2 DC Power Cable Connection ............3 Antenna Connection ................ 4 Accessories Connections ..............5 Getting Acquainted ..............6 Front panel ..................6 Rear panel .................. -
Page 11: Supplied Accessories
The standard accessories may vary slightly depending on the version you have purchased. Please contact your local authorized Alinco dealer should you have any questions. Alinco and authorized dealers are not responsible for any typographical errors there may be in this manual. Standard accessories may change without notice. -
Page 12: Initial Installation
Initial Installation Mobile installation The transceiver may be installed in any position in your car, where the Determine the appropriate controls and microphone are easily accessible and it does not interfere with angle of the transceiver, using the safe operation of the vehicle. If your vehicle is equipped with air bags, the 3 screw hole positions be certain your transceiver will not interfere with their deployment. -
Page 13: Dc Power Cable Connection
Initial Installation Reconnect any wiring removed from the negative terminal. DC Power Cable Connection Mobile Operation The vehicle battery must have a nominal rating of 12V. Never connect the transceiver to a 24V battery. Be sure to use a 12V vehicle battery that has sufficient current capacity. -
Page 14: Antenna Connection
Initial Installation The current capacity of your power supply must be 12A or more. the problem is resolved, replace the fuse. If newly installed fuses continue to blow, disconnect the power cable and contact your dealer for Connect the DC power cable to the regulated DC power supply and assistance. -
Page 15: Accessories Connections
Initial Installation SPEAKER MIC Transmitting without first connecting an antenna or other matched For voice communications, connect a provided Speaker mic into the load may damage the transceiver. Always connect the antenna to the transceiver before transmitting. socket on the front of the main unit. Turn the ring firmly on the plug All fixed stations should be equipped with a lightning arrester to reduce until it locks. -
Page 16: Getting Acquainted
Getting Acquainted Front panel Press : Press to return to previous menus. Press to delete characters when texting message. EXIT key Press and hold to active keypad lock. Press/ press and hold these keys to use the pre- P1-P6 key programmed functions. -
Page 17: Speaker Mic
Getting Acquainted SPEAKER MIC NO. KEY FUNCTION Switches between Main and Sub bands. Number Key Input VFO frequency or DTMF dial out etc. Programmed key [Set the programs in PC software]. PA MENU The MENU key is set as default setting. Programmed key [Set the programs in PC software]. -
Page 18: Microphone Operation
Microphone Operation MICROPhONE OPERAtION RESUME FACtORY DEFAULt If your transceiver seems to be malfunctioning becuase of wrong DOWN operation or setup, this function will be able to resume all setup and channels to factory default. Press and hold [P2] Key + CH knob + Power key at the same time to power on the transceiver. -
Page 19: Basic Operations
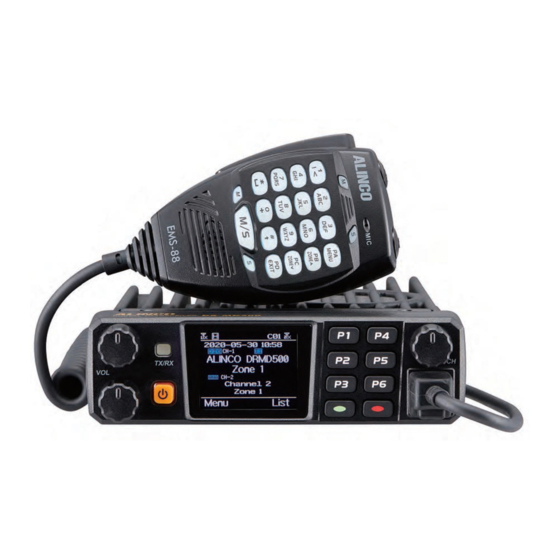
Basic Operations Options SPARES tURNING ON thE POwER EMS- 88 Speaker Microphone Turn on the transceiver by pressing the power key, and the LCD displays ERW-21 PC interface cable "Booting, please wait". Then it will show a start-up message, and you will hear a beep after 7 seconds. -
Page 20: Specifications
Specifications GENERAL tRANSMIttER VHF: 55W(144-148MHz), 50W/25W/10W/1W TX /RX : 136MHz - 174MHz RF Power Output Frequency Range 400MHz - 480MHz UHF: 40W/25W/10W/1W 76-108MHz (FM radio RX only) Less than 1GHz: -36dBm Number of Channels 4000 channels Channel Spacing More than 1GHz: -30dBm Analog: 12.5/25KHz 25kHz: 40dB FM Hum &...
Need help?
Do you have a question about the DR-MD500 and is the answer not in the manual?
Questions and answers