Table of Contents
Advertisement
Available languages
Available languages
Automatic Battery Charging Station
Estación de carga automática de batería
Station de chargement de batteries automatique
76-1
OWNERS MANUAL / MANUAL DEL USUARIO /
MANUEL D'UTILISATION
PLEASE SAVE THIS OWNERS MANUAL AND READ BEFORE EACH USE. This manual
will explain how to use the battery charger safely and effectively. Please read and follow
these instructions and precautions carefully.
POR FAVOR CONSERVE ESTE MANUAL DEL USUARIO Y LEALO ANTES DE CADA
USO. En este manual le explica cómo utilizar el cargador de batería de manera segura y
confiable. Por favor, lea y siga las siguientes instrucciones y precauciones.
GARDER LE MANUEL D'INSTRUCTION ET LISEZ LE AVANT CHAQUE UTILISATION.
Ce manuel explique comment utiliser le chargeur de batterie d'une façon securitaire et efficace.
S'il vous plaît lisez et suivez ces instructions et precautions.
0099001921E-03
Advertisement
Table of Contents

Related Manuals for Schumacher Electric DSR127


Summary of Contents for Schumacher Electric DSR127
- Page 1 Automatic Battery Charging Station Estación de carga automática de batería Station de chargement de batteries automatique 76-1 OWNERS MANUAL / MANUAL DEL USUARIO / MANUEL D’UTILISATION PLEASE SAVE THIS OWNERS MANUAL AND READ BEFORE EACH USE. This manual will explain how to use the battery charger safely and effectively. Please read and follow these instructions and precautions carefully.
-
Page 2: Table Of Contents
CONTENTS IMPORTANT SAFETY INSTRUCTIONS – SAVE THESE INSTRUCTIONS ..........5 PERSONAL SAFETY PRECAUTIONS .......................5 PREPARING TO CHARGE .........................6 CHARGER LOCATION ..........................6 DC CONNECTION PRECAUTIONS ......................6 FOLLOW THESE STEPS WHEN BATTERY IS INSTALLED IN VEHICLE ..........6 FOLLOW THESE STEPS WHEN BATTERY IS OUTSIDE VEHICLE ............7 GROUNDING AND AC POWER CORD CONNECTIONS .................7 ASSEMBLY INSTRUCTIONS ........................7 CONTROL PANEL ............................7... - Page 3 CONTENIDOS INSTRUCCIONES IMPORTANTES DE SEGURIDAD – GUARDE ESTAS INSTRUCCIONES ....15 PRECAUCIONES DE SEGURIDAD PERSONAL ..................15 PREPARACIÓN PARA LA CARGA ......................16 UBICACIÓN DEL CARGADOR.........................16 PRECAUCIONES DE CONEXIÓN EN CC ....................17 SIGA ESTOS PASOS CUANDO LA BATERÍA ESTÉ COLOCADA EN EL VEHÍCULO ......17 SIGA ESTOS PASOS CUANDO LA BATERÍA SE ENCUENTRE FUERA DEL VEHÍCULO ....17 CONEXIONES A TIERRA Y ENERGÍA DE CA ..................18 INSTRUCCIONES DE MONTAJE ......................18...
- Page 4 TABLE DES MATIÈRES CONSIGNES DE SÉCURITÉ IMPORTANTES – CONSERVER CES INSTRUCTIONS ......26 MESURES DE SÉCURITÉ PERSONNELLE ....................26 PRÉPARATION POUR LE CHARGEMENT ....................27 EMPLACEMENT DU CHARGEUR ......................27 PRÉCAUTIONS SUR LA CONNEXION C.C....................27 ÉTAPES À SUIVRE QUAND LA BATTERIE EST INSTALLÉE DANS UN VÉHCULE ......28 ÉTAPES À...
-
Page 5: Important Safety Instructions - Save These Instructions
Automatic Battery Charging Station OWNERS MANUAL 76-1 PLEASE SAVE THIS OWNERS MANUAL AND READ BEFORE EACH USE. This manual will explain how to use the charger safely and effectively. Please read and follow these instructions and precautions carefully. IMPORTANT SAFETY INSTRUCTIONS – SAVE THESE INSTRUCTIONS SAVE THESE INSTRUCTIONS –... -
Page 6: Preparing To Charge
WARNING: Do not use this charger for charging Lithium Ion batteries other than the Lithium Iron Phosphate (LiFePO ) type. Other Lithium Ion battery types may not be sufficiently charged or may be overcharged with this charger. Overcharging may ignite or burst a battery and cause injury to persons and damage to property. -
Page 7: Follow These Steps When Battery Is Outside Vehicle
FOLLOW THESE STEPS WHEN BATTERY IS OUTSIDE VEHICLE WARNING: A SPARK NEAR THE BATTERY MAY CAUSE A BATTERY EXPLOSION. TO REDUCE THE RISK OF A SPARK NEAR THE BATTERY: Check polarity of battery posts. POSITIVE (POS, P, +) battery post usually has a larger diameter than NEGATIVE (NEG, N, –) post. - Page 8 BATTERY VOLTAGE BUTTON Use this button to select one of the following: 12V – The battery is a 12V type and charges at the corresponding rate. CAUTION: Do not use the 12V setting for a 6V battery. Overcharging will occur. The battery may burst and cause injury to persons and damage to property.
-
Page 9: Operating Instructions
START/STOP BUTTON Use this button to start or stop the charging process, after the battery is properly connected and battery voltage and type have been selected. If the battery voltage is greater than 0.2 V, the display will briefly show “ON”... -
Page 10: Using The Voltmeter To Test Battery State Of Charge
GENERAL CHARGING NOTES • The large chassis-mounted main fan runs as needed, based on temperatures of the individual charging boards within the unit and the total power being supplied by the unit. The board-mounted fans run based on the corresponding board temperature. •... -
Page 11: Battery Percent And Charge Time
13. BATTERY PERCENT AND CHARGE TIME This charger adjusts the charging time in order to charge the battery completely, efficiently and safely. The duration of the charging process depends on three factors: Battery State If a battery has only been slightly discharged, it can be charged in less than a few hours. The same battery could take up to 10 hours if very weak. - Page 12 CODE DESCRIPTION REASON/SOLUTION The connections to the battery are The battery is connected backwards. Or for multiple reversed or are made incorrectly. batteries being charged, the connections are not proper. Unplug the charger and reverse or correct the connections to the battery(s). The charger was unable to keep The battery won’t hold a charge.
-
Page 13: Before Returning For Repairs
THIS PRODUCT. THIS LIMITED WARRANTY IS NOT TRANSFERABLE OR ASSIGNABLE. Schumacher Electric Corporation (the “Manufacturer”) warrants this charger for one (1) year from the date of purchase at retail against defective material or workmanship that may occur under normal use and care. -
Page 14: Warranty Card
ORIGINAL receipt because it will be required for any warranty claims. This warranty is not transferable. Send warranty card only. DO NOT SEND UNIT TO THIS ADDRESS FOR REPAIR. Mail this card to: Schumacher Electric Corporation 801 Business Center Drive Mount Prospect, IL 60056-2179 Name ______________________________________________________________... -
Page 15: Instrucciones Importantes De Seguridad - Guarde Estas Instrucciones
Estación de carga automática de batería MANUAL DEL USUARIO 76-1 POR FAVOR CONSERVE ESTE MANUAL DEL USUARIO Y LEALO ANTES DE CADA USO. En este manual le explica cómo utilizar el cargador de batería de manera segura y confiable. Por favor, lea y siga las siguientes instrucciones y precauciones. INSTRUCCIONES IMPORTANTES DE SEGURIDAD –... -
Page 16: Preparación Para La Carga
Si el ácido de la batería tiene contacto con su piel o su ropa, lave de inmediato el área afectada con agua y jabón. En caso de que ingrese ácido en un ojo, sumerja el mismo de inmediato bajo agua potable corriente por al menos 10 minutos y obtenga atención médica en forma inmediata. -
Page 17: Precauciones De Conexión En Cc
PRECAUCIONES DE CONEXIÓN EN CC Conecte y desconecte las pinzas de salida CC. sólo después de haber establecido todos los interruptores del cargador a la posición de “apagado” (si es aplicable) y de haber desconectado el enchufe de C.A. del tomacorriente eléctrico. Nunca permita que las pinzas tengan contacto entre sí. Sujete las pinzas a la batería y al chasis, como se indica en en las secciones 6 y 7. -
Page 18: Conexiones A Tierra Y Energía De Ca
CONEXIONES A TIERRA Y ENERGÍA DE CA Este cargador de batería está destinado a un uso en un circuito con tensión nominal de 120 V y requiere de un circuito funcional de 15A. El enchufe se debe conectar a un tomacorriente adecuadamente instalado y que cuente con descarga a tierra de acuerdo con todas las ordenanzas y códigos. - Page 19 BOTÓN DE TIPO DE BATERÍA Utilice este botón para seleccionar el tipo de batería. NOTA: Las baterías deberían identificarse con su tipo. Si está cargando una batería sin identificación, revise el manual del artículo que la utiliza. NOTA: Cuando el tipo de batería “LITH” esta seleccionado, solo la configuración de “12V” está disponible. Estándar –...
-
Page 20: Instrucciones De Operación
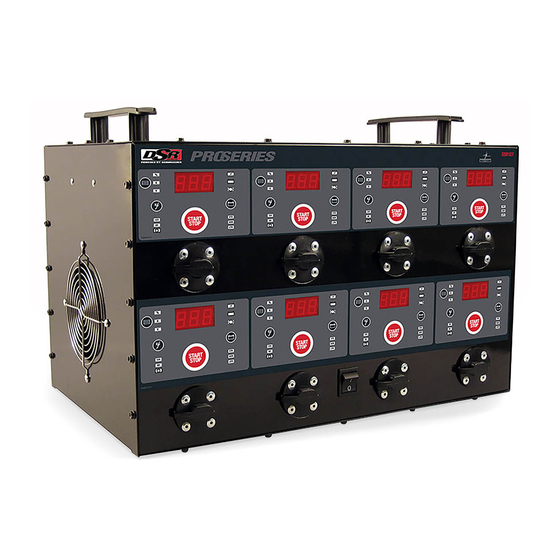
11. INSTRUCCIONES DE OPERACIÓN ASPECTOS GENERALES Conecte la alimentación de CA y ponga el interruptor ON/OFF del panel frontal en la posición ON. Luego, seleccione una toma para carga de las ocho disponibles. Conecte la batería, siguiendo las precauciones enumeradas en las secciones 6 y 7.Seleccione la opción apropiada entre Voltaje de batería y Tipo de batería y presione START. -
Page 21: Cómo Utilizar El Voltímetro Para Evaluar El Estado De La Carga De La Batería
CONTROL DE POTENCIA Para evitar que la unidad supere el nivel de corriente de entrada especificado de 15 A, todas las estaciones de carga están conectadas por un bus de comunicación I C (se pronuncia “i al cuadrado de c”), y una estación, que se comunica con las demás estaciones, acumula los datos de potencia. -
Page 22: Mantenimiento Y Cuidado
Tamaño de la batería El cargador selecciona, en forma automática, una tasa de carga de hasta 12 amperes. El cargador carga a la tasa seleccionada y eventualmente reduce la tasa de carga en forma controlada. Luego de que el proceso de carga ha comenzado, la pantalla digital puede utilizarse para determinar el progreso de la carga seleccionando el modo % de batería. - Page 23 CÓDIGO DESCRIPCIÓN RAZÓN/SOLUCIÓN El cargador ha detectado que la batería El cargador detiene la corriente, automáticamente, si detecta se está sobrecalentando (fuga térmica). que la batería se está sobrecalentando. Revise la batería o reemplácela. El cargador se apaga porque su Asegúrese de que el cargador no tenga los orificios de temperatura interna excede el límite.
-
Page 24: Antes De Devolver A Reparaciones
El Fabricante no presta garantía por lo accesorios utilizados con este producto que no sean los fabricados por Schumacher Electric Corporation y que no estén aprobados para su uso con este producto. La presente Garantía Limitada será nula si el producto se utiliza en forma errónea, se trata de manera inadecuada, es reparado o modificado por personas que nos sean el Fabricante o si esta unidad es revendida a través de un vendedor minorista no autorizado. -
Page 25: Tarjeta De Garantía
Esta garantía no es transferible. Envie tarjeta de garantía solamente. NO ENVÍE LA UNIDAD A ESTA DIRECCIÓN PARA SU REPARACIÓN. Enviar esta tarjeta a: Schumacher Electric Corporation 801 Business Center Drive Mount Prospect, IL 60056-2179 Nombre ____________________________________________________________ Dirección ___________________________________________________________... -
Page 26: Consignes De Sécurité Importantes - Conserver Ces Instructions
Station de chargement de batteries automatique MANUEL D’UTILISATION 76-1 GARDER LE MANUEL D’INSTRUCTION ET LISEZ LE AVANT CHAQUE UTILISATION. Ce manuel explique comment utiliser le chargeur de batterie d’une façon securitaire et efficace. S’il vous plaît lisez et suivez ces instructions et precautions. CONSIGNES DE SÉCURITÉ... -
Page 27: Préparation Pour Le Chargement
NE JAMAIS fumer ou allumer des flammes à proximité de la batterie ou du moteur. Soyez extra prudent pour réduire le risque de laisser tomber un outil en métal sur la batterie. Ça pourrait faire une étincelle ou produire un court-circuit à la batterie ou à d’autres parties électriques et pourrait produire une explosion. -
Page 28: Étapes À Suivre Quand La Batterie Est Installée Dans Un Véhcule
ÉTAPES À SUIVRE QUAND LA BATTERIE EST INSTALLÉE DANS UN VÉHCULE AVERTISSEMENT : UNE ÉTINCELLE PRÈS DE BATTERIE PEUT CAUSER SON EXPLOSION. POUR RÉDUIRE LES RISQUES D’ÉTINCELLE PRÈS DE LA BATTERIE : Placer les cordons C.A. et C.C. de manière à éviter qu’ils soient endommagés par le capot, une portière ou les pièces en mouvement du moteur. -
Page 29: Directives D'assemblage
NOTE : Conformément à la réglementation canadienne, l’utilisation d’un adaptateur est interdite au Canada. L’utilisation d’un adaptateur aux États-Unis n’est pas recommandée et ne doit pas être utilisé. UTILISEZ UNE RALLONGE L’utilisation d’une rallonge n’est pas recommandée. Si vous devez utiliser une rallonge, suivez ces directives : •... - Page 30 À décharge poussée – Mettre le bouton sur AGM. Les batteries à décharge poussée sont marquées « À décharge poussée » ou « Marine ». Les batteries à décharge poussée sont en général plus grosses que les autres types de batterie. Ce type de batterie a moins d’énergie instantanée, mais par contre fournit plus d’énergie à...
-
Page 31: Consignes D'utilisation
11. CONSIGNES D’UTILISATION APERÇU Connecter l’alimentation électrique et placer le commutateur Départ/Arrêt du panneau avant à la position « ON ». Sélectionner ensuite une sortie de recharge non utilisée parmi les huit sorties présentes. Raccorder la batterie, selon les mesures indiquées dans les parties 6 et 7. Sélectionner la bonne tension de batterie et le bon type de batterie et appuyer sur START. -
Page 32: Utilise Un Voltmètre Pour Tester L'état De Charge De Votre Batterie
RÉGLAGE DE PUISSANCE Pour empêcher l’unité d’excéder les spécification de courant d’entrée de 15 A, toutes les stations de charge sont connectées par un bus de communication de I C (prononcé « i au carré c »), et les données de puissance sont accumulées par une station communiquant avec toutes les autres. -
Page 33: Maintenance Et Entretien
Dimensions de la batterie Le chargeur détecte automatiquement une vitesse de charge jusqu’à 12 A. Le chargeur charge à la vitesse sélectionnée et réduit finalement la vitesse de charge de façon contrôlée. Une fois la charge commencée, l’affichage numérique est utilisé pour déterminer l’avancement de la charge en sélectionnant le mode % Battery. - Page 34 CODE DESCRIPTION RAISON / SOLUTION Le chargeur s’éteint, car sa S’assurer que les trous de ventilation latérale du température excède la limite. chargeur ne sont pas bloqués. Mettre le chargeur à l’abri du soleil et à l’ombre. La tension de la batterie a chuté Cela peut être causé...
-
Page 35: Avant De Retourner Pour Les Réparations
CETTE GARANTIE LIMITÉE N’EST PAS TRANSFÉRABLES NI CESSIBLES. Schumacher Electric Corporation (le « Fabricant ») garantit ce unité pour un (1) an à compter de la date d’achat au détail contre les défauts de matériaux ou de fabrication qui peuvent se produire dans des conditions normales d’utilisation et de soins. -
Page 36: Carte De Garantie
éventuelle réclamation au titre de la garantie. Cette garantie n’est pas transférable. Envoyer la carte de garantie seulement. NE PAS ENVOYER L’UNITÉ À CETTE ADRESSE POUR RÉPARATION. Envoyer cette carte à : Schumacher Electric Corporation 801 Business Center Drive Mount Prospect, IL 60056-2179 (É.-U ) Nom _______________________________________________________________...
Need help?
Do you have a question about the DSR127 and is the answer not in the manual?
Questions and answers