Table of Contents
Advertisement
Available languages
Available languages
Quick Links
Advertisement
Table of Contents

Related Manuals for Krups KB 181D


Summary of Contents for Krups KB 181D
- Page 1 VACUUM SMOOTHIE BLENDER www.krups.com...
-
Page 4: Système De Verrouillage De Sécurité
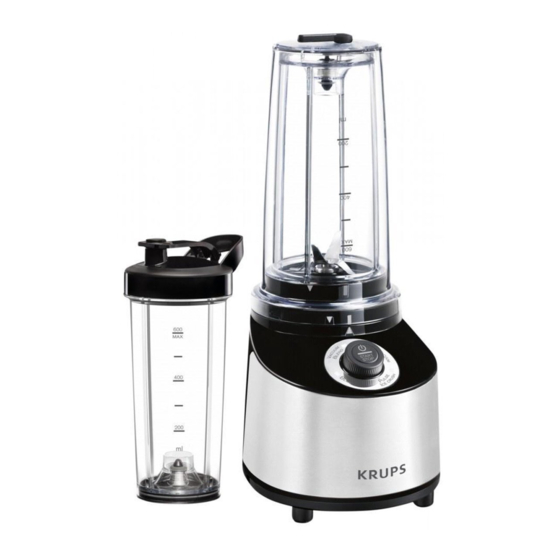
DESCRIPTION A Bloc moteur C Accessoires gourde C1 Couvercle inférieur B Bouteilles Blender C2 Bouchon B1 Couteau D Accessoires gourde supplémentaires B2 Bouteille en plastique (selon modèle) B3 Bouteille Vaccum D1 couvercle inférieur D2 Bouchon D3 Couvercle inférieur ATTENTION Les consignes de sécurité font partie de l’appareil. - Page 5 UTILISER VOTRE APPAREIL „ Placez le bloc moteur (A) sur une surface plane et stable. „ Mettez les ingrédients dans la bouteille du blender (B2). Le niveau maximal de 600 ml (voir le marquage sur la bouteille) ne doit pas être dépassé. Pour de meilleurs résultats, nous vous recommandons de remplir la bouteille d’abord avec les ingrédients liquides, puis avec les ingrédients frais ou congelés (coupez les ingrédients en morceaux de 2 cm au maximum).
- Page 6 RECETTES Vacuum 1min 50 Blend 130 g 270 g Vacuum 1min 50 Blend 130 g 270 g Pulse 5 sec 80 g NETTOYER VOTRE APPAREIL „ Débranchez l’appareil et enlevez la bouteille (B). „ Manipulez-le délicatement, car les lames sont tranchantes. „...
- Page 7 QUE FAIRE SI L’APPAREIL NE FONCTIONNE PLUS PROBLEM CAUSE SOLUTION L’appareil ne Il n’est pas branché. Branchez l’appareil dans une prise fonctionne pas. électrique fournissant la même tension électrique que celle spécifiée sur l’appareil. La bouteille (B) n’est Vérifiez que la bouteille est pas correctement correctement assemblée.
-
Page 8: Before Using For The First Time
DESCRIPTION A Motor unit C Bottle accessories C1 Bottom lid B Blender bottles C2 Top B1 Blade D Additional bottle accessories B2 Plastic bottle (depending on model) B3 Vacuum bottle D1 Bottom lid D2 Top D3 Bottom lid WARNING The safety instructions are part of the device. -
Page 9: Using Your Appliance
USING YOUR APPLIANCE „ Set the motor unit (A) on a flat and stable surface. „ Add the ingredients to the blender bottle (B2). The maximum level of 600 ml (refer to the gauge on the bottle) must not be exceeded. For best results, we recommend first filling the bottle with liquid ingredients, then with the fresh or frozen ingredients (cut the ingredients into a maximum of 2 cm pieces). -
Page 10: Cleaning Your Appliance
RECIPES Vacuum 1 min 50 Blend 130 g 270 g Vacuum 1 min 50 Blend 130 g 270 g Pulse 5 secs 80 g CLEANING YOUR APPLIANCE „ Unplug the appliance and remove the bottle (B). „ Handle it with care, as the blades are sharp. „... -
Page 11: What To Do If Your Appliance Does Not Work
WHAT TO DO IF YOUR APPLIANCE DOES NOT WORK PROBLEMS CAUSE SOLUTIONS The appliance does It is not plugged in. Plug the appliance in using a plug with not work. the same voltage. The bottle (B) is not Check that the bottle is correctly correctly assembled or assembled;... -
Page 12: Vor Dem Ersten Gebrauch
BESCHREIBUNG A Motorblock C Zubehör Trinkflasche C1 Unterer Deckel B Behälter C2 Verschluss B1 Messereinsatz D Zubehör für zusätzliche Trinkflasche B2 Kunststoffflasche (modellabhängig) B3 Vakuumflasche D1 Verschluss D2 Kunststoffflasche D3 Unterer Deckel ACHTUNG Die Sicherheitsanweisungen gehören zum Gerät. Bitte lesen Sie diese Bedienungs- anleitung vor der Inbetriebnahme des Ge- rätes aufmerksam durch. -
Page 13: Benutzung Des Gerätes
BENUTZUNG DES GERÄTES „ Stellen Sie den Motorblock (A) auf eine ebene, stabile Fläche. „ Geben Sie die Zutaten in die Kunststoffflasche (B2). Die maximale Füllmenge beträgt 600 ml (siehe Markierung an der Flasche) und darf nicht überschritten werden. Um das beste Ergebnis zu erzielen, empfehlen wir erst die flüssigen Zutaten in die Flasche zu geben und dann die frischen/gefrorenen Zutaten (schneiden Sie die Zutaten in Stücke von maximal 2 cm). - Page 14 REZEPTE Vacuum 1 Min. 50 Blend 130 g 270 g Vacuum 1 Min. 50 Blend 130 g 270 g Pulse 5 Sek. 80 g REINIGUNG IHRES GERÄTS „ Ziehen Sie den Netzstecker des Gerätes und entfernen Sie den Behälter (B). „...
- Page 15 WAS KÖNNEN SIE TUN, WENN IHR GERÄT NICHT FUNKTIONIERT? PROBLEME URSACHEN LÖSUNGEN Das Gerät funktioniert Das Gerät ist nicht Verbinden Sie das Gerät mit einer nicht. mit einer Steckdose Steckdose mit gleicher Spannung. verbunden. Der Behälter (B) Prüfen Sie, ob den Behälter korrekt ist nicht korrekt zusammengesetzt ist.
-
Page 16: Operazioni Preliminari
DESCRIZIONE A Blocco motore D Accessori per recipiente supplementari (a seconda del B Recipiente frullatore modello) B1 Lama D1 Coperchio inferiore B2 Recipiente in plastica D2 Tappo B3 Involucro Vacuum D3 Coperchio inferiore C Accessorio per recipiente C1 Coperchio inferiore C2 Tappo ATTENZIONE! avvertenze... - Page 17 UTILIZZO „ Posizionare il blocco motore (A) su una superficie piana e stabile. „ Versare gli ingredienti nel recipiente (B2). Non superare il livello massimo di 600 ml (indicato sul recipiente). Per risultati ottimali, si raccomanda di riempire il recipiente prima con gli ingredienti liquidi, poi con gli ingredienti solidi (freschi o congelati), tagliati a pezzi di 2 cm al massimo.
-
Page 18: Pulizia Dell'apparecchio
RICETTE Vacuum 1 min 50 Blend 130 g 270 g Vacuum 1 min 50 Blend 130 g 270 g Pulse 5 sec 80 g PULIZIA DELL'APPARECCHIO „ Scollegare l'apparecchio dalla rete elettrica e rimuovere il recipiente (B). „ Manipolarlo con delicatezza perché le lame sono taglienti. „... -
Page 19: Risoluzione Dei Problemi
RISOLUZIONE DEI PROBLEMI PROBLEMA CAUSA SOLUZIONE L’apparecchio non Non è collegato Collegare l’apparecchio a una presa di funziona. all’alimentazione. corrente con lo stesso voltaggio. Il recipiente (B) Verificare che il recipiente sia non è assemblato assemblato correttamente; smontarlo o posizionato e riassemblarlo (Fig.1 e Fig.2) e correttamente sull’unità... - Page 20 FR ....P. 4 – 7 EN ....P. 8 – 11 DE ....P. 12 – 15 IT ....P. 16 – 19 8020001809...
Need help?
Do you have a question about the KB 181D and is the answer not in the manual?
Questions and answers