Table of Contents
Advertisement
Quick Links
この度は本製品をお買い上げいただきまして誠にありがとうございま
す。 本製品を末永く安全にご使用いただくため、 この取扱説明書をよく
お読みください。 お読みになった取扱説明書はなくさないように大切
に保管してください。
フルセット SNB-48 /
ユーザーズセット SNB-48CVS 取扱説明書
Full Set SNB-48 /
Users Set SNB-48CVS Instruction Manual
Thank you very much for purchasing this product. Kindly read the
contents of the Instruction Manual to ensure the safe and long-term
use of your harmonica. Store the manual in a safe location to prevent
loss after reading it.
ENGLISH P.18 ~
Advertisement
Chapters
Table of Contents

Subscribe to Our Youtube Channel
Related Manuals for Suzuki SHINOBIX SNB-48CVS


Summary of Contents for Suzuki SHINOBIX SNB-48CVS
- Page 1 ENGLISH P.18 ~ フルセット SNB-48 / ユーザーズセット SNB-48CVS 取扱説明書 Full Set SNB-48 / Users Set SNB-48CVS Instruction Manual この度は本製品をお買い上げいただきまして誠にありがとうございま Thank you very much for purchasing this product. Kindly read the す。 本製品を末永く安全にご使用いただくため、 この取扱説明書をよく contents of the Instruction Manual to ensure the safe and long-term お読みください。...
- Page 2 お客様へのお願い / CAUTION リードは折れる場合がございます。 折れたリードを飲み込ま Laufe der Zeit können die Stimmzungen durch Materialermüdung zerbrechlich werden. Sollte eine Stimmzunge abbrechen, ないようにご注意ください。 演奏前に、 取扱説明書に記載の passen Sie bitte auf, dass sie keine der Fragmente einatmen リードに関する注意事項を必ずご確認ください。 oder verschlucken. Bitte lesen Sie vor der ersten Benutzung die Bedienungsanleitung.
-
Page 3: Table Of Contents
目次 忍 SHINOBIX web ガイド QR コードから 「忍 SHINOBIX web ガイド」 へアク 安全にお使いいただくために ...............3 セスしていただけます。 分かりやすい動画で使い 1. はじめに ....................4 方をご紹介しています。 ぜひご覧ください。 1-1 本製品について ......................4 1-2 セット内容........................5 1-3 主な仕様・各部の名称 .....................5 1-4 スズキクロマチックハーモニカ本体を使用することができます ....6 2. 本製品の使い方 ..................7 2-1 演奏方法 ........................7 2-2 音配列について ......................8 2-3 バルブについて ......................8 2-4 マイクを使用する ......................9 3. -
Page 4: 安全にお使いいただくために
安全にお使いいただくために 通常のお手入れについて 注 意 安全に末永くご使用いただくため以下の指示を必ずお守りください。 演奏後は穴を下に向けて軽く振り、 たまった水を抜きましょう。 やわらかい布でから拭きする か、 ハーモニカ除菌クリーナー(HAC-01) や消毒用エタノールを含ませた布できれいにしま 演奏の前に しょう。 本紙に記載の無い薬品や溶剤などを使ってのお手入れは、 製品を傷める恐れがありま 手を洗い、 口をきれいにすすぎましょう。 また1音ずつゆっくり鳴らしてみて、 音程がおかしく すので絶対にしないでください。 お手入れ後はケースにしまって保管してください。 ないか確認しましょう。 通常より音程が大きく下がっている音があれば、 リードが折れている 可能性があります。 その場合、 使用しないでください。 リードに関する注意事項 異物を入れないでください リードは折れることがあります 吹口やすき間に異物を入れないでください。 故障 ・ 破損の原因になります。 ハーモニカは内部で 「リード」 と呼ばれる小さな金属の板が振動し、 音が鳴る仕組みです。 リー カバーを強く押さないでください ドは使用頻度や吹く息の強さによって金属疲労で音が下がったり、 亀裂が入ったり、 また折れ たりすることがあります。... -
Page 5: はじめに
1. はじめに 1-1 本製品について 忍SHINOBIXはハーモニカとサイレンサー (消音器) の2つのパーツで構成され、 簡単に着脱することができます。 サイレンサーは 内部がらせん構造になっており、 小型ながらも高い消音性能を発揮します。 サイレンサーのみを持たないでください 片手で持ったり、 サイレンサーのみを持ったりせず、 両手で持ってください。 本体とサイレンサーが外れ、 製品が落下 ・ 破損するだけでなく、 ケガの恐れがあ り危険です。... -
Page 6: セット内容
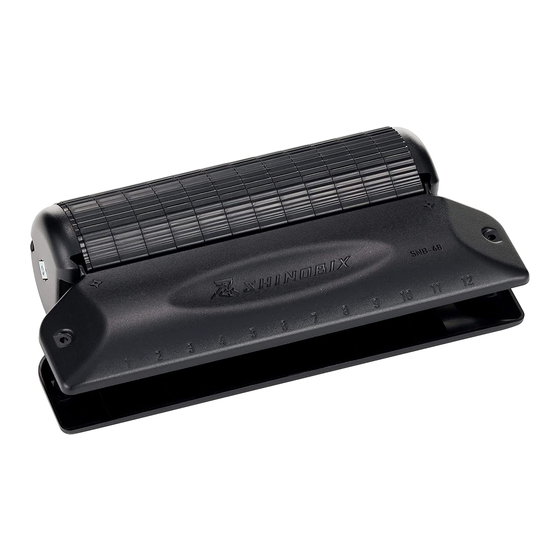
1-2 セット内容 ご購入後そのまま演奏できるフルセット 【SNB-48】 と、 ハーモニカ本体が付属していないユーザーズセット (交換用セット) 【 SNB- 48CVS】 があります。 SNB-48 (フルセット) SNB-48CVS (ユーザーズセット) サイレンサー サイレンサー ハーモニカ 上下カバー セミハードケース カバー留めネジ×2セット セミハードケース カバー 1-3 主な仕様・各部の名称 サイレンサー (消音器) 音 域 : 12穴48音 c ~ d スライド式クロマチック カバー留めネジ スライドアクション : ロングストローク (クロス配列) サイレンサー組立ネジ 材 質 : カ バー ・ サイレンサー ・ ボディ/ ABS 寸 法... -
Page 7: スズキクロマチックハーモニカ本体を使用することができます
1-4 スズキクロマチックハーモニカ本体を使用することができます 忍SHINOBIXはフルセットでご使用いただくほか、 カバーとサイレンサーをスズキ12穴クロマチックハーモニカの本体 ※ に取り付 けてご使用いただくことが可能です。 そのため、 現在お使いいただいているお気に入りのモデルでもサイレンサーをご使用いただ けます。 ※ 本体が使用可能な機種(2019年9月現在) スズキ12穴クロマチックハーモニカ SCX-48/G-48/G-48W/S-48S • ハーモニカ本体のみの販売はしておりません。 • SNB-48(フルセッ ト)に付属している本体はSCX-48と同様のものです。 フルセットSNB-48をご購入された方 「2. 本製品の使い方」 ( P.7) へ « « フルセットSNB-48を購入し、 他のハーモニカ本体を使用したい方 「3-1 サイレンサー (消音器)の着脱」 ( P.10) → 「3-3 ハーモニカカバーの着脱」 ( P.13) へ « « ユーザーズセットSNB-48CVSをご購入された方 「3-3 ハーモニカカバーの着脱」 ( P.13) → 「3-1 サイレンサー (消音器)の着脱」 ( P.10) へ «... -
Page 8: 本製品の使い方
2. 本 製品の使い方 2-1 演奏方法 右の図のように手に持ち、 ハーモニカをくわえ、 吹き吸いとスライドレバー操作により音を 出します。 サイレンサーによる消音効果で、 音量を抑えることができます。 Y 楽器の特性上、 通常のクロマチックハーモニカと吹奏感が異なります。 Y 上カバーを強く押さえると、 サイレ ンサーが外れる場合があります。 Y 本製品は完全に無音にするものではございません。 演奏の際は近隣のご迷惑にならないようにお気をつけください。 Y 片手で持ったり、 サイレ ンサーのみを持ったりしないでください。 本体とサイレ ンサーが外れ、 製品が落下 ・ 破損するだけでなく、 ケガの恐れがあり危険です。 演奏のコツ 低音と高音は初めての方には特に出しにくい音です。 ( 低音を鳴らすためには空気をゆっくり多く、 高音を鳴らすため には早くリードへ送らなければなりません。 ) また、 音色も口の形によって変化します。 初めのうちは正しく音が出せ ないかもしれませんが、... -
Page 9: 音配列について
2-2 音配列について 1つの穴でスライドレバーを戻したままの 「吹き」 と 「吸い」 、 レバーを押したときの 「吹き」 と 「吸い」 でそれぞれ異なる音が出ます。 平常時 レバーを押した時 2-3 バルブについて クロマチックハーモニカのプレートには 「バルブ」 と呼ばれている空気弁がついています。 バルブはとても薄く不用意 に触れるとすぐに折れたり、 曲がったりしてしまうので扱いには注意が必要です。 冬期など寒い時にハーモニカを吹いた場合、 息の水分でプレートとバルブの間に水がたまり、 バルブがプレートに貼 り付くことがあります。 バルブを使用しているハーモニカは全てこのような現象が起きますが、 故障ではありません。 バルブが貼り付かないよう、 冬期は体などでハーモニカを温めてから使用すると良いでしょう。 右のQRコードから、 webで解説動画をご覧いただけます。 Y 特に本製品は消音効果を高めるため、 通常の製品よりも密閉性が高く、 上記の現象が起こりやすくなっ ています。 «... -
Page 10: マイクを使用する
2-4 マイクを使用する 本製品はハーモニカマイクHMH-100 (別売) を装着することが可能です。 マイクで収音した 音をヘッドホン等でモニターすることで、 通常の演奏時と同じ音圧で音を聴くことができ ます。 サイレンサー背面にマイク装着部があります (左右2 ヵ所) 。 右図のように、 どちらかの装 左 着部からマイクをサイレンサー内部に差し込んでください。 右 溝にコードを引っ掛けて固定してください。 Y マイ クを外す時は、 取り付けと逆の手順で行っ て ください。 « Y 左側は低音、 右側は高音を多く拾います。 好みで左右のマイ ク装着部を使い分けて ください。 « Y マイ クを使用しない時は、 マイ クを外して ください。 « コードを強く引っ張らないでください... -
Page 11: お手入れの方法
3. お手入れの方法 作業は必ず机の上で行ってください 3-1 サイレンサー ( 消音器 ) の着脱 クリーニング時やサイレンサーを他のハーモニカ本体に付け替える際には、 サイレンサーを取り外してください。 取り外すとき 図のようにサイレンサーを持ち、 上カバーにある2 ヶ所の マーク マーク マーク マークをゆっくりと押しながら、 ハーモニカをスライドさ せます。 半分程度ずらすと外れます。 突起がある方 (上カバー側) 突起がある方 (上カバー側)... - Page 12 装着するとき ハーモニカをサイレンサーと半分程度ずらした位置に乗 マーク マーク マーク せます。 下カバー (マークの裏辺り) をゆっくりと押しながら、 ハーモニカをスライドさせます。 止まるまで押してくだ さい。 正しい向きで取り付けてください サイレンサーには向きがあります。 向きが間違っていると取り付け 突起がある方 られません。 無理に取り付けると、 故障 ・ 破損の原因になります。 (上カバー側) 突起がある方 (上カバー側) サイレンサー (消音器) 取り付け面 突起がある方が上カバー側です...
-
Page 13: サイレンサー ( 消音器 ) のお手入れ
3-2 サイレンサー ( 消音器 ) のお手入れ 汚れがひどくなる前に、 定期的に分解してクリーニン グしましょう。 サイドカバー 左右同じ形状です。 サイレンサー (消音器) とハーモニカを外します。 「3-1 サイレンサー (消音器)の着脱」 ( P.10) をご覧く サイレンサー組立ネジ « « サイレンサーの右側にネジ、 ださい。 左側にナットを取り付けます。 サイレンサー組立ネジを外し、 分解します。 (プラスドライバー No.2) 部品がバラバラになりますので、 なくさないように セル 12個すべて、 同じ形状です。 注意してください。 同じ向きに揃えます。 部品を洗浄します。 エンドカバー 樹脂製部分は水洗いできます。 洗浄後は水分をよく 突起がある方... -
Page 14: ハーモニカカバーの着脱
3-3 ハーモニカカバーの着脱 クリーニング時や楽器の調整、 カバーを他のハーモニカに付け替える際などにカバーを外します。 外すとき サイレンサー (消音器) とハーモニカを外します。 「3-1 サイレンサー (消音器)の着脱」 ( P.10) をご覧ください。 « カバー留めネジを緩め、 カバーを外します。 ( プラスドライバー No.1) 付けるとき カ バー留めネジを軽く締め、 ハーモニカ本体にカバーを取り付けます。 軽く押す 上カバーにはネジ、 下カバーにはナットを入れます。 ネジを締めこむ前に、 サイレンサー (消音器) を装着します。 「3-1 サイレンサー (消音器)の着脱」 ( P.10) をご覧ください。 « この隙間が小さくなる 右図のようにハーモニカ本体を軽く押し、 サイレンサーと本体の間に大きな隙間ができな ように調整する。 いように調整してください。... - Page 15 ユーザーズセットSNB-48CVSをご購入された方、 またはハーモニカ本体を交換する方は、 まずお手持ちのハーモニカ ※ のカバーを外し、 バル ブ接着剤の処理をしてください。 ※ 本体が使用可能な機種 (2019年9月現在) スズキ12穴クロマチックハーモニカ SCX-48/G-48/G-48W/S-48S • ハーモニカ本体のみの販売はしておりません。 • SNB-48(フルセッ ト)に付属している本体はSCX-48と同様のものです。 記載の機種以外には使用しないでください 記載の機種以外に使用すると、 変形や破損する恐れがあります。 また十分な消音効果が得られない場合があります。 バルブ接着剤の処理について カバーの密着性を高めるため、 右図のようにバルブ接着剤のはみ出しが大きい場合は、 次 の処理をしてからカバーを取り付けましょう。 2mm すべてのバルブを確認し、 吹き穴側から見て左側に出ている部分、 吹き穴側との間が 2mm以上出ている部分を、 カッターナイフなどで削り取ります。 下プレートも同様に処理 上プレート を行ってください。 下プレート 注意して作業を行ってください カッターナイフなどでけがをしないように注意して作業を行ってください。 また、 バルブ を曲げないように注意して作業を行ってください。 Y SNB-48 (フルセッ ト) に付属している本体は、 上記処理が施されています。 «...
-
Page 16: Q&A
4. Q&A Q. 消音効果はどのくらいあるの? 音圧レベル (dB) 忍SHINOBIXサイレンサーは、 強い息で演奏した際により大きな効果 を発揮します。 地下鉄の電車 一般的なクロマチックハーモニカの音圧を100%とした場合と比較し、 約20%程度の音圧にまで軽減します。 これはデシベル換算において、 目覚まし時計 普通の息量の時80 ~ 90dBの音圧を60 ~ 70dBまで軽減しています。 Y 騒音計から約50cmの距離にて測定 (当社比較調査) 。 « 普通の会話 Y デシベル (dB) は音圧や音の強さを表す単位で、 値が高いほど大きな音になります。 « Y 本製品は完全に無音にするものではございません。 演奏の際は近隣のご迷惑にな « 図書館内 らないようにお気をつけください。 一般的な クロマチックハーモニカ 葉のふれあう音 忍 SHINOBIX 最小... - Page 17 Q. スライドの動きがわるくなった クロマチックハーモニカのスライド部 (レバー部分) は非常に狭い隙間を動いています。 そのため一定期間使用すると唾液や 汚れが付着し、 次第にスライドの動きが悪くなってきます。 そのような場合、 マウスピース部分を掃除してください。 1. ハーモニカ除菌クリーナー (HAC-01 : 別売、 又は消毒用エタノール) とガーゼを用意します。 2. ハーモニカのボディ部分のカバー、 マウスピース部分のネジに合う小型ドライバーを用意します。 3. マウスピースの両側のネジを外し、 分解します。 [分解図] Y 分解する際、 ネジやシリコンチュー ブなどの細かい部品をなく さないように注意して ください。 « Y 重なっ ている部分の順序、 方向をよく覚えておきましょう。 « ネジ 4. ハーモニカ除菌クリーナーを含ませたクロスを使って、 それぞれの部品に 付着している汚れを拭き取ります。 マウスピース 汚れが酷い場合はぬるま湯に数分つけてから、 食器用洗剤と歯ブラシ等を シリコンチューブ...
- Page 18 Q. 着脱がかたくなった・ゆるくなった ハーモニカとサイレンサーの着脱がスムーズにいかない場合は、 サイレンサー組立ネジの締め付けの強弱を調整すると改善 されます。 「3-1 サイレンサー (消音器)の着脱」 ( P.10) をご覧ください。 « « その他ハーモニカに関するQ&AをスズキWEBサイトでもご紹介しています。 ハーモニカのしくみや吹き方、 練習に使える無料の楽譜などの情報が満載です。 www.suzuki-music.co.jp...
- Page 19 1-2. Set Descriptions ..................21 1-3. Main Specifications and Part Names ............. 21 1-4. Can Now Be Used with Suzuki Chromatic Harmonicas ......22 2. How to Play the Harmonica ..........23 2-1. Playing the Harmonica ................23 2-2.
-
Page 20: Ensuring The Safe Use Of Your Harmonica
After playing, tap out the harmonica in the palm of your hand, and then wipe it with a soft, harmonica from damage. lint-free cloth. For more thorough cleaning, wipe with a cloth dampened with HAC-01 (Suzuki Before playing Harmonica Sterilization Cleaner) or ethanol to disinfect it. Do not use any chemicals or solvents other than those listed here to clean your harmonica. -
Page 21: Foreword
1. Foreword 1-1. Product Descriptions SHINOBIX harmonicas consist of two parts; the harmonica and the silencer. They are easily fitted together. The inside of the silencer is spiral-shaped, and provides high levels of silencing performance despite its compact size. Do not hold the harmonica only by the silencer. Do not hold it in one hand or hold it only by the silencer, but hold it in both hands. -
Page 22: Set Descriptions
1-2. Set Descriptions There are two sets available, the SNB-48 Full Set that can be played immediately after purchase, and the SNB-48CVS Users Set that does not include the harmonica (part replacement set). SNB-48 (Full Set) SNB-48CVS (Users Set) Silencer Silencer Harmonica Upper and lower covers... -
Page 23: Can Now Be Used With Suzuki Chromatic Harmonicas
1-4. Can Now Be Used with Suzuki Chromatic Harmonicas In addition to using the SHINOBIX with the Full Set, it is also possible to use the covers and silencer with Suzuki 12-hole Chromatic Harmonicas*. This enables the silencer to be used with the favorite models in your possession. -
Page 24: How To Play The Harmonica
Helpful Tips On Playing Your Suzuki “Chromatic” Harmonica The upper and lower registers of chromatic harmonica are particularly sensitive to the amount of air needed to produce these notes. -
Page 25: Note Positions And Relationships
2-2. Note Positions and Relationships Blowing and sucking single holes with the slide lever released will produce different tones to when blowing and sucking with the slide lever pressed. Slide Out Slide In 2-3. About the Valve In a chromatic harmonica, each reed has an air valve underneath it. If you look into the back of the instrument you will see the draw reeds and the valves on the blow reeds. -
Page 26: Using A Microphone
2-4. Using a Microphone The HMH-100 harmonica microphone (sold separately) can be attached to the product. Monitoring the tunes recorded with the microphone on headphones, etc., allows you to listen to the music at the same acoustic level as when you are actually playing. There are clips for attaching the microphone on the rear of the silencer (two locations on Left the left and right). -
Page 27: Cleaning And Maintenance
3. Cleaning and Maintenance Perform the following tasks over a table or desktop without fail. 3-1. Attaching and Detaching the Silencer The silencer must be removed for cleaning purposes and when attaching it onto a different harmonica. Detaching the Silencer Grip the silencer as shown in the illustration, slowly press Marks Marks... - Page 28 Attaching the Silencer Place the harmonica approximately half way along the Marks Marks Marks silencer. Slide the harmonica while slowly pushing the lower cover. Continue pushing until it will go no further. Make Sure the Silencer is Attached Facing in the Correct Direction The silencer has a correct and incorrect direction.
-
Page 29: Cleaning The Silencer
3-2. Cleaning the Silencer You are advised to periodically dismantle and Side Cover clean the silencer before it gets too dirty. The same shape on the left and right. Detach the silencer from the harmonica. Silencer Assembly Screw « See “3-1. Attaching and Detaching the Silencer” «... -
Page 30: Attaching And Detaching The Harmonica Covers
3-3. Attaching and Detaching the Harmonica Covers Detach the covers when cleaning or adjusting the instrument, and when attaching the covers to another harmonica. Detaching Detach the silencer from the harmonica. « See “3-1. Attaching and Detaching the Silencer” (P. 26) Loosen the cover screw and remove it. - Page 31 * Compatible Models (As of September 2019) Suzuki 12-Hole Chromatic Harmonicas SCX-48/G-48/G-48W/S-48S • The comb and read plates are not sold individually. • The harmonica included in the SNB-48 (Full Set) is the same as the SCX-48.
-
Page 32: Q&A
4. Q&A Q: What level of silencing can be expected? Volume Level (dB) The harder the harmonica is blown, the larger the silencing effect of the SHINOBIX silencer. Subway train When compared to the normal volume of a chromatic harmonica calculated at 100%, the volume will be reduced by approximately Alarm clock 20%. - Page 33 Q. Slide movement has deteriorated The slide lever moves around in a very narrow gap. After playing for a while, moisture and residue from your breath builds up on the slider and makes it sticky, reducing the efficiency of the slide action. To make the slide move freely again, please clean the mouthpiece and slider as follows.
- Page 34 Q: The silencer is too tight (too loose) when attached If you have difficulty attaching and detaching the silencer smoothly, either loosen or tighten the silencer assembly screws to adjust and improve it. « See “3-1. Attaching and Detaching the Silencer” (P. 26) «...
- Page 36 〒 430-0852 静岡県浜松市中区領家 2-25-12 TEL (053) 461-2325 2-25-12 Ryoke Naka-Ku Hamamatsu Japan w ww. s u zuk i -mus i c.co.jp 9106-1B-MAS-MM-266-A 00457-10112...
Need help?
Do you have a question about the SHINOBIX SNB-48CVS and is the answer not in the manual?
Questions and answers