Advertisement
Quick Links
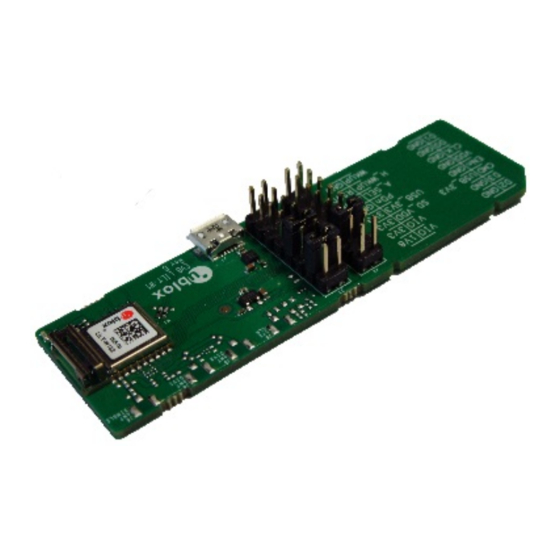
Quick Start EVK-LILY-W1
1. Overview
1 (EVB)
4a (SD card
4b (Micro-USB)
connector)
2a (SDIO)
UBX-15031003 - R01
3 (U.FL antenna connector J6
- For EVK-LILY-W131 only)
5 (Power LED)
2b (USB)
2. Setup
Download the latest EVK-LILY-W1 documentation
from www.u-blox.com/evk-downloads.
1. Build and install the Linux drivers and
configuration tools as per the User Guide.
2. Select SDIO or USB interface through jumper
settings. The I/O voltage is set to 3.3 V by
default.
a. For SDIO (2a): Bridge J2 7=8 and J3 5=6
b. For USB (2b): Bridge J2 5=6 and J3 7=8
3. For EVK-LILY-W131: Connect one antenna
with U.FL connector to the antenna
connector J6 (3).
4. Connect the EVB (1) to the host either by:
a. Inserting the EVB with the SD card connec-
tor (4a) into an SDIO capable slot or
b. Connecting a USB cable from the host to
the micro-B connector J7 (4b) on the EVB.
5. Power LED (5) is green.
Advertisement

Subscribe to Our Youtube Channel
Related Manuals for Ublox EVK-LILY-W1


Summary of Contents for Ublox EVK-LILY-W1
- Page 1 Quick Start EVK-LILY-W1 1. Overview 2. Setup 3 (U.FL antenna connector J6 - For EVK-LILY-W131 only) Download the latest EVK-LILY-W1 documentation 1 (EVB) from www.u-blox.com/evk-downloads. 1. Build and install the Linux drivers and configuration tools as per the User Guide.
- Page 2 The evaluation kit is available for internal (LULA). antenna and antenna pin variants of the Refer to the EVK-LILY-W1 User Guide for a LILY-W1 module. The EVK-LILY-W131 for description of how to build and install the the antenna pin variant includes a U.FL coax- drivers and basic usage examples.
Need help?
Do you have a question about the EVK-LILY-W1 and is the answer not in the manual?
Questions and answers