Advertisement
Quick Links
Advertisement

Related Manuals for Javes JCD-720P


Summary of Contents for Javes JCD-720P
- Page 1 JAVES JCD-720P LED & LCOS Projector User Manual...
-
Page 2: Important Safeguards
IMPORTANT SAFEGUARDS 1.Please read and understand all safety instructions in the manual and keep it appropriately for future reference. 2.Don’t look directly into the lens when the lamp is turned on. Serious damage to your eyes could result. 3.Refer all service to qualified service personnel. - Page 3 these requirements before attempting to use the unit. If the voltage fluctuates more than 10% or in an unstable voltage and possible power-off area, you’re suggested to use the Automatic Voltage Regulator, SPD, or UPS to connect the power cable. 6.Don’t put the projector on an unstable cart, stand or table.
- Page 4 Please keep the projector at least 50 cm away from wall and make sure that the air is circulating around the projector. ②.Hot places like in a car with window closed. ③.The places with excessive moisture, dirt, dust, fog or others which will pollute the optics components, shorten the service life and make the screen get darker.
- Page 5 10. Don’t put projector on blankets, pads or other soft coverings that may block the vents. 11.Don’t cover the projector with cloth or other materials. 12.Don’t put any inflammable material nearby the projector. 13. The thermovent should never be covered blocked.
-
Page 6: Brief Introduction
16.Don’t set liquids on the projector. Spilled liquids may damage your projector. In case the projector get wet by liquids, unplug it and call the authorized service center for servicing. Brief introduction Outstanding features: 1. . . . Small size design enhances the portability 2.... - Page 7 Inventory: 1- Projector 1- Remote control 1- AV cable 1- VGA cable 1- Operation manual 1- Warranty card Optical SPEC : Panel Lcos Light output 60 Lumen ( screen lumens) (ANSI Lumens) 300 lumens ( lamp output) Contrast 150:1 ratio Projection 8 ~...
- Page 8 Supported 4:3 16:9 Aspect Ratio Video Input HDMI VGA CVBS supported LED lamp LED(OSRAM) 25w LED life >30000h Keystone Lens +13.8 ~ -2.8° POWER Input AC100 ~ 240V 50/60 Hz ADAPTER Output DC19V, 3A Typical POWER 30W Weight 0.8kg...
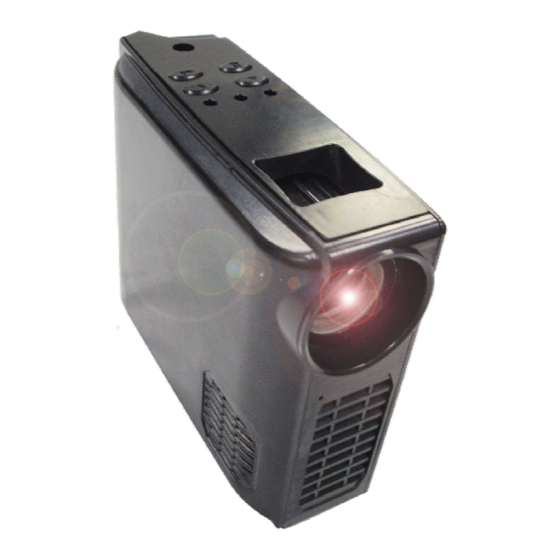
- Page 9 Projector appearance illustration:...
- Page 10 Part names: : : : 1 1 1 1 、 、 、 、 UP UP UP UP button button button button 2 2 2 2 、 、 、 、 DOWN button DOWN button DOWN button DOWN button 3 3 3 3 、 、 、 、 ENU button ENU button ENU button...
- Page 11 5 5 5 5 、 、 、 、 REMOTE CONTROL SENSOR REMOTE CONTROL SENSOR REMOTE CONTROL SENSOR REMOTE CONTROL SENSOR 6 6 6 6 、 、 、 、 FOCUS RING FOCUS RING FOCUS RING FOCUS RING 7 7 7 7 、 、 、 、 LENS LENS LENS LENS...
- Page 12 size: : : :...
- Page 13 CONNECTION: : : : When connecting signal source to projector, make sure that: 1. The equipments are turned off before any connecting. 2. Using correct signal cable for every signal source. 3.Make sure you connect the power cord firmly into the DC socket. The projector has 3 input interfaces, which are HDMI input, VGA input, CVBS input.
- Page 14 HDMI cable is needed if laptop or PC don’t have HDMI interface itself.) 2.Connect the other end of HDMI cable to projector。See pictures below: 3.Adjust the resolution on the second screen to 1280x768 and refresh rate to 60HZ, extend the first screen to the second screen.
- Page 15 Click the second screen, adjust the resolution to 1280x768 and checked at the box“ ”...
- Page 16 Click button, then click button, the menu is as follows : Set into 60HZ.
- Page 17 click the screen shows as:set nView nView nView as nView...
- Page 18 set into mode as follows and click”确 认”...
- Page 19 VGA input: : : : Connecting projector to laptop or PC: 1.use VGA cable, connect one end of the cable to laptop or PC.(1.If laptop or PC...
- Page 20 has two VGA interfaces, and you need a dual view, then graphic card needs to have same setting as in HDMI input. 2. If the projector has DVI to VGA cable, and you need a dual view, then graphic card also needs to have same setting as in HDMI input.
- Page 21 2.Connect the other end of S-VIDIO to AV cable to projector as follow: 3.If video source output is CVBS signal, then connect directly as follow: 4.Set the graphic card in dual view or copy view, following the same way as in HDMI input.
- Page 22 Operation: Start the projector Start the projector: : : : Start the projector Start the projector 1.Plug the DC cable into the side of the projector, and then plug the AC cable into your electrical outlet. The Lamp LED on adapter lights on.
- Page 23 7.Turn on your computer. Make sure your laptop’s external video port is activated. 8.If the video source is active, press the source button on the keypad to display your computer’s image. OSD menu: : : : The projector has OSD menu that allow you to make image adjustments and change a variety of settings.
- Page 24 : : : : Remote control Remote control Remote control Remote control...
- Page 25 : Source buttons : Close menu/return buttons : UP/DOWN buttons : ENTER button : Reset button : Keystone button...
-
Page 26: Picture Menu
OSD function: : : : ⑴ ⑴ ⑴ ⑴ Press Menu button to open it Picture menu... - Page 27 CONTRA RA RA RAST ST ST ST CONT CONT CONT BRIGHTNESS BRIGHTNESS BRIGHTNESS BRIGHTNESS COLOR COLOR MODE COLOR COLOR MODE MODE MODE SCALE SCALE SCALE SCALE UP/DOWN buttons Close menu/return buttons Enter button ⑵ ⑵ ⑵ ⑵ Press ENTER button to next page in menu...
- Page 28 System System menu menu System System menu menu OSD LANGUAGE OSD LANGUAGE OSD LANGUAGE OSD LANGUAGE DURATION DURATION DURATION DURATION HALFTONE HALFTONE HALFTONE HALFTONE INFORMATION INFORMATION INFORMATION INFORMATION...
-
Page 29: Source Menu
MOMORY RECALL MOMORY RECALL MOMORY RECALL MOMORY RECALL Up/down button Close menu/return Enter button ⑶ ⑶ ⑶ ⑶ Press ENTER button to next page in menu SOURCE MENU... - Page 30 SOURCE SOURCE SOURCE SOURCE Up/down button Close menu/return Enter button...
-
Page 31: Maintenance
⑷ ⑷ ⑷ ⑷ Press ENTER button to picture menu MAINTENANCE: : : : Clean the lens Clean the lens Clean Clean the lens the lens You can clean the lens when it has stain or dust on surface: 1、Use compressed-air tank to clean the dust 2、Using lens-wiping paper or soft clean cloth to lightly wipe it. - Page 32 Clean projector shell Clean projector shell Clean projector shell Clean projector shell Turn projector unplug projector from wall outlet before clean. 1.Use soft, non-piling cloth to wipe. 2.Use water and neutral detergent to wet the soft cloth and wipe the shell. (...
- Page 33 2.Take out batteries in remote control. 3.Use the original packing or the packing in same material to pack projector Transport projector Transport projector Transport Transport projector projector Transport projector in a manufacture - supplied case or the same packing.
- Page 34 Problem solution: : : : P P P P ossibl ossibl ossibl ossible e e e solution solution solution solution r r r r eason eason eason eason Problem power connection connect the projector projector projector projector is not well power cord well.
- Page 35 lens cap is not open lens cap no image no image no image no image open Len is out of Use focusing focus. ring to bring image is not image is not image is not image is not into focus. clear clear clear...
Need help?
Do you have a question about the JCD-720P and is the answer not in the manual?
Questions and answers