
Related Manuals for RCA P50M


Summary of Contents for RCA P50M
- Page 1 Mini Projector User’s Guide with Integrated Multimedia Player Please read this manual before Model P50M...
-
Page 2: Table Of Contents
Table of Contents 1. Table of Contents---------------------------------1 2. Warnings-----------------------------------------2 3. Accessories---------------------------------------3 4. Overview-----------------------------------------4 5. Remote Control Functions-------------------------5 6. General Operation---------------------------------6 a. Startup and Shutdown------------------------6 b. Positioning-----------------------------------6 d. A/V Input------------------------------------8 t s i - - - - 7. Media Player-------------------------------------10-12 8. USB On-The-Go Data Transfer---------- -------- 13 &... -
Page 3: Warnings
WARNINGS Important Safety Instructions Caution: To prevent electric shock, match the wide blade on the power cord plug to the wide slot on an electrical to replace the obsolete outlet. Do not modify the power cord plug, or you will bypass this safety feature. 1. -
Page 4: Accessories
Accessories Remote Control Power Adapter Composite A/V Cable VGA Cable USB Cable Rubber Stand Carrying Bag... -
Page 5: Overview
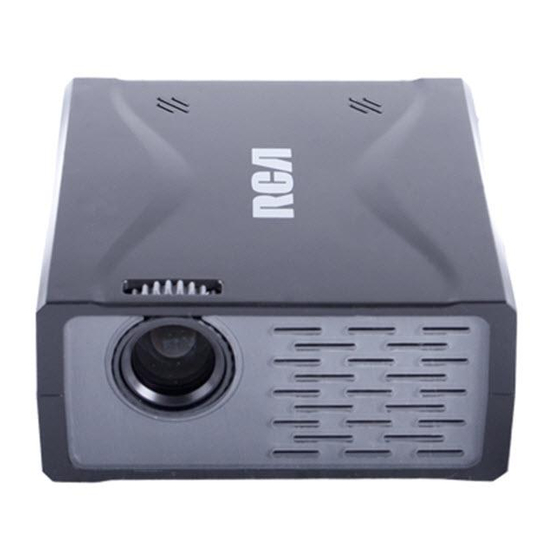
Overview Front View PROJECTION LENS FOCUS ADJUSTMENT Rear View POWER BUTTON SD CARD HEADPHONE OUTPUT OUTPUT POWER INPUT VGA INPUT... -
Page 6: Remote Control Functions
Remote Control Functions Power O /On Exit Menu=Enter, Ok Horizontal Switch Signal Source Mirror Image Mute Sound Volume Up Volume Down... -
Page 7: General Operation
Startup and Shut down – To start up, connect the power adaptor to the rear power input and plug in the adaptor. Press the power button, and the welcome logo will appear as the P50M starts. To shut down, hold the power button for 3 seconds until the optical engine turns o . - Page 8 VGA signals. Important: Be sure to setup the computer to enable video signal output. If you are using the P50M Mini Projector as an external monitor on Windows based systems, this can be done by selecting “extend my desktop to this monitor”...
-
Page 9: A/V Input
General Operation To connect an A/V cable: Insert the 3.5mm portion into the A/V port of the projector and insert the male end of the source device’s A/V cables into the 3.5mm A/V cable adaptor. Then click on either the “A/V input” icon in the main menu, or press “source”... - Page 10 Focus Adjustment/Throw Distance The focus can be adjusted by turning the wheel located at the front of the projector. The projector is capable of the following throw and focus distances: Focus Dial Diagonal Diagonal Vertical Horizontal Throw size size size size distance (inch)
-
Page 11: Media Player
Media Player AVI, JPG. For supported video encoding please see Pictures and videos can be accessed via an SD memory card, MultiMedia on the back of the projector. Power on the projector and select “SD Card”. The SD Card submenu will appear. - Page 12 Media Player Viewing Photos – To view photos click on the “Photos” icon in the submenu. This will display all photos available on the SD Card. Click on a photo to display photos in the slideshow mode. While in slideshow mode you can scroll through photos by pressing the left or right buttons on the remote control.
- Page 13 Media Player Playing Videos – To play videos click on the “Video” icon in the submenu. video is large, please allow a few moments after a few minutes the projector is still unable to play the video, it may be an incompatible type.
-
Page 14: Usb On-The-Go & Data Transfer
To access data on your USB storage device, plug your USB device into the USB slot on the back of the P50M. Once the connection is made, select the USB Mode in the Home menu data will be available. After selecting USB Host you should now be able to access the data on the USB device through the Media Player. -
Page 15: Setup Menu
Setup Menu The Setup Menu can be accessed by clicking on the “Setup” icon in the main menu. Slide Show Settings – The slide show settings allow the user to change the speed, transition style, and display mode of the slide show. “Fit to screen” or “normal”... -
Page 16: Troubleshooting
Troubleshooting THE PROJECTOR DOES NOT TURN ON SOLUTION POSSIBLE CAUSES Check to ensure the power outlet or battery source is good. There is no power Check the power adapter to ensure a proper connection with the wall outlet as well as the projector. The projector is in the If you hear a fan, the unit is still running it’s cooling cycle. - Page 17 INPUTS / OUTPUTS PROJECTION SYSTEM Video In: Composite A/V (3.5mm Jack) Native Resolution: SVGA (800x600) PC / Laptop: 15 pin VGA (up to 1280x960) Brightness: 75 ANSI-Lumens Audio Out: 3.5mm Stereo Headphone Jack Contrast Ratio: 1000:1 USB: Standard/Type-A Noise: <20 dBA Control System: Infrared Remote Control Projection Lens: Manual Focus STORAGE CAPACITY SD/TF card reader...
-
Page 18: Warranty
Proof of warranty eligibility is required and must be presented to obtain warranty service. • Contact RCA Customer Care at (800) 274-3014. Our representatives will help you troubleshoot and diagnose the problem. If the issue cannot be resolved by our Customer Care Team, you will be issued an... - Page 19 Customer Care Center is staffed 24x7 with product experts that can assist you with any questions that may arise during setup and use of your RCA projector) • Installation and setup service adjustments • Damage caused by accident, abuse or misuse •...
- Page 20 If you purchased your product outside the USA or Canada: This warranty does not apply. Contact your dealer for warranty information. Please do not send any products to the Oregon address listed in this ©2011. All rights reserved. Model P50M T00000XXXX Printed in China...
Need help?
Do you have a question about the P50M and is the answer not in the manual?
Questions and answers