Advertisement
Quick Links
Advertisement

Related Manuals for Shimano SM-EC79


Summary of Contents for Shimano SM-EC79
- Page 2 English – Dutch – German – French – Spanish – 112 Japanese 113 – 134 Italian 135 – 156 Portuguese 157 – 178 Danish 179 – 200 Swedish 201 – 222 Greek 223 – 244 Finnish 245 – 266 Chinese 267 –...
-
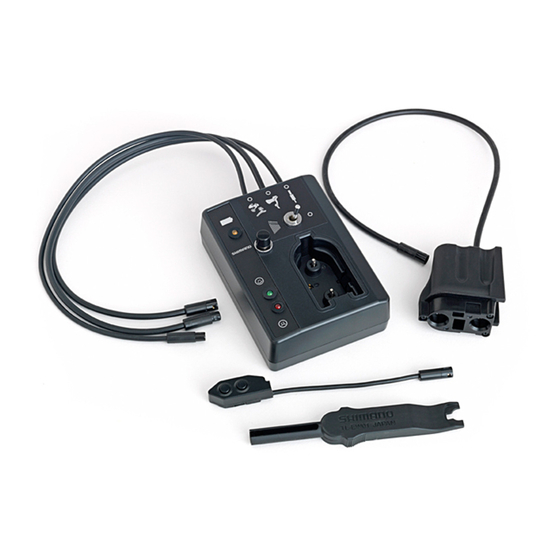
Page 3: Names Of Parts
SM-EC79 INDEX Gear shifting operation Gear shifting operation • • • • • • • • • • • • • • • • • • • • • • • • • • • • Installation Installation • • • • • • • • • • • • • • • • • • • • • • • • • • •... -
Page 4: Problem Location Procedure Using The Checker
Using the checker The two functions of this checker are to NOTE: determine locations of problems and to This checker may not be possible to change the switch directions. determine the locations of some types of problem. Problem location procedure using the checker Derailleur (front derailleur or rear No problem... - Page 5 Problem with front derailleur or rear derailleur continuity First remove the battery from the battery bracket, and then insert the battery into the checker. The power indicator will illuminate or flash. (If it illuminates, the battery can be used; if it flashes, recharge the battery.) * If there is no response from the checker when the battery is inserted into it, there may be a problem with the battery.
- Page 6 Disconnect the connector for the rear derailleur (front derailleur). Insert the derailleur connector of the checker into the rear derailleur (front derailleur). Press the ENTER switch on the checker. The check will start automatically and the judgment will be given. * To try actual operation, press the ENTER switch several times while turning the crank arm.
- Page 7 Using the checker Problem with SM-EW79A + ST-7970 operation Disconnect the connector for the SM-EW79A junction, connect the lever connector of the checker to the connector from SM-EW79A junction A, and then press the ENTER switch. SM-EW79A Junction A Adjustment button Adjustment LED Battery LED...
- Page 8 Before a further 10 seconds have passed, press the shifting switch for the ST-7970 lever. If there is no problem, the judgment indicator (green) on the checker will illuminate. If the green indicator does not illuminate when the switch is pressed, check the SM-EW79A.
- Page 9 Using the checker SM-EW79A check With the checker still connected to (A), connect the switch checker to (B). Press the ENTER switch. Press a switch on the switch checker, and check that the green indicator illuminates. • Green indicator illuminates - - - The SM-EW79A is OK.
- Page 10 Electric cable continuity check Disconnect all of the rear derailleur, front derailleur and junction A connectors. Connect the electric cable connector (5-wire) to the cable receptor of the checker, connect the electric cable to the component (rear derailleur connector, front derailleur connector or battery bracket) that you would like to check, and then press the ENTER switch on the main checker unit.
- Page 11 Using the checker For the battery bracket The green indicator will illuminate Battery bracket For the front derailleur or rear derailleur The green indicator will illuminate Front derailleur connector Rear derailleur connector The green indicators on the electric cable checker and the main checker unit will illuminate.
-
Page 12: Changing The Shifting Switch Direction
Changing the shifting switch direction * Make the mode selection while the power indicator is turned off or while the battery has been removed. Insert the battery into the checker. Check that the orange power indicator illuminates, and then continue to the next step of making the connections and carrying out the test. * If the indicator is flashing, the battery cannot be used and must be recharged. - Page 13 When the ENTER switch is pressed, the power indicator (orange) will illuminate, and the judgment indicator (green) and the judgment indicator (red) will flash alternately. (Orange) illuminates Transition to direction change mode in progress flash alternately Once the transition to direction change mode is complete, the three indicators on the main checker unit will alternately indicate the shifting switch which shift gears to the outside for the left and right ST-7970 levers.
- Page 14 Changing the shifting switch direction During this mode, press the shifting switch that you would like to use for shifting gears toward the outside. Depending on the input, the outside indication will change according to the Outside Outside following pattern. direction direction The directions of the shifting switches will...
Need help?
Do you have a question about the SM-EC79 and is the answer not in the manual?
Questions and answers