
Related Manuals for Drinkpod 100 Series


Summary of Contents for Drinkpod 100 Series
- Page 1 SERIES (SW5K) OWNER MANUAL Please read this manual carefully prior to operating your Drinkpod. Retain for future reference.
- Page 2 Child Supervision • WARNING: To avoid any hazards due to instability of the appliance, it must be installed, Never store or expose your Drinkpod in an Unsupervised children should not be allowed to maintained, and repaired, in accordance with environment less than 32 ℉.
- Page 3 Water Filtration System Setup & Getting Started Table of Removing/Replacing Filters Contents Flushing Filters Indicator Lights Safety, Caution, & Usage Filter Cycles What’s Included Maintenance Notes Features & Specifications...
- Page 4 What's included...
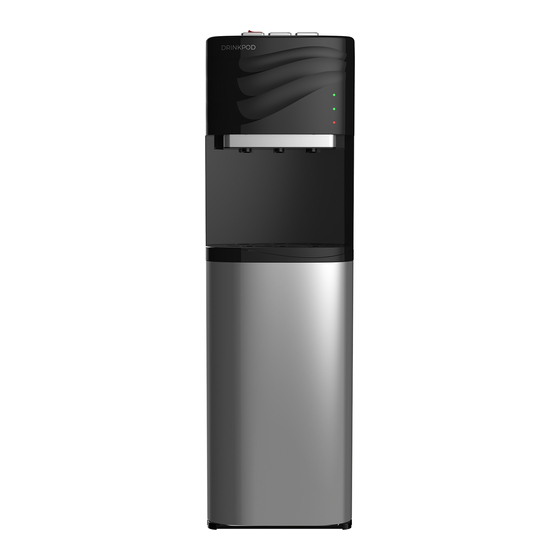
- Page 5 Hot Water Dispenser Button (w/Safety) Service & Support Letter Top Cover Feedback Request Letter Status Indicator Lights Owner Manual Water Dispensers 100 Series Drinkpod (SW5K) Filter Access Door Condenser Coils Cooling Mode Switch Heating Mode Switch Power Cable (Not Shown) Hot Water Outlet (Drain)
- Page 6 Features Model SW5K Rated Power 520 Watts & Specs Heating Power 420 Watts Refrigeration Power 90 Watts Water Production Power 10 Watts Rated Pure Water Flow 0.32 gal/min [43.5 psi] (1.2 L/min [0.3 MPa]) Deliciously Pure & Healthy Water Four stage, high precision filtration and purification to ensure Hot Water Production &...
- Page 7 water Filter system Cold Water Tank Solenoid Ambient Water Outlet Valve Post Sediment Cold Water Outlet Carbon Membrane Carbon Filter Filter Filter Block Hot Water Outlet Hot Water Tank Inline & Purification Flowchart Reducing Valve Drain Water Water Inlet...
- Page 8 Optimally a kitchen sink. • 1x Pair Of Pliers • 1x Drill & Drill Bit If you’ll need/want to Setup & create a more direct route for your Drinkpod’s water Getting source line). • 1x Sick Beat (song)* Started Recommended for...
- Page 9 Step 2 Unpack product. Remove accessories & papers and set aside. Remove Drinkpod, and place on ground.
- Page 10 Read Before Proceeding Unlike most of our competitors, we’ve upgraded our installation kit to include a premium Brass Tee Union Adapter, rather than the traditional self- piercing saddle joint. If, for any reason, you are unable to complete the installation using Step 3 we recommend Insert...
- Page 11 Step 4 Gather pliers, 25’ PVC tubing, brass tee union adapter, and drill + drill bit (if hole is required and unavailable to connect watersource to Drinkpod). Step 5 Identify cold water line source.
- Page 12 Step 6 Step 7 Twist cold water Unscrew source valve (counter- clock-wise to clockwise) turn off. kitchen sink faucet hose from cold water shutoff valve. Use pliers carefully if required to loosen tight connection.
- Page 13 Step 8 Screw brass quick joint (clockwise) down onto cold water shutoff valve. Do Step 10 not tighten with pliers more than 1/4 Screw kitchen sink turn. faucet hose (we unscrewed in step 7) onto the top brass quick joint (clockwise) . Do not tighten with pliers more than 1/4 turn.
- Page 14 Step 11 Unscrew compression nut from quick connect adapter. Step 12 Thread 25’ x 1/4” PVC tubing through quick connect adapter’s compression nut.
- Page 15 Step 13 Firmly slide 25’ x 1/4” PVC tubing over quick connect adapter Step 14 up to (but not Firmly screw the overlapping) the compression nut threads. back on to quick connect adapter. Do not tighten with pliers more than 1/2 turn.
- Page 16 25’ x 1/4” PVC that 25’ x 1/4” PVC tubing has been laid can reach from your water so that it reaches source to the Drinkpod. Water Inlet with at least several feet of slack. Should this require drilling Make sure Drinkpod...
- Page 17 Ensure 1’ section off the end valve is closed. 25’ x 1/4” PVC tubing at a 90° angle. This valve is what you’ll use to locally shut off water to your Drinkpod for tasks like relocation, or swapping filters.
- Page 18 , and Step 19 are properly mounted. Firmly push the open end of new short tubing into Cold Water Inlet, on the back of your Drinkpod until you cannot push it any further. STOP!!! Sediment Before proceeding, immediately check Pre-Carbon...
- Page 19 Step 22 To Remove: 1. Pull back filter pod. 2. Twist counter clockwise. 3. Gently pull filter out/down. Step 24 Open 1/4” Shutoff Valve by twisting Step 23 clockwise. To Replace: 1. Gently insert filter upwards. 2. Twist clockwise. 3. Gently push filter back in/up.
- Page 20 Step 25 Open quick connect adapter. Step 26 Open cold water source line.
- Page 21 Always Flush New Pre & Post Carbon Filters Prior To Use Step 28 Step 27 You must flush the pre-carbon Plug in. and post carbon Outlet should filters until always be they discharge grounded. clean water, to ensure any loose particulates are removed prior to using.
- Page 22 Indicator Lights legend ON = Cooling Water OFF = Not Cooling ON = Heating Water OFF = Not Heating ON = No Water OFF = Sufficient Water...
- Page 23 Filter Filters can be ordered from our website at drinkpodusa.com, Amazon, Ebay, and other online retailers. CYCLES The times below are for reference only. Data is based on 2.5 Gallons / 10 Liters usage per day. The actual lifespan of filters varies based on local water quality, and usage.
- Page 24 Additional • Never place anything flammable next to the machine. MAINTENANCE • Remember to shut down heating and cooling mods, if appliance will NOTES go extended time without use. • For long term storage: switch off, unplug power, shutoff and disconnect water, drain all water from dispensers, and finally from hot water drain valve.
- Page 25 • Never use chemical solvents like • Every Drinkpod comes with a gasoline to clean appliance. Only limited 12 month warranty from the clean with tap water and soft cloth. date of purchase. • Never pull the power plug from wall socket prior to turning off machine’s...
- Page 26 10 minutes after they discharge clean water, to ensure any loose particulates are removed prior to using. Copyright © Drinkpod, LLC. All rights reserved. The Drinkpod brand and logo are trademarks of Drinkpod,...
Need help?
Do you have a question about the 100 Series and is the answer not in the manual?
Questions and answers
unit is beeping
The Drinkpod 100 Series unit is beeping because the Leak Detection Sensor has detected water and shut down the system as a precaution against flooding.
This answer is automatically generated