Advertisement
Quick Links
User's Manual
2.4GHz Long Range HDCD Digital
Wireless Audio Transmitter
Packing list
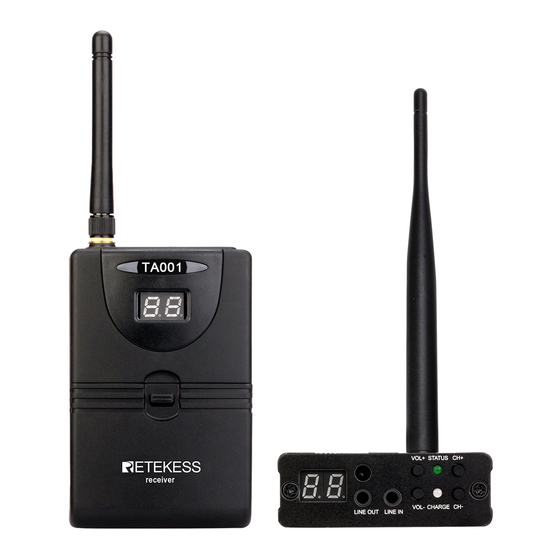
1. Wireless Transmitter×1
2. Power Adapter×1
3. 3.5mm Audio Cable×1
4. 3.5mm Convert RCA Audio Cable×1
5. Charging Cable ×1
6. 6.5mm(male)to 3.5mm(female) adapter ×1
7. Antenna ×1
8. User's Manual×1
Introduction
TA001 developed by Eshow Electronic Commerce Co. Ltd, is a Hi-Fi digital wireless
audio transceiver with excellent resistance against various RF interferences.
The work range is much long, up to 200 meters/ 650 feet in open air, the transmitter
and receiver will be connected faster and more stable, no delay.
It is characterized by a lot advantages, such as highly integrated and small size,
high quality sound (with HDCD sound effect, highest sampling ratio in the field),
strong anti-interference ability (Its input voltage as broad as 3.6v to 6v and audio
frequency output as high as 50mw), and its input interface is compatible with
microphones and stereo frequency.
System Installation
1. Connect your music player device(Such as speaker, amplifier or headphone)
with the receiver from the 3.5mm audio output.
2. Powered on the Receiver with our power adapter.
3. Slide the power switch on the back of the receiver to the ON position.
4. Slide the Music/Mic switch on the back of the receiver to the MUSIC position for
stereo audio input, or slide the switch to Mic position for voice input.
5. Connect your audio source with the transmitter
6. Powered on the transmitter with our power adapter
7. Slide the power switch on the back of the transmitter to the ON position.
8. Slide the Music/Mic switch on the back of the receiver to the MUSIC position for
stereo audio input, or slide the switch to Mic position for voice input.
9. The transmitter and the receiver will complete pairing automatically, then, you
can enjoy your wireless HDCD music.
Input Selection
The 3.5mm audio jack on the front of the transmitter can accept stereo audio input
or a Mono voice input. The Music/Mic switch ont the back it used to selecthe type
of your audio source being used.
Music: Use this position if you are using a stereo audio input.
0dB: Use this position if you are using a normal microphone.
20dB: Use this position if you are using a microphone with a highly sensitive pickup.
Transmitter Rear Panel
1
Transmitter Front Panel
line out line in
line out
Audio Source
Restoring Factory Default Settings:
If you want to set the transmitter and/or receiver back to the condition it was in
when they don't work smoothly by wrong operating, simply press and hold the
CH+ button for about 20 seconds until the status LED begins to flash. Power the
device off and wait about 30 seconds, then power it on again and it will be restored
back to the default settings.
Safety Precautions and Procedures
● DO NOT place transmitter or receiver around direct sunlight or any heat source
such as electric/gas stove or heaters of any kind.
Do not place near an open flame.
● DO NOT place anything on top of the receiver or transmitter.
Allow the unit to sit in an "open air" environment with plenty of room around it.
Unit can overheat when not in an "open air" environment.
● DO NOT take apart the transmitter or receiver for any reason.
THIS WILL VOID THE WARRANTY and could cause electric shock injury.
There are no user replaceable parts inside the unit.
Units can only be repaired/replaced by the manufacturer.
● DO NOT spill liquid on the unit. Store in a safe dry place free from moisture.
NOT FOLLOWING SAFETY PROCEEDURES VOIDS ALL WARRANTIES!
Declaration
1. Intellectual property right statement: The hardware and software of the product
is protected by copyright law and the international convention. Without any
written authorization of our company, any copy of the product and of the
specifications, parts or all, will bear the corresponding legal responsibility. The
brochures are copyright based on our company. Without the consent of our
company, a part or all of the manual should not be released.
2. The manual is only for reference and the ultimate practical features are
depending on the products which ordered and received by users.
FAQ
1. Question: How to Pair the receiver with the transmitter?
Answer: No need additional operation. Just follow our installing instruction. The
receiver will pair the transmitter automatically.
2. Question: How to change the channel?
Answer: You just need change the channel of transmitter. The receiver will
automatically change the channel to match that of its paired transmitter.
3. Question: Why there are mutual interferences between our products and WIFI?
Answer: Our system uses the 2.4GHz carrier to transmit the audio information
from the transmitter to the receiver. Because the frequency of WIFI is
also 2.4GHz, there is the potential possibility of interference between
our system and WIFI.
4. Question: How to avoid and reduce interference between our products and
WIFI?
Answer: As the product has 10 channels,if you want to avoid interference
between our products and WIFI,we recommend changing the channel
to 0 or 1.
2
Main Technical Index
No
Description
1
Work Voltage
2
Work Current
3
Operation Temperature
4
RF IC Frequency
2400 - 2483.5 MHz
5
MODULATION
Data Rate
6
7
Channel Space
8
Frequency Stability
Practical Module
9
2400 - 2483.5 MHz
Frequency Range
10
Module Channel Space
11
RF Range
12
TX Power
13
RX Sensitivity
14
Input Level
15
Input Impedance
Selection of inputs of
16
Input interface
microphones and stereo
17
Stereo Output Level 1
18
Stereo Output Level 2
19
Output Impedance
Gain ration of output
20
and input
20 - 20000Hz ( ±1dB )
21
Frequency Response
22
Latency
23
Sampling Ratio
24
S/N Ratio
25
THD
26
Dynamic Range
27
Channel Separation
3
Transmitter
3.6- 6V DC
Max 120mA
‐15 - 65℃
GFSK
2M bps
4MHz
± 156KHz
4MHz
0 - 20dBm
Max 1.0Vrms
10k Ohm
frequency
1∶1
< 0.5 ms
64K@16bit*2
95dB
0.3 % @ 1kHz
90dB
85dB
Advertisement

Related Manuals for Retekess TA001


Summary of Contents for Retekess TA001
- Page 1 2400 - 2483.5 MHz Frequency Range TA001 developed by Eshow Electronic Commerce Co. Ltd, is a Hi-Fi digital wireless If you want to set the transmitter and/or receiver back to the condition it was in audio transceiver with excellent resistance against various RF interferences.
- Page 2 EU declaration of conformity is available at the following internet Antennas All Retekess radios are designed, manufactured, and tested to ensure they meet address: www.retekess.com. • Do not use any portable radio that has a damaged antenna. If a government-established RF exposure levels.
Need help?
Do you have a question about the TA001 and is the answer not in the manual?
Questions and answers