
Subscribe to Our Youtube Channel
Related Manuals for Salutron HardyTest D400


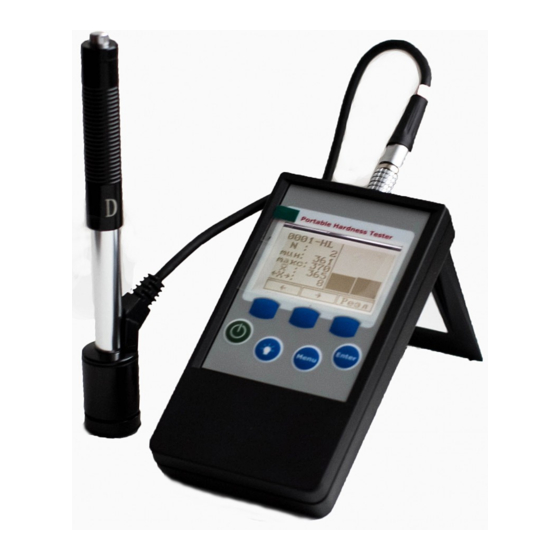
Summary of Contents for Salutron HardyTest D400
- Page 1 U s e r ´ s M a n u a l U s e r ´ s M a n u a l Hardy Test Test Hardy ® ® D400 D400 I M P A C T H A N D H E L D I M P A C T H A N D H E L D H A R D N E S S T E S T E R ! ! H A R D N E S S T E S T E R...
- Page 2 HardyTest D400 Operations Manual for the HardyTest D400! 1. Introduction ! 2. Technical Specification! 2.1 Principal of Measurement ! 2.2 Technical Features of the Hydraulic Impactor ! 2.3 Preparation of the Test Pieces! 2.4 Technical Features of the Measuring Device! 3.
- Page 3 Operations Manual for the HardyTest D400! 1. Introduction ! Welcome to SaluTrons HardyTest D400 operations manual. The D400 was developed to do fast, comfortable and easy measurements in the field of hardness testing. ! The following are included in the delivery: ! Measuring device: The D400 gauge for hardness tests.
- Page 4 HardyTest D400 Typical fields of application:! Identification of materials in the inventory ! Measurements from difficult positions! Measuring big test pieces with varying hardness ! On the spot check of heavy test pieces! Control at the production of metallic materials!
-
Page 5: Principal Of Measurement
2.1 Principal of Measurement ! The HardyTest D400 is a instrument for hardness testing which works on the basis of the HL/ HLD principal. This method was first introduced in 1978 by Ing. D. Leeb. The idea is that an impactor falls on another objects and rebounds. - Page 6 HardyTest D400 2.2 Technical Features of the Hydraulic Impactor ! Hydraulic Impactor ! Length: ! 147 mm! Diameter: ! 20 mm! Weight:! 75 g! Maximum test hardness: ! 940 HV! Impactor! Impact energy:! 11 N.mm! Mass of the impact body:! 5.5 g!
- Page 7 HardyTest D400 Indentation of the test tip! Details of the hydraulic Comparative chart of the different impactor materials and units according their measurement method ! Page ? of ?
- Page 8 HardyTest D400 2.3 Preparation of the Test Pieces! Roughness: ! ! ISO N7, 10 micrometers RT, 2 micrometers RA! Minimum sample weight 5 kg (compact piece) <5 kg (supp. by a piece with a greater solid mass, use delivered paste for connection)
- Page 9 HardyTest D400 2.4 Technical Features of the Measuring Device! Page ? of ?
- Page 10 HardyTest D400 3. Keyboard ! Switch-On key: Use to turn the gauge on and off. For turning off the gauge press and hold the button. ! Light: Use to manage the lighting settings of the screen. ! „No“: Lighting always off.! „Always“: Lighting always on.!
- Page 11 HardyTest D400 4. Start up Screen! When turning on the gauge following screen will appear. This is the main screen in which all measurements are executed. ! 4.1 Adjust Measurement Parameters! To executed a metering correctly it is crucial to adjust the measurement settings depending on the situation.
- Page 12 HardyTest D400 4.2 Statistics! The HardyTest D400 offers the possibility of doing a quick analysis of the measured data. To enter the statistics mode press the mid screen key. The height of the bars in the graphic shows the relative difference between the measurements. ! Min: ! ! Minimum value in the group of measurements.!
- Page 13 HardyTest D400 4.3 Memory! By pressing the left screen key you get into the memory settings. Alternatively you can get there through pressing Menu and scrolling down till Memory. ! Samples! By opening Samples through pressing Enter you can manage the amount of measured values which should be grouped together into one group of measurements (e.g.
- Page 14 HardyTest D400 View! By entering View you can see all your measured samples in their groups.! Histogram! When entering Histogram you will see that it looks quite the same like Statistics. Histogram offers the same feature like Statistic with the big difference, that now only saved samples are shown in their group of measurements.
- Page 15 HardyTest D400 5. Main Menu! To get access to the Main Menu you have to press the Menu button while on the Start up screen. ! Here you will find following options. ! 5.1 Settings! In the Settings section you can also adjusted the material, unit and angle for the measurement like explained in 4.1.!
- Page 16 HardyTest D400 Note: The unit Leeb will be always shown as an reference to prevent following problem.! If a metering shows a result of e.g. 500 HLD and the user has adjusted Rockwell C (HRC) as his main unit the screen will show following. ! The problem is that there is no value in HRC until 510 HLD (20.00 HRC = 510 HLD).
- Page 17 HardyTest D400 Materials and there corresponding units! Page ? of ?
- Page 18 For all necessary information regarding Angle adjustments see 4.1.! 5.2 Alarms! The HardyTest D400 offers the feature to set so called alarms. That means that the user may set an value for the minimum hardness and for the maximum hardness of his measured material.
-
Page 19: Maintenance
HardyTest D400 6. Maintenance ! The HardyTest D400 in general doesn't need to be maintained to much. Nevertheless there are to thinks to consider.! 6.1 Batteries! The gauge operates with an 9 Volt block battery. If the battery status should be low obviously the battery has to be changed. - Page 20 HardyTest D400 7. Correct Measuring ! After the adjustment of the measurement parameters (material, unit, angle) you may directly start with the metering. Don´t forget to check the right calibration from time to time as indicated in the last paragraph of 6.2. ! 7.1 Preparation of Test Piece!
- Page 21 HardyTest D400 As in any other control procedure take at least 3 samples not exceeding a distance of 4 mm from each other. The results should not have a difference of more than +/- 6 HDL units. If the difference should be greater, verify the support of the hydraulic impactor and the correct support of the test piece.!
- Page 22 HardyTest D400 8. Software! In case that it should be necessary to transfer the saved data from your HardyTest D400 to an PC we included the software TKM Link to the delivery. In order to install the software under Windows carry out following instructions.! 8.1 Installation of the Hardware Driver!
- Page 23 HardyTest D400 8.2 TKM Link! Now after installing the driver for the HardyTest D400 you may transfer your saved measurements. Go again on the CD and start TKM Link. You can also first copy the application on your hard disk and start it from there. And additional installation is not necessary.
- Page 24 SaluTron Messtechnik GmbH Dr.-Gottfried-Cremer-Allee 30/7 D-50226 Frechen · Fax. +49 (0) 2234 9999962 Tel. +49 (0) 2234 9999960 · Email: info@salutron.de www.salutron.de ·...
Need help?
Do you have a question about the HardyTest D400 and is the answer not in the manual?
Questions and answers