
Subscribe to Our Youtube Channel
Related Manuals for GRASS VALLEY LIVETOUCH


Summary of Contents for GRASS VALLEY LIVETOUCH
- Page 1 LIVETOUCH SPORT HIGHLIGHTS & REPLAY SYSTEM Software version: 1.15 User Guide Issue 3 Revision 5 2020-12-22...
-
Page 2: Fcc Compliance
Valley USA, LLC, or one of its affiliates or subsidiaries. All other intellectual property rights are owned by GVBB Holdings SARL, Grass Valley USA, LLC, or one of its affiliates or subsidiaries. All third party intellectual property rights (including logos or icons) remain the property of their respective owners. - Page 3 LiveTouch User Guide Title LiveTouch User Guide Part Number Issue 3 Revision 5 Revision 2020-12-22, 15:23...
- Page 4 The presence of this symbol in or on Grass Valley equipment means that it has been tested and certified as complying with applicable Underwriters Laboratory (UL) regulations and recommendations for USA.
- Page 5 LiveTouch User Guide The presence of this symbol in or on Grass Valley equipment means that it has been tested and certified as complying with applicable Intertek Testing Services regulations and recommendations for USA/Canada. The presence of this symbol in or on Grass Valley product means that it complies with all applicable European Union (CE) directives.
- Page 6 Notices Cautions A caution indicates a possible hazard to equipment that could result in equipment damage. Observe the following cautions when operating or working on this equipment: • This equipment is meant to be installed in a restricted access location. •...
- Page 7 Replace the battery only with the same or equivalent type recommended by the manufacturer. Dispose of used batteries according to the manufacturer’s instructions. Before disposing of your Grass Valley equipment, please review the Disposal and Recycling Information at: http://www.grassvalley.com/assets/media/5692/Take-Back_Instructions.pdf...
- Page 8 électrique, de compatibilité électromagnétique et de conformité environnementale. Le symbole ci-contre sur un appareil Grass Valley ou à l’intérieur de l’appareil indique qu’il est conforme aux normes applicables en matière de sécurité laser. Avertissements Les avertissements signalent des conditions ou des pratiques susceptibles d’occasionner des blessures graves, voire fatales.
- Page 9 LiveTouch User Guide • Dans le présent manuel, toutes les instructions qui nécessitent d’ouvrir le couvercle de l’équipement sont destinées exclusivement au personnel technique qualifié. • N’utilisez pas cet appareil dans un environnement humide. • Cet équipement est mis à la terre par le conducteur de mise à la terre des cordons d’alimentation.
- Page 10 Remplacez la pile uniquement par un modèle identique ou équivalent recommandé par le fabricant. Disposez des piles usagées conformément aux instructions du fabricant. Avant de vous séparer de votre équipement Grass Valley, veuillez consulter les informations de mise au rebut et de recyclage à: http://www.grassvalley.com/assets/media/5692/Take-Back_Instructions.pdf...
- Page 11 Grass Valley believes this environmental information to be correct but cannot guarantee its completeness or accuracy since it is based on data received from sources outside our company. All specifications are subject to change without notice.
-
Page 12: Lithium Batteries
Lithium Batteries Battery Warning Your Grass Valley equipment usually comes with at least one button battery located on the main printed circuit board. The batteries are used for backup and should not need to be replaced during the lifetime of the equipment. -
Page 13: Laser Safety - Fiber Output Sfp And Qsfp Modules Warning
LiveTouch User Guide Laser Safety - Fiber Output SFP and QSFP Modules Warning LASER SAFETY The average optical output power does not exceed 0 dBm (1mW) under normal operating conditions. Unused optical outputs should be covered to prevent direct exposure to the laser beam. -
Page 14: Safety And Emc Standards
Notices Safety and EMC Standards This equipment complies with the following standards: Safety Standards Information Technology Equipment - Safety Part 1 EN60950-1: 2006 Safety of Information Technology Equipment Including Electrical Business Equipment. UL1419 (4 Edition) Standard for Safety – Professional Video and Audio equipment (UL file number E193966) EMC Standards This unit conforms to the following standards: EN55032:2015 (Class A) -
Page 15: Emc Performance Of Cables And Connectors
EMC Performance of Cables and Connectors Grass Valley products are designed to meet or exceed the requirements of the appropriate European EMC standards. In order to achieve this performance in real installations it is essential to use cables and connectors with good EMC characteristics. - Page 16 Notices...
-
Page 17: Table Of Contents
LiveTouch Server Used Disk Space Indicators ........36... - Page 18 Using the T-bar............. . .66 3 Using the LiveTouch Panel ......67 Overview of the Touchscreen Panel .
- Page 19 Applying Star Ratings and Tagging Clips........101 Propagation of LiveTouch Tagging Metadata ....... .106 Clip Transitions Function .
- Page 20 Switching Between Live Recordings on the Desktop ......191 Always in Record (AiR) on the LiveTouch Server ......192 6 LiveTouch Desktop Application .
- Page 21 Using the LiveTouch Play-out Modes........
- Page 22 Configuring the LiveTouch Output on the Server ....... . 251...
-
Page 23: Getting Started
T-bar. LiveTouch can form part of a larger system comprising one or more seats. Each LiveTouch seat consists of a desktop client application running on a PC, with an associated LiveTouch Panel. -
Page 24: New Features Available In Livetouch Version 1.13
• FUNC + Play Speed (panel) • Save by Pressing Slot in PBS New Features Available in LiveTouch version 1.13 The following new features are provided with the LiveTouch version 1.13 system: • Auxiliary Audio facilities New Features Available in LiveTouch version 1.12 The following new features are provided with the LiveTouch version 1.12 system:... -
Page 25: Livetouch Key Features Added In Version 1.11
• Improved operation of the Jog Wheel. • A facility to transfer LiveTouch tags to the LiveTouch Server sQ environment. • Facility to select any LiveTouch sQ 1200 recording stream in the Go! Editor. • Improved function indication by lighting Function option buttons when selected. -
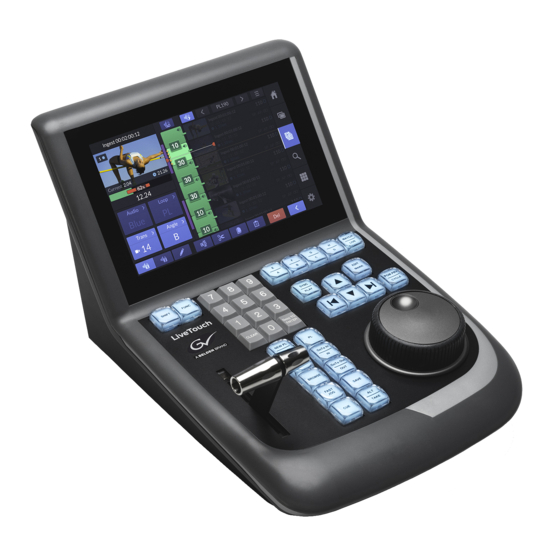
Page 26: Livetouch Panel
LiveTouch Panel LiveTouch Panel LiveTouch features a dedicated hardware control panel with an intuitive touchscreen providing quick clip selection, speed tools and configurable user options. The panel features familiar button placement as well as a number pad for fast navigation by clip number and timecode. -
Page 27: Livetouch Desktop Client
For connection details, see the LiveTouch Installation Guide. LiveTouch Desktop Client The LiveTouch Panel is paired to a LiveTouch Desktop client PC, running the Desktop client application and GUI, which acts as the intermediary between the LiveTouch Panel and LiveTouch Manager, passing commands over the network to execute playback operations. -
Page 28: Livetouch Manager
As video is recorded and ingested into the video server, the LiveTouch ISA keeps track of where each frame is stored along with any associated metadata, and the storage location in which the clips reside. You can search the LiveTouch ISA from a Web Bin to find clips or playlists indexed by the LiveTouch Manager. -
Page 29: Getting Started Checklist
LiveTouch User Guide Getting Started Checklist There are a number of tasks you need to complete before you can start using LiveTouch once all components are connected. You might find it helpful to use the following checklist: • Configure the output ports for Playout and set the port user ID. -
Page 30: Starting The Livetouch Panel
Getting Started Starting the LiveTouch Panel Starting the LiveTouch Panel Start up the LiveTouch Panel by switching on the LiveTouch rear panel switch; see Figure 1- on page 27. Initial Communication Setup in the Home Screen Press to display the Home screen shown in... - Page 31 LiveTouch User Guide Ingest Tab (Setup Feeds to Record on the Options Menu LiveTouch Server) (Display Optional) Playout Tab Live Tab (Group Feeds to Use for (Setup Playout Clipping, & Creating Playlists) Ports) Home Softkey (Active) Selected Playout Port Available...
-
Page 32: Setting-Up Playout Ports And User Id In The Playout Tab
Assign a port user ID and activate playout ports in the Playout tab of the Panel as follows: 1 Select the tab. You will see the available LiveTouch servers (e.g. NS2, NS3 shown in Figure 1-4) in the left-hand section of the Panel, each displaying the ports available for selection. -
Page 33: Setting The Port And Overlay Highlight Color
LiveTouch User Guide 4 Tap to open the target server and display any available ports on that server. The softkey changes to and the server ports are listed as either: • Ports can be selected. • Ports can no longer be selected. - Page 34 Getting Started Setting the Port and Overlay Highlight Color Overlay Color Popup Selected Port & Overlay Highlight Color Fig. 1-9: Changing the Port and Overlay Highlight Color Select a port highlight color as required. When satisfied with the Playout port and overlay settings, tap to open the selected ports.
-
Page 35: Using The Options Menus In The Playout Tab
LiveTouch User Guide Using the Options Menus in the Playout Tab In addition to tapping the Panel touchscreen to open or close ports, you can use the two Options menus to perform these tasks. Open or close either of the Options menus by tapping the options menu button: , respectively. -
Page 36: Livetouch Server Used Disk Space Indicators
The ports are returned to the Available Ports pane with the status Available. LiveTouch Server Used Disk Space Indicators Each of the Home screen tabs displays the available ports on connected LiveTouch servers in the left-hand pane of the LiveTouch Panel. - Page 37 LiveTouch User Guide Server Used Disk- Space Indicators Fig. 1-14: Server Used Disk-space Indicators in the Ingest Tab The threshold conditions for the used disk-space indicators are as follows: Green: 0 to 65% Sufficient disk-space available. Blue: 65 to 85%...
-
Page 38: Setting-Up Recording Of Ingested Feeds In The Ingest Tab
Settings menu again. Use the Ingest tab to set up recordings for the live feeds being ingested into the LiveTouch video server(s). set up the recording of ingested live feeds in the Ingest tab of the Panel as follows: 1 Open the tab. - Page 39 LiveTouch User Guide Ports Being Actively Recorded Port Available for Recording and Selected Fig. 1-16: Port Selected in Available Ports Pane 3 Tap each available port containing the feed you want to record to select the port(s), then either drag the selected ports into the In Record pane, or tap to add them to the In Record folder corresponding to that video server.
- Page 40 Getting Started Setting-up Recording of Ingested Feeds in the Ingest Tab Recording Group Name Recording Duration Crash Record Start Recording Always-in-Record Fig. 1-18: Start Record on n Ports Popup In the Start Record popup dialog, set the recording parameters as follows: a Set the name used to identify the set of recordings.
-
Page 41: Pausing Or Stopping Active Recording
Available Fig. 1-19: Selected Ports in Record To open the folder and manage or view the actual recording ports, double-tap the folder. LiveTouch lists the individual ports being recorded on that server. Tap to Return to Folder View Ports Being... -
Page 42: Using The Options Menus
Getting Started Using the Options Menus 1 In the right-hand In Record panel, select all recordings or specific recordings as follows: • Select the entire folder: : Pause or stop all recordings on that server. • Select a specific recording or multiple recordings as required: : Pause or stop only selected recordings. - Page 43 LiveTouch User Guide Open or close either of the Options menus by tapping the options menu button: , respectively. Fig. 1-23: Ingest Options Menu Fig. 1-24: Ingest Record Options Menu...
-
Page 44: Setting-Up The Live Feeds To Use In The Live Tab
Fig. 1-25: Overview of the Home Menu Live Tab Once you have opened the ports for playout and defined the recordings on the LiveTouch Server, you can select the live feeds you want to use in the LiveTouch interface as follows: 1 Open the tab. - Page 45 It is not mandatory to group your live feeds but it enables you to use the LiveTouch multi-cam features and switch between different camera angles in the group(s).
- Page 46 Getting Started Setting-up the Live Feeds to Use in the Live Tab Once you have moved ports into the Selected Ports pane, you can decide which ports to use for clipping. You can also modify the multi-cam groups, if required. Add Group Folder Four Ports in Group 2 No Ports Yet In Use...
-
Page 47: Setting The Default Home Angle On A Port
If the feed belongs to a group, then LiveTouch initially assigns the live feed keys ABCD on the panel to that group by default. So when you use any of these keys, they act on the group containing the home angle. -
Page 48: Changing Camera Angle Letters In A Group
Getting Started Using the Options Menus Home Angle Icon Fig. 1-32: Home Angle Feed Selected 2 Select the feed or group to which you want to assign the home angle. The feed can be ungrouped, in the same group or in a different group. 3 Open the Selection Options menu and select Set Home. -
Page 49: Using The Options Menus
LiveTouch User Guide Live Feeds and Groups Selected for Closure Tap to Close Selected Feeds Fig. 1-33: Closing Selected Feeds To close all in use live feeds together, tap to select the In Use folder, then tap Using the Options Menus... -
Page 50: Closing The Live Ports
Getting Started Closing the Live Ports Switches Between Remove Home & Set Home Angle Depending on Home Availability Fig. 1-35: Live Selection Options Menu Fig. 1-36: Live In Use Options Menu Closing the Live Ports You can stop using a live port or ports, if necessary, from the Live tab of the Home screen as follows: 1 Select the active live port(s) you want to close. - Page 51 LiveTouch User Guide Confirm Live Port Closure Fig. 1-37: Confirming the Closure of Live Ports 3 Press to confirm the port closure(s). The live feed is removed from the port window and the live feed is made available for selection in the Available Ports pane.
- Page 52 Getting Started Closing the Live Ports...
-
Page 53: Understanding The Panel Controls
The LiveTouch Panel was designed to meet the rigorous demands of live sports production and is used to control playback of media on the LiveTouch output. It features a slow-motion T-bar for precise control of the playback speed and a jog/shuttle wheel for fast and accurate record and clip navigation. - Page 54 Understanding the Panel Controls Overview Shift & Function Camera/Feed & Live/Match Extender Keys Keys Play/Sync Play Keys Number Event Mark/Edit Keypad T-Bar Program/Preview Cycle Key Navigation Keys Jog/Shuttle Wheel Panel Control Keys Fig. 2-1: Keys and Controls on the LiveTouch Panel...
-
Page 55: Numeric Keypad Keys
Press then type numbers, to display a field for timecode entry:. Up to 99 live feeds can be connected to a LiveTouch, with each feed or camera listed in a tab of the Live Feed bar on the Desktop. To switch to a live feed, press nn .... - Page 56 Jumps to page 1 in the library Jumps to page 1, bank 2 in the library Jumps to page 1, bank 2, slot 3 in the library. To enter a numeric value into LiveTouch: • Type the number, then press to confirm.
- Page 57 Live Touch User Guide Item(s) Description CLEAR Clear numeric value and/or timecode entry fields. + MARK Removes the selected event mark from the timeline. Removes all event marks from the timeline. + SAVE Removes selected clips from the clips library or playlist. + INSERT Clears insert point from speed profile.
-
Page 58: Shift And Function Extender Keys
Understanding the Panel Controls Shift and Function Extender Keys Shift and Function Extender Keys extender keys on the panel have the following functions: Key(s) Description SHIFT Extends access to secondary key functions (top function label on a key). Press and release the key, then press the target key to invoke its secondary function. -
Page 59: Camera Feed And Live/Match Keys
Live Touch User Guide Camera Feed and Live/Match Keys The four camera feed keys key on the panel have the following functions: Key(s) Description Selects the appropriate camera or feed, A through H (depending on your system configuration). By default, these keys switch between feeds A - D of a multi-cam group. If the A key is double-pressed, the keys will then switch between feeds E - H, as per the upper set of button labels. -
Page 60: Play/Sync, Mark/Edit And Program/Preview Keys
Understanding the Panel Controls Play/Sync, Mark/Edit and Program/Preview Keys Play/Sync, Mark/Edit and Program/Preview Keys The Play, Mark and Program keys on the panel have the following functions: Key(s) Description PLAY Start playback at 100% on the selected camera and channel. If in PGM/PRV mode, this applies to the PGM channel. -
Page 61: Navigation Keys
Live Touch User Guide Navigation Keys The navigation keys enable you to navigate to mark points in a feed or clip, or to defined positions in the clip library or playlist. Key(s) Description When working with clips: • Step between the mark points on the current camera or feed, or between live clip tabs. -
Page 62: Panel Action Bar Keys
Understanding the Panel Controls Panel Action Bar Keys Panel Action Bar Keys The main block of Panel Action Bar keys have the following functions: Key(s) Description + To PL Appends the currently selected clip(s) to the end of the active playlist (or creates a new one if no playlists exist). - Page 63 Live Touch User Guide Key(s) Description FAST JOG Toggle Fast Jog on or off. Fast jog increases the speed at which the jog wheel jogs the on-air clip, according to the Fast Jog multiplier configuration setting. The default setting (when key is bright blue) is for Fast Jog to be on. When the key is unlit Fast Jog is off.
- Page 64 Understanding the Panel Controls Panel Action Bar Keys Key(s) Description SAVE Saves the current marked event to the library. Enter a number first, e.g., nn + to save the clip to a specific numbered slot in the library. Save changes to a transition or speed profile when editing any of these for a clip.
-
Page 65: Using The Transport Controls On The Panel
Live Touch User Guide Using the Transport Controls on the Panel The transport controls on the Panel comprise the Jog/Shuttle Wheel and the T-bar. Using the Jog/Shuttle Wheel Use the jog/shuttle wheel to navigate forward and backward through a live feed or saved clip. -
Page 66: Using The T-Bar
Understanding the Panel Controls Using the T-bar Using the T-bar Use the T-bar to start playing-out a cued clip, or to slo-mo part of a clip, increasing the play speed from zero. Change the position of the T-bar either to speed-up or slow-down the play-out speed of a clip, as required. -
Page 67: Using The Livetouch Panel
Using the LiveTouch Panel Overview of the Touchscreen Panel The LiveTouch Panel touchscreen provides clean, instant access to your highlights library. You can navigate through your library, manage clips and playlists and interact with content using menus and a variety of touch gestures. The touchscreen is designed to execute common operations quickly and easily, while also providing sophisticated tools for multi- cam operation and other advanced features. -
Page 68: Using The Panel Touchscreen Menu Softkeys
Clip Action Clips Library Fig. 3-1: Overview of the Clips Screen Components The touchscreen panel provides an interactive interface to operate LiveTouch together with the LiveTouch panel keys and transport controls. Using the Panel Touchscreen Menu Softkeys The available panel screen options down the right-hand side of the screen are as follows:... -
Page 69: Navigating The Touchscreen
Navigating the Touchscreen You can navigate around the LiveTouch touchscreen using any of the following methods: • Press a menu softkey on the touchscreen to open a different screen. • Press other controls on the touchscreen to use a function or open a list of options, depending on the type of control. -
Page 70: Using The Livetouch Panel
Marking Reference Points in the Live Recording Enhancements to the LiveTouch workflow for marking points of interest in the Live recording provide the following capabilities: •... -
Page 71: Working With Reference Markers In Mark Mode
Live Touch User Guide When the Mark Mode is active for a live recording, tap to open the Mark pane: Selected Mark Label with Mark Pane Open Number Mark in Record Close Mark Pane Mark 27 Thumbnail Timeline Selected in Mark Pane Fig. - Page 72 Using the LiveTouch Panel Marking Reference Points in the Live Recording You can then use the keys to step backward or forward through your mark points from the current position in the record timeline. Note: In/Out points are not displayed on the record train.
-
Page 73: Using In/Out Reference Marks To Create Clips
Using In/Out Reference Marks to Create Clips Figure 3-6 on page 74 for a schematic overview of how LiveTouch saves clips from the live feeds, depending on the method you choose to save the clip. The default clip durations for the various methods available to save a clip are set in the Clips tab of the Panel Settings (In Save Length, Out Save Length, Mark Save Length and One Press Highlights). - Page 74 Using the LiveTouch Panel Marking Reference Points in the Live Recording Fig. 3-6: Different Methods Available to Save a Clip Using Default or User-defined Durations...
-
Page 75: Marking In And Out Points To Save A Clip
To mark and save a clip of interest quickly to the library, press: then When you save the clip, LiveTouch uses the preset, default duration from the mark point to generate a clip of default length. The default clip durations are defined in the Saving section of the Clips Settings menu. See Saving Clip Settings on page 162. -
Page 76: Removing Mark Points From The Recording
Using the LiveTouch Panel Editing an Event Duration Edit Event in Timeline Audio Preset Applied Default Speed Setting Applied Fig. 3-7: Editing a Marked Event To exit edit mode without making any changes, press the key again. Removing Mark Points from the Recording... - Page 77 Live Touch User Guide 3 Press to confirm the timecode and jump to that position in the clip. To remove the numeric box without entering a timecode value, press again. The following sections provide an overview of some of the tasks you can perform on the panel.
-
Page 78: Working With The Clips Library
Working with the Clips Library Working with the Clips Library Overview The LiveTouch clips library screen enables you to create and organize your clips and to apply default settings. From the LiveTouch clips library screen, you can: • Create and save clips to any location in the clips library. - Page 79 Panel Settings: Clips Configuration on page 162. When saving a clip from a live recording group, LiveTouch saves all camera angles in the group in the same library slot. Fig. 3-8: Schematic Overview of Pages, Banks and Slots in the Clip Library...
-
Page 80: Using The Clips Library Display
Using the LiveTouch Panel Using the Clips Library Display Using the Clips Library Display To display the clips library screen: • Press Currently Cued Next Available Clips Library Clip Slot in Library Clips Library Navigation Controls Clips Library Button Active... - Page 81 Live Touch User Guide Fig. 3-11: Panel Clip Entry Controls In addition, you can use the action bar along the bottom of the screen to move clips to different locations in the library, see the section Navigating Through the Clips Library page 82.
-
Page 82: Navigating Through The Clips Library
Using the LiveTouch Panel Navigating Through the Clips Library Navigating Through the Clips Library Navigate through the clips library using the navigation keys at the top of the screen. The navigation keys have the following functions: • Go to the previous bank. -
Page 83: Pushing A Clip Or Playlist To Another Livetouch User Or User Group
1 Press on the LiveTouch panel. This opens a dialog box listing all other LiveTouch users and user groups. Touch a user/ group and enter a slot number. To push a clip or playlist to the previously selected LiveTouch user or group:... -
Page 84: Renaming A User Group
Renaming a User Group 1 Press on the LiveTouch panel to open a dialog box listing LiveTouch users and user groups. Touch the group you want to rename to select it. 2 Touch the icon, then touch the group name again; the soft keyboard is displayed. -
Page 85: Using The Action Bar In The Clips Library
Live Touch User Guide Using the Action Bar in the Clips Library The action bar at the bottom of the screen provides Rename, Delete, Cut, Copy, Paste and Send softkeys, to manage individual clips, or groups of clips in different parts of the library. Note: When renaming a clip saved with multiple angles, it is possible to rename all angles in the slot at the same time. -
Page 86: Timeline Step-Through Mode
Using the LiveTouch Panel Using the Action Bar in the Clips Library Fig. 3-18: Slot Pre-Named Use the Clear Name button to discard the name, if required. Timeline Step-through Mode Press to toggle the action bar between Action mode and Timeline Step-through... -
Page 87: Using The Clip Entry Controls In The Clips Library
Applying the Default Speed for Slo-mo Playback You can apply a default playback speed to slo-mo a particular clip each time it is played. LiveTouch displays the default playback speed as a percentage in the lower two-thirds of the Speed box. - Page 88 Using the LiveTouch Panel Using the Clip Entry Controls in the Clips Library Click to Open Speed Settings Popup Default Setting Highlighted Constant Speed Presets Speed Profile Click to Toggle Default Speed Without Opening Settings Popup Fig. 3-21: Preset Speed Settings 3 Select one of the three available preset speeds to apply to the selected clip.
-
Page 89: Changing A Slo-Mo Speed Preset
Live Touch User Guide Changing a Slo-mo Speed Preset To change the default value of a preset speed box: 1 Press to open the Speed Settings options. 2 Press on the speed preset box containing the default speed setting you want to modify;... - Page 90 Using the LiveTouch Panel Using the Clip Entry Controls in the Clips Library Fig. 3-24: Initial Speed Profile Popup 4 Jog to a position in the clip where the profiling is to start. 5 Set the required speed either using the T-bar, or by entering a speed value using the...
- Page 91 Live Touch User Guide The following example shows the steps involved in creating a half-speed (50%) profile for a section of a clip. Step 1: Jog/Shuttle to Start Point in Clip & Set T-Bar to 50% Step 2: Press to Insert Keyframe at 100% & at 50% Step 3: Jog/Shuttle to Next Point in Clip at End of 50%Section, Set T-Bar to 100% &...
-
Page 92: Assigning Audio Patching Options
Using the LiveTouch Panel Using the Clip Entry Controls in the Clips Library Completed Speed Profile Fig. 3-26: Defining a Speed Profile Note: Setting the speed down to 0% invokes a pause that requires you to press to restart play at 100% from this point. ... - Page 93 Figure 3-29), listing the available options. Choose a different audio preset from the list, if required, and LiveTouch adds the option to the audio patching popup menu. The Change Audio Preset popup lists all audio presets saved when defining Audio Patching in the Audio section of the User configuration, see...
-
Page 94: Auxiliary Audio
Auxiliary clips are often referred to as Aux Clips. Define, Select and Add an Aux Clip to a Playlist Using the LiveTouch Panel 1 To define a clip as an aux clip: • Select the clip to be defined as an aux clip. This could be any clip that carries audio, so video clips can be selected if you want to use the audio content as an aux clip. - Page 95 Live Touch User Guide Blue speaker icon shows clip 113 is now available to use as an aux clip Fig. 3-31: Confirmation of Clip Availability 2 To add an aux clip to a playlist: • Open the required playlist. • Tap ;...
- Page 96 Using the LiveTouch Panel Using the Clip Entry Controls in the Clips Library Fig. 3-35: Aux Clip Selection The selected aux clip will be added for the duration of the playlist. If the playlist is longer than the aux clip, the clip will be looped. When a clip is added to a playlist, it becomes known as an Aux Track.
- Page 97 T-Bar. Define, Select and Add an Aux Clip to a Playlist Using the LiveTouch Client This is performed in basically the same way as for the LiveTouch panel, as described above. Some actions are carried out slightly differently however: 1 To access Aux Audio using the client: •...
- Page 98 Using the LiveTouch Panel Using the Clip Entry Controls in the Clips Library Add a Keyframe to an Aux Clip and Adjust Level 1 To add the keyframe: • Scroll to the point in the clip where you want the keyframe to be added, and click the Add button.
- Page 99 Live Touch User Guide Fig. 3-41: Aux Audio Edit - Client Fig. 3-42: Aux Audio Edit - Client...
-
Page 100: Assigning The Loop Function To A Clip Or Clips
Using the LiveTouch Panel Using the Clip Entry Controls in the Clips Library Fig. 3-43: Aux Audio Edit - Client Assigning the Loop Function to a Clip or Clips The Loop function enables you to loop play clips or groups of clips in the library. -
Page 101: Applying Star Ratings And Tagging Clips
Applying Star Ratings and Tagging Clips Applying a Star Rating to a Clip When using the LiveTouch Panel, you can assign one to three stars to clips with the Tagging Options window. This can be performed using either the button or the key. - Page 102 Using the LiveTouch Panel Using the Clip Entry Controls in the Clips Library Assigning a star rating to a clip using the key: 1 Double-press to open the Tagging Options window. Event Tags Roster Tags Clear Tags Open Edit Tagsheets Dialog...
- Page 103 Live Touch User Guide Applying Event Tags to a Clip When using the LiveTouch Panel, you can assign an event tag to clips with the Tagging Options window. This can be performed using either the button or the key. Applying an event tag to a clip using the button: 1 Select the clip or clips to be assigned an event tag.
- Page 104 Using the LiveTouch Panel Using the Clip Entry Controls in the Clips Library For information on user rules and loading tag sheets or roster files, see the LiveTouch Installation Guide. Applying an event tag to a clip using the key:...
- Page 105 Live Touch User Guide Editing Tagsheets Press to open the Editing Tagsheets dialog: Event Tags Roster Tags Delete Rename Deselect Reorder by Number Press to Apply Action Fig. 3-53: Editing Tagsheets Page The available tagsheet function softkeys along the top of the screen are as follows: Delete Selected: Delete selected tags from the active tagsheet....
-
Page 106: Propagation Of Livetouch Tagging Metadata
Fig. 3-54: Dragging Tags to New Position in Tagsheets Page Propagation of LiveTouch Tagging Metadata LiveTouch tagging metadata needs to populate the description field when ISA clips are created. When tags are modified (added to or deleted) the same must happen on the ISA... - Page 107 If the update fails after the third attempt, no further updates are made. By default, LiveTouch saves tag metadata to the ISA Description field in the Server Bin, see Figure 3-55. You can, however, change the target field for the metadata using a console command.
-
Page 108: Clip Transitions Function
Using the LiveTouch Panel Using the Clip Entry Controls in the Clips Library Clip Transitions Function The Transitions function in the clip entry controls is used to add crossfade transitions between clips in a playlist, if required. Transitions are not available for use in the clips... - Page 109 Live Touch User Guide Camera Angle Selection Panel Press to Preview Camera Angle F Press to Open Angle Current Default Selection Camera Angle E Fig. 3-57: Previewing Different Camera Angles Changing the Selected Camera Angle for Multi-cam Recordings Use the Angle control to change the selected camera angle saved with a multi-cam clip as follows: 1 Select the multi-cam clip and press the box.
-
Page 110: Working With Super-Slow Motion (Ssm)
SSM recordings can be controlled by sQ Record, automation or always-in-record, however, SSM feeds can only be used by LiveTouch (sQ Play is not yet supported). For more information on SSM, and configuring the LiveTouch Server to handle SSM feeds,... - Page 111 Live Touch User Guide SSM Speed Indicator (3x) on Clips Generated from SSM Live Feed Fig. 3-61: Angle Selection Panel Displaying Group of Eight Camera Angles on Panel...
-
Page 112: Working With Playlists
Working with Playlists Overview The LiveTouch Playlists screen provides an interface that enables you to build, manipulate and play-out sequences of highlights. You can quickly and easily load all available camera angles of a clip or build sequences containing various events of interest. -
Page 113: Creating A New Playlist Of Clips
Creating a New Playlist of Clips Create a new playlist as follows: 1 Press LiveTouch creates a new empty playlist using the next available playlist number, starting at library slot 190 (see also Changing the Library Playlist Slot Default, below) if no playlists currently exist. - Page 114 To renumber or rename a playlist, use the softkey in the Action bar. When you create a playlist, LiveTouch temporarily saves the playlist in the library slot corresponding to the playlist number, starting at slot 190 unless the default has been...
-
Page 115: Changing The Playlist Thumbnail
Live Touch User Guide Changing the Playlist Thumbnail When a new playlist is created, a thumbnail is automatically set. By default, the thumbnail from the first clip in the playlist is used, but this can be changed if required. To do this: 1 Cue the playlist. -
Page 116: Using The Playlist Options Menu
Using the LiveTouch Panel Using the Playlist Controls In addition, you can also navigate to a playlist using these alternative methods: • Enter the three-digit number of the playlist, then press Using the Playlist Options Menu The Playlist Options menu enables you to: •... -
Page 117: Changing The Speed Of A Clip In A Playlist
Live Touch User Guide Fig. 3-67: Playlist Controls When working with playlists any changes you make using the clip entry controls override any playback settings saved with the clips in the clips library. Changing the Speed of a Clip in a Playlist Change the playback speed of one or more clips in a playlist as described in the section Setting a Constant Speed for Slo-mo Playback on page 87. -
Page 118: Assigning The Loop Function To Individual Clips In A Looped Playlist
Using the LiveTouch Panel Using the Playlist Controls Apply Loop Function to Entire Playlist Apply Loop Function to Group of Clips Apply Loop Function to Selected Clips in Playlist Fig. 3-68: Loop Function Applied to Clip 4 Press to apply the Loop function to the entire playlist. -
Page 119: Assigning The Loop Function To Grouped Clips In A Looped Playlist
Live Touch User Guide 3 Press to open the Loop Selection popup. 4 Press in the Loop Selection popup. You will see the loop icon highlighted in the clip details. Loop Function Active for Entire Playlist Loop Function Active for Single Clip in Playlist Playlist Plays to this Point, then Loops on Clip... -
Page 120: Tagging Clips In A Playlist
Using the LiveTouch Panel Using the Playlist Controls Loop Function Active for Entire Playlist Looping Side-banner for Looped Group Loop Function Active for Two Grouped Clips in Playlist Playlist Plays to this Point, then Loops through Clips 118 & 131 Until Take Button pressed. -
Page 121: Editing Transitions Between Clips In A Playlist
User Guide Editing Transitions Between Clips in a Playlist LiveTouch enables you to define cross-fade or V-fade transitions, over a number of frames, between clips in a playlist. You can apply the transition to both audio and video, or only... - Page 122 Using the LiveTouch Panel Using the Playlist Controls • Press and select one of the preconfigured transitions available from the Transition Settings popup. Once applied, a transition is shown as a blue bubble between neighboring clips. You can switch the transition on or off simply by touching the transition bubble.
- Page 123 Live Touch User Guide You can use this menu to apply either a V-fade or cross-fade transition to audio, video, or to both audio and video tracks. When you select a V-fade transition type, you can also set the color of the background matte for the transition. The selected color is reflected in the V-fade icon, for example: V-fade to Black Transition V-fade to Red Transition (Video Only)
- Page 124 Using the Playlist Controls Modifying Transitions in Split-audio Mode In addition to applying cross-fade or V-fade transitions to audio tracks, LiveTouch provides split-audio tools allowing you to manipulate the audio transitions in a playlist independently of the video track. These tools enable you effectively to uncouple the audio track from the video track and adjust the start- and end-points of the audio track as required, within constraints.
- Page 125 A representative image of the track and its leading tails is displayed in the clip timeline. A schematic overview showing how LiveTouch builds a clip and its tails for a standard clip duration of 5 seconds at a frame rate of 25 frames/second is shown in Figure 3-80.
- Page 126 Using the LiveTouch Panel Using the Playlist Controls As long as the audio track has sufficient tails, you can extend the audio track so that it starts to play in the time-frame of the preceding track of the playlist. Alternatively you might choose to delay the start of the selected audio track by extending the preceding track into the current track.
- Page 127 Live Touch User Guide More About Playlist Transitions when Using Split-audio Mode When using split-audio mode, there are a number of constraints that you need to consider when adjusting the in and out points of audio tracks. Figure 3-82 shows a scenario where the transitions between audio tracks are simple cuts. In this example, you can advance the in point of an audio track to the beginning of the preceding audio track as long as sufficient tails are present.
- Page 128 Using the LiveTouch Panel Using the Playlist Controls Figure 3-83 shows a scenario using V-fade transitions of equal duration between both audio and video tracks. In this example, you can advance the in point of an audio track only as far as a point at least 12 frames before the transition of the preceding audio track.
- Page 129 Live Touch User Guide audio track only as far as a point at least 12 frames before the transition of the preceding audio track. Video Audio Audio Video Audio Track 3 Can be Advanced to a Point at Least 12 Frames Before the Transitions Between Track 2 &...
-
Page 130: Changing The Default Camera Angle For A Clip In A Playlist
Using the LiveTouch Panel Using the Playlist Controls Changing the Default Camera Angle for a Clip in a Playlist With multi-camera recordings the first live recording sets the default camera angle used. In the library the default angle displays in the clip’s details. -
Page 131: Using Synchronized Play-Out
Live Touch User Guide Using Synchronized Play-out When synchronized play-out is active and the focus is on Program (PGM), you can control both channels together, and the actions of play, jog, shuttle, T-bar and navigation apply to both Program (PGM) and Preview (PRV) channels simultaneously. Moving the focus to Preview (PRV) deactivates synchronized play-out. -
Page 132: Working With The Livetouch Play-Out Modes
• Program/Program mode (PGM/PGM) • Program/Preview mode (PGM/PRV) You can switch between default play-out modes by pressing Alternatively, you can also switch mode in the User tab of the LiveTouch Settings menu, see the section Panel Settings: User Configuration on page 152. -
Page 133: Program/Program (Pgm/Pgm) Mode On The Panel
Live Touch User Guide Program/Program (PGM/PGM) Mode on the Panel In Program/Program mode you can operate ports with a dedicated, independent play-out on each port. In this mode there is no interaction or play-through from one channel to another. Press to switch control from PGM 1 to PGM 2. - Page 134 Using the LiveTouch Panel Working with the LiveTouch Play-out Modes Port 4: PGM Mode 1. The visible border on the play window and on the Livetouch overlay indicates PGM 1 is currently under control. 2. Press CYCLE Key to Switch...
-
Page 135: Program/Preview (Pgm/Prv) Mode On The Panel
Live Touch User Guide Program/Preview (PGM/PRV) Mode on the Panel The Program/Preview mode allows interaction between play-out channels. In this mode the program channel is played to air and the preview channel is used to preview and prepare the next clip or recording for output to air. In PGM/PRV mode, the PLAY key and the T-bar will always initiate playout on the PGM channel. - Page 136 Using the LiveTouch Panel Working with the LiveTouch Play-out Modes Port 4: PGM Mode 1. Use T-Bar & PLAY in PGM Port Window to Initiate Playout 4. Play Port 4 to Air 5. Video on PGM Swapped to PRV 3. Press TAKE Key to Dissolve ...
-
Page 137: Using Program/Preview (Pgm/Prv) Mode With A Playlist
Live Touch User Guide Using Program/Preview (PGM/PRV) Mode with a Playlist When cueing a playlist in PGM/PRV mode, the first clip in the dissolve playlist is cued on the PGM port window and the second clip in the list is automatically cued in the PRV port window. - Page 138 Using the LiveTouch Panel Working with the LiveTouch Play-out Modes PGM Mode PRV Mode Dissolve 1. To Start Playing Cued Clip to Air, Press: Playlist Clip 1 Clip 2 2. To Change Clip Cued on PRV, Use Jog Wheel to...
-
Page 139: Using The Web Bin
The IP address of the LiveTouch web bin host machine used for the search is defined in the Search IP Address(es) field of the Network tab in the Panel Settings, as described in... -
Page 140: Searching For Clips In The Web Bin
Using the LiveTouch Panel Searching for Clips in the Web Bin Search Column Search Search Text Field Filter Drop-down Clips or Playlists Search by User Save Search Toggle Star Rating or Tag Column Search Order Ascending/Descending Matching Search Results by Page... -
Page 141: Working With The Search Results
Live Touch User Guide Tap to Open Clear Search drop-down Menu String Save Search String Columns Included in Search Columns Excluded From Search Fig. 3-90: Restricting the Search to Specific Columns Working with the Search Results Use the web bin controls at the bottom of the screen to manage the search results. Unselected Clip Selected Clip Highlighted Send Selected Clips... -
Page 142: Saving A Clip Or Clips To The Local Clips Library
Working with the Search Results Saving a Clip or Clips to the Local Clips Library The LiveTouch web bin gives you access to remote clips, created by other users, and import them into your local clips library. To save a clip or clip(s) to the local clips library: 1 Search for the clip(s) using the search tools and methods described previously. -
Page 143: Saving A Web Bin Search String
Live Touch User Guide Playlist Search Activated Selected Playlists Controls Activated Fig. 3-93: Selecting a Playlist in the Playlist Search Results 3 Press 4 Press to switch to your local clips library. 5 Locate the Page, Bank and Slot where you would like to save your copied playlist(s). 6 Press This pastes your copied playlist(s) into the target location. -
Page 144: Retrieving A Search String From The Web Bin
Using the LiveTouch Panel Working with the Search Results Playlist Search Activated Selected Playlists Controls Activated Fig. 3-94: Selecting a Playlist in the Playlist Search Results Retrieving a Search String from the Web Bin Re-use a saved search string from the web bin database as follows: 1 Tap to go to your saved web bin searches. -
Page 145: Removing Web Bin Search Strings
Live Touch User Guide 3 To return to the web bin without selecting a search, tap: Removing Web Bin Search Strings You can remove saved search strings using one of the following methods: • To remove a single search, tap: in the top right-hand corner of the individual search. -
Page 146: Switching Playout Ports In The Playout Tab
2 Select the Playout tab Any in-use ports are displayed in the right-hand Playout Ports pane. You will see the available LiveTouch servers (e.g., NS2, NS3 below), displayed in the left- hand Playout Ports pane. to expand the server listing and display any ports that are unused and available for selection. - Page 147 Live Touch User Guide Fig. 3-98: Confirming Port Closure 6 Select the ports you would now like to use for playout. This opens the Open Ports for Playout popup. 7 If necessary, change the user name assigned to the ports, enter the new user name using the soft keypad then press Fig.
- Page 148 Using the LiveTouch Panel Switching Playout Ports in the Playout Tab Selected Overlay Highlight Color Selected Highlight Radio Button Fig. 3-100: Selecting a Different Overlay Highlight Color for the Playout Ports 8 Press to complete the set up and use the new selected ports.
-
Page 149: Entering Data In The Livetouch Fields
Live Touch User Guide Entering Data in the LiveTouch Fields LiveTouch provides a soft alphanumeric keypad and a soft numeric keypad, which you can use to enter the required data into the LiveTouch input fields. Entering Alphanumeric Text Blank fields that require text entry such as a name or category, when pressed, display a soft keyboard allowing you to enter text. -
Page 150: Entering Numeric Values
(or press Return on the external keyboard). If required, press Cancel to cancel your input, or Confirm to accept your input. Backspace/Delete Confirm (Enter) Input Cancel & Close Keypad Fig. 3-102: Soft Numeric Keypad on LiveTouch Panel... -
Page 151: Configuring The Livetouch Panel Settings
Configuring the LiveTouch Panel Settings Overview The LiveTouch Settings menu on the Panel enables you to configure the default operational parameters for the system from a single interface on the LiveTouch Panel. Press the Settings softkey to open the menu, with each section of the settings... -
Page 152: Panel Settings: User Configuration
Configuring the LiveTouch Panel Settings Panel Settings: User Configuration Panel Settings: User Configuration The User configuration tab enables you to define the following: • PGM/PRV Mode settings • Audio settings • General user settings User Settings Active Toggle to Lock Length of Audio &... -
Page 153: Pgm/Prv Mode Settings
User Guide PGM/PRV Mode Settings Playout Mode Settings Note: Only available when more than one playout port is open. Allows you to set the default playout mode for LiveTouch. Option Description Set default playout mode to Program/Program. Set default playout mode to Program/Preview. - Page 154 Configuring the LiveTouch Panel Settings PGM/PRV Mode Settings Option Description Clip transition V-fade - can be applied to audio track, video track or both audio and video. Select a V-fade as the default transition. Activates the swatch popup to set the V-fade flash color for the transition.
- Page 155 When selected, this setting is applied in the following cases: • If you switch from PGM/PGM mode to PGM/PRV mode, LiveTouch automatically takes you to the PRV port window when you have at least one active playlist. • In PGM/PRV mode when switching from the clips library to a playlist.
-
Page 156: Func + Play Speed
This is setting is intended to prevent output of a distorted audio track as the play speed of a clip is reduced or increased when using variable speed playback. You can define minimum and maximum thresholds above and below which LiveTouch mutes any audio tracks. -
Page 157: Creating Audio Presets
Live Touch User Guide Option Description Sets the lower speed limit, below which any audio tracks are muted. Enter the new setting on the numeric keypad, then press Confirm. When active, you will see displayed in the mode indication area of the panel touchscreen. Default: 0% Sets the upper speed limit, above which any audio tracks are muted. - Page 158 Configuring the LiveTouch Panel Settings Audio Settings Adjust Mapping of Inputs to Outputs as Required Saved Audio Patch Presets Add New Audio Preset Configurations Save List of Audio Presets (Inactive) Delete Saved Presets (Inactive) Fig. 4-4: Creating a New Audio Preset...
-
Page 159: General User Settings
For more information, see the section Assigning Audio Patching Options on page 92. If necessary, press to remove any presets from the saved list. When a preset is in use, LiveTouch disables the delete function and grays-out the icon: General User Settings In the General user settings, you can set the following: •... - Page 160 If you change the step-through units, LiveTouch reflects this change in the LiveTouch section of the Desktop Client <F1> configuration page. To change the step-through intervals, tap the step-through box containing the target...
- Page 161 Automatically to Library Position Fig. 4-10: Cursor Movement on Number Entry Using Panel Figure 4-11 shows the same actions on the LiveTouch Desktop with the Automated Cursor Movement on Number Entry feature active. Cursor Highlight Moves to Library Position Automatically as You Enter Each Number: ...
-
Page 162: Panel Settings: Clips Configuration
In Save Length Set the default clip length (in seconds) when LiveTouch auto-saves a clip after pressing: Default: 5 seconds Out Save Length Set the default clip length (in seconds) when LiveTouch auto-saves a clip after pressing: Default: 5 seconds... -
Page 163: Server Publish Settings
Live Touch User Guide Option Description Mark Save Set the default clip length (in seconds) when LiveTouch auto-saves a Length clip after pressing: Default: 120 seconds One Press When enabled, this automatically saves a clip to the next available slot Highlights when Save is pressed. - Page 164 Configuring the LiveTouch Panel Settings Server Publish Settings Metadata Fields Fig. 4-13: Server Publish Settings...
-
Page 165: Panel Settings: Panel Configuration
Live Touch User Guide Panel Settings: Panel Configuration The Panel configuration tab enables you to define the following: • Jog Wheel settings • T-Bar settings • Keys settings • Screen settings • General settings Panel Settings Active Scrollbar to Display Further Panel Settings Settings... - Page 166 Configuring the LiveTouch Panel Settings Jog Wheel Settings Option Description Default Fast Jog Set the shuttle mode as default, engaging the clutch to allow movement of the jog wheel to shuttle forward or backward through a clip at up to 64x real-time speed.
-
Page 167: Calibrating The Jog Wheel Shuttle End-Stops
Live Touch User Guide Calibrating the Jog Wheel Shuttle End-stops On occasion you may need to re-calibrate the end stops of the jog when used in shuttle mode, to set the full extremities of its range with the clutch engaged. Return to Panel Settings Screen Rotate Panel Jog... -
Page 168: T-Bar Settings
Configuring the LiveTouch Panel Settings T-Bar Settings addition, confirm that the at rest position still reads 0%. If not, you can reset this after adjusting the end points, by pressing after releasing the jog wheel. Note: Do not exit the Panel Settings without pressing as your changes may not be saved. -
Page 169: Configuring The Alternate T-Bar Range
Live Touch User Guide 5 Either press to save your settings and return to the Panel Settings menu or press to configure the alternate T-bar range, as described in the following section. Return to Panel Settings Screen Press to Set Upper Limit Press to Set Lower Limit... - Page 170 Configuring the LiveTouch Panel Settings T-Bar Settings Fig. 4-18: Various Alternate T-Bar Configurations When using LiveTouch, toggle the alternate T-Bar mode on and off by pressing the keys: or pressing on the panel touchscreen The Alternate T-Bar range provides the following features: •...
- Page 171 Live Touch User Guide Return to Panel Settings Screen Maximum of Upper Range (0 to 400%) Press to Set Bottom of Dead Band Press to Set Top of Dead Band Speed in Dead Band Minimum of Lower Range (0 to -400%) Alternate T-bar Range of Configuration Active...
-
Page 172: Keys Settings
Configuring the LiveTouch Panel Settings Keys Settings The dead band is a zone where play is usually at 0%, usually in the lower third of the scale. The dead band allows you to set a resting position for the T-bar, when in alternate mode, between the positive forward range and the negative reverse range. -
Page 173: Key Monitor
Live Touch User Guide Option Description SHIFT/FUNC Timeout Defines the active duration following a press of the keys during which a second button can be pressed to invoke additional functions. Double Press Delay The maximum allowed elapsed time between two button presses to define a double-press. -
Page 174: Screen Settings
Configuring the LiveTouch Panel Settings Screen Settings Fig. 4-22: Keys Monitor When you press a key on the Panel, the corresponding key on the Key Monitor lights to show that the key is active. In addition, movements of the Jog Wheel and T-Bar are also reflected on the Key Monitor. -
Page 175: General Settings
Live Touch User Guide Option Description Screen Saver Select the screen saver operation from: • Off (screen saver not used) • Screen only active • Panel keys only active • Both screen and panel keys active. Delay The period of inactivity that must elapse before the screen switches off or the screen saver is activated, depending on the configuration of the screen saver. - Page 176 Configuring the LiveTouch Panel Settings General Settings The configurable options available for the general panel operation are as follows: Option Description Over Temp Alarm Set the temperature at which the over-temperature alarm is triggered. Default: 70C Fan Trip Temp Set the maximum temperature at which point the fan cuts in to cool the Panel.
-
Page 177: Panel Settings: Network Configuration
Client IP Address IP address of the Desktop client PC running the LiveTouch Desktop Client application. This setting must be defined on installation to pair the LiveTouch Panel with the required LiveTouch workstation. Port TCP port number of the associated LiveTouch Desktop Client. -
Page 178: Information
Configuring the LiveTouch Panel Settings Information Information The Information section provides details of the system network, including: • Local Area connection status: (Connected or Disconnected) • MAC Address • Link Bandwidth • DHCP Server • IP address • Subnet Mask address •... - Page 179 Live Touch User Guide Press to Trace Route Resulting Output from Ping Fig. 4-27: Running Network Ping in Diagnostics Press to Trace Route Result Output of Trace Route Fig. 4-28: Running Trace Route in Diagnostics...
-
Page 180: Panel Settings: About Configuration
This section gives you access to the following administrative functions for the whole LiveTouch system: Option Description Close the application software on the LiveTouch Panel. The Panel software restarts automatically. Use this function when changing configuration parameters such as the Client IP Address and Port. -
Page 181: Alarms
• Over Temperature • Main Fan • CPU Fan • LiveTouch Client • LiveTouch Manager. The current status of each item is reflected by the message (Ok, Connected, Disconnected, etc.) and the color in which the message is displayed, for example: •... -
Page 182: Information
Configuring the LiveTouch Panel Settings Information Information This section of the About tab provides detail about your LiveTouch system that can be useful in the event you need to contact the support organization. Panel Settings Active Scrollbar to Display Further... -
Page 183: Licensing
Live Touch User Guide Licensing Press to display the licensing information for the LiveTouch application. Fig. 4-31: LiveTouch License Information Screen Fig. 4-32: LiveTouch License Information Screen... -
Page 184: Livetouch Port Configurations
Configuring the LiveTouch Panel Settings LiveTouch Port Configurations LiveTouch Port Configurations The following table lists some of the port combinations supported by LiveTouch for different picture resolutions. Supported Port Combinations Resolution Max Number of MONITOR tab PLAYOUT tab Total Supported Channels... -
Page 185: Livetouch Setup On The Desktop Client
Configuring Playout Ports Using the Desktop You need to assign a port User ID and configure the playout ports to enable LiveTouch to communicate with the available LiveTouch server channels. To configure LiveTouch playout ports from the Desktop: 1 Enter a Port Owner ID in the User input box. - Page 186 Ports Fig. 5-3: Configuring Playout Ports on the LiveTouch Server LiveTouch displays server channels that are available for selection in light gray with a checkbox to the right of the channel ID. Any server channels under the control of another owner are dark gray and the checkbox is not available.
-
Page 187: Optional Setup Tasks
If not, you can skip this stage and configure audio patching presets later, as required. Defining Audio Presets Using the Desktop LiveTouch can record and play back, edit, ingest and export files with up to 16 channels of audio. You can apply input audio channel patching and gain control settings, by channel, on single recordings through the server’s web management interface. - Page 188 LiveTouch Setup on the Desktop Client Defining Audio Presets Using the Desktop List of Preconfigured Audio Patch Presets Fig. 5-4: Managing Audio Presets on the Desktop The Manage Audio Presets screen lists any existing audio patch presets. Press any of the presets then Edit to display the patching settings for that preset.
-
Page 189: Selecting Live Recordings
Live Recordings Button Fig. 5-6: Opening the Live Recordings Configuration Window Any live recordings configured by way of the LiveTouch Server are displayed. 2 Select the appropriate checkboxes to choose the recordings to monitor. To select all available channels, select the Select All checkbox. - Page 190 The Refresh function is also useful when elements such as recording names are changed. LiveTouch displays the available channels you can select in a series of tabs directly below the Port windows on the Desktop. Live Recording Tabs Fig.
-
Page 191: Grouping Multiple Camera Angles In Live Recordings On The Desktop
Switching Between Live Recordings on the Desktop On the Desktop display, LiveTouch displays all available live recordings in a series of tabs immediately below the channel windows. To display a live recording in the current Port window (either PGM (program) or PRV (preview) depending on the mode) press one of the live recording tabs. -
Page 192: Always In Record (Air) On The Livetouch Server
Fig. 5-10: Schematic Representation of the Always in Record Feature You can use the Ingest tab of the Home page on the LiveTouch Panel to pause, or even stop active recordings. See the section Pausing or Stopping Active Recording on page 41. -
Page 193: Livetouch Desktop Application
LiveTouch Desktop Application... -
Page 194: Overview Of The Livetouch Desktop Client Application
Overview of the LiveTouch Desktop Client Application Overview of the LiveTouch Desktop Client Application The LiveTouch Desktop client application mirrors the panel operation, while providing a more detailed overview of the content of the clips library and playlists. Changes made in one are reflected dynamically on the other. - Page 195 LiveTouch User Guide Fig. 6-2: Overview of Desktop Screen Components (see key overleaf)
- Page 196 LiveTouch Desktop Application Overview of the LiveTouch Desktop Client Application Key to Figure 6-2 on page 195: Component Description Port window 1 Port window 2 Playlists Playlist tools. Provides tools to set characteristics for the playlist, including looping, transitions, and stars. In addition, provides access to split audio mode and displays the order of the selected clip together with the total duration of the playlist.
- Page 197 Clips library: Page 1, Bank 1, Slots 0 through 9. All slots empty. Application Bar. Provides access to LiveTouch and other integrated applications, depending on your system configuration. Server and user configuration options. Play controls and PGM/PGM or PGM/PRV mode switch.
-
Page 198: Using The Port Windows & Live Recording Tabs
Using the Port Windows & Live Recording Tabs Port Window Layout The LiveTouch Desktop screen features two Port Windows along the top of the screen. The port windows display the active recording or cued clip, according to the playback mode selected, which can be either: •... -
Page 199: Switching Between Port Windows
• Press the Tab key on the keyboard. • Click the mouse cursor in the target port window. For more information, see the section Using the LiveTouch Play-out Modes on page 205. Adding Recording Clips In addition to the live recordings you can also work on a clip saved on a server. -
Page 200: Switching Between Live Recording Tabs
• Press directly on one of the available live recording tabs. • Press the corresponding live feed key: on the LiveTouch panel. By default, these keys switch between feeds A - D of a multi-cam group. If the A key is double-pressed, the keys will then switch between feeds E - H, as per the upper set of button labels. -
Page 201: Closing A Live Recording Tab
LiveTouch User Guide Note: In previous versions of LiveTouch, right-clicking to rename the recording tab would cause it to go Live. This behavior has been updated, and now right-clicking will NOT cause the tab to go Live. Closing a Live Recording Tab... -
Page 202: Using The Desktop Play Controls
LiveTouch Desktop Application Using the Desktop Play Controls Using the Desktop Play Controls Using the Play Controls in the Port Window The play controls consist of several buttons with dedicated functions, that you can use as an alternative to the play control keys on the panel. - Page 203 102. The following table shows the effect the different play controls have on a clip selected from the clips library. Action Effect on LiveTouch Select a clip in the library, then press: Clip cued in the port window: Clip Cued/Paused...
- Page 204 LiveTouch Desktop Application Using the Play Controls in the Port Window Action Effect on LiveTouch Play the clip, press: Clip cued in the port window: Clip Playing-out Clip play-out complete. Clip cued in the port window: (If optional eject mode enabled, press: to clear clip from the Port...
-
Page 205: Using The Livetouch Play-Out Modes
• When the PRV window is active, pressing the red: key switches to the PGM window. When using the LiveTouch Desktop or Panel touchscreen, you can also distinguish between the active and inactive Port windows by the color of the border, which is defined when configuring the channel ports. -
Page 206: Working In Pgm/Prv Mode
LiveTouch Desktop Application Using the LiveTouch Play-out Modes b Press The clip starts to play in the PGM Play-out window. a Press Take. The clip starts to play immediately in the play-out window. To play-out another clip in the other port window: 4 Select the second PGM window so that the border is highlighted. - Page 207 LiveTouch User Guide The content starts to play-out from the PGM Play-out window at the same speed as the previous clip in the PGM window. If Sync Play is also selected, then the content will play in both PGM and PRV port windows.
- Page 208 LiveTouch Desktop Application Using the LiveTouch Play-out Modes 1. Select Clip in Library PRV Preview Window: 2. Cue Clip 3. Take Clip Through to PGM Port Window PGM Play-out Window: 5. If PGM/PRV - Take Plays At 100% is Off,...
- Page 209 LiveTouch User Guide Working with Reference Markers on the Desktop Client As the live recording plays through, you can follow its progress in the record timeline. You can mark a point of interest in the record timeline at any time by pressing: After adding a marker, you can view the number of a mark by hovering the cursor over the red mark of interest in the record timeline and if necessary add a description of the marker.
- Page 210 LiveTouch Desktop Application Using the LiveTouch Play-out Modes You can review the markers added to a timeline in the Mark Pane on the Desktop Client. To open the Mark Pane, right-click in the clip port window to display the options menu and then select Open Marks.
-
Page 211: Using The Clips Library
LiveTouch User Guide Using the Clips Library The clips library displays all saved clips stored in a Page: Bank: Slot structure. Library Library Clip Selection Page 1, Bank 1, Highlight Page 1, Bank 2, Slots 0 - 9 Slots 0 - 9... -
Page 212: Clips Library
78. Navigating the Library Using the Panel To navigate the library using the LiveTouch panel, see Navigating Through the Clips Library on page 82. Using the Keyboard Use one of the following methods to navigate through the clips library using the Desktop keyboard: •... -
Page 213: Managing Library Entries
LiveTouch User Guide Managing Library Entries Press the softkey, to the right of the play controls. This opens the Manage Entries popup menu, shown in Figure 6-11: Fig. 6-11: Manage Entries Popup Menu Use the options in the Manage Entries popup menu as follows:... -
Page 214: Renaming A Page Title
LiveTouch Desktop Application Renaming a Page Title 3 Click Protect; the clip is protected, and a padlock is displayed on the thumbnail to indicate this: Fig. 6-13: Protected Clip To un-Protect a clip, repeat steps 1-3; the protection will be toggled off. -
Page 215: Clip Details
LiveTouch User Guide Clip Details Each recorded clip stores the following information: • Title • Duration • Start Timecode • Library slot number • Camera angle (when using multi-cam recordings) • Default playback settings (speed, audio patching, looping) • Tag and star rating. -
Page 216: Changing A Slo-Mo Speed Preset
LiveTouch Desktop Application Clip Details 3 Select one of the three available preset speeds to apply to the selected clip, for example, 350%, 60% or 75%. The selected constant speed setting is assigned to the clip(s). Changing a Slo-mo Speed Preset, below, for information on changing these default values. - Page 217 LiveTouch User Guide 7 Set the required speed using one of the following methods to add keyframes to the profile: • Adjust the T-bar then press to set the speed at that point, or • Enter a speed value (as a percentage) on the numeric keypad then press 8 Repeat steps 5 - 6 to add as many keyframes as required for the speed profile.
-
Page 218: Switching Camera Angles
It is important to note that any changes you make locally are not reflected back to the LiveTouch Manager, however, you can refresh the tag set or rosters from the source files on the LiveTouch Manager to revert to the original content. - Page 219 Clear the local cache to remove all changes you have made to your local tag list or rosters. The exclamation point symbol shows that you have locally cached tag lists and rosters that have been removed from the LiveTouch Manager; click this button to remove these lists and rosters.
-
Page 220: Managing Tags Locally
Order the tags by tag number (default sort.) • Insert a new tag using the soft keypad. The tag remains local to the Desktop Client and is not saved to the LiveTouch Manager. The new tag is always allocated the next available tag number. -
Page 221: Applying Tags To Clips
User Guide • Delete the selected tags from the local table. This does not affect the source tag table on the LiveTouch Manager. • Remove the selection highlight from selected tags so that they are no longer subject to the tool actions. -
Page 222: Removing Tags From Clips
LiveTouch Desktop Application Star-rating and Tagging Clips Selected Clip Thumbnails Scroll to Additional Rosters Click to Apply Selected Tags Preferred Right Roster Available Tag Preferred Left Roster Fig. 6-21: Tag Selection Window 4 Select the tags or roster labels you want to apply to the selected clips, then click This applies the tags to the target clip(s) and returns you to the main clipping screen. -
Page 223: Editing A Clip
LiveTouch User Guide Selected Clip Thumbnails with Applied Tags & Roster Labels Applied Roster Labels Applied Roster Click to Remove Labels Selected Tags Fig. 6-22: Removing Tags from Clips 3 Click then This removes all tags and roster labels from the selected clips and returns you to the main clipping screen. -
Page 224: Renaming A Clip
LiveTouch Desktop Application Renaming a Clip Renaming a Clip To edit the name of a clip: 1 Right-click on the target clip and select Rename from the Options menu. This opens the soft keyboard with the current clip name highlighted in the entry field. If the clip name is too long to fit in the field, hover over it with the cursor to display the full name. -
Page 225: Restriping Clip Timecode
LiveTouch User Guide 6-26: Slot Pre-Named Click Clr (or <Del> on the physical keyboard) to discard the name, if required. Restriping Clip Timecode You can restripe a clip’s timecode if you wish. To do this: 1 Drag the clip to restripe to either the Desktop or the Editor. -
Page 226: Running A Library Search Using The Web Bin
Running a Library Search Using the Web Bin The LiveTouch web bin enables you to search through all available material on the system. You can search by title, library slot, or user either to load clips into the local library, or to send clips directly to a playlist. - Page 227 LiveTouch User Guide Fig. 6-29: Using the Web Bin 2 Type a search string into the Search field. The display changes dynamically, as you type, filtering the entries according to your entry. The search filters use all categories, not just the title, so clips can be searched using timecode, location, etc.
-
Page 228: Working With Playlists
LiveTouch Desktop Application Working with Playlists Working with Playlists Overview A playlist is a collection of saved clips, collated and ready for play-out. Each playlist is stored as a separate tab in the playlist area. Playlist Sort Active Playlist Tab... -
Page 229: Switching Between Playlists
Panel, or in the action bar on the touchscreen. LiveTouch creates a playlist, indicated by a numbered Playlist tab at the top of the list. You can add further playlists as new tabs along this same row. You can edit the tab names and numbers as required, see the section Renaming or Renumbering a Playlist Tab on page 231. -
Page 230: Playing A Playlist
LiveTouch Desktop Application Playing a Playlist Playing a Playlist A playlist can be block-played in full, or individual clips cued or taken, as required. The color of the current clip indicator bar is either Orange (Cued), or Green (Playing), see on page 230. -
Page 231: Sorting A Playlist By Timecode
LiveTouch User Guide See the Desktop Editing User Guide and Timeline Editing User Guide for details on editing clips. Sorting a Playlist by Timecode You can sort a playlist by timecode using the Sort tools in the top left-hand corner of the... -
Page 232: Closing A Playlist
The current port window remains open, but empty. Press when requested to complete the action. Confirm Confirm the Close action. Cancel Closes the menu without making any changes. Note: When closing a playlist, LiveTouch deletes the temporary copy of the playlist from the Clips Library. -
Page 233: Editing Transitions Between Clips In A Playlist
Figure 6-38. You can also set transitions directly using the LiveTouch Panel, see the section Editing Transitions Between Clips in a Playlist on page 121. To edit a transition: 1 Select a clip in a playlist, then either press the transition icon ( ) or click the blue transition box between clips. -
Page 234: Defining Transition Settings
5 If opened at the playlist level, select whether to apply to all entries or only the selected clips. If you choose to apply to all entries, LiveTouch automatically applies the default transition to any new entries added to the playlist. - Page 235 LiveTouch User Guide Pointer Indicates Video Track Associated with Audio Track Audio Cut Transition Audio Track for Clip 116 Extended Past the Start of Adjacent Clip 111 Cross-fade Transition V-fade Transition Tap to Quit Split-audio Mode Fig. 6-40: Split-audio Mode 2 Select the target clip for which you want to adjust the audio track.
- Page 236 A representative image of the track and its leading tails is displayed in the clip timeline. A schematic overview showing how LiveTouch builds a clip and its tails for a standard clip duration of 5 seconds at a frame rate of 25 frames/second is shown in Figure 3-96 on page 145.
-
Page 237: Audio Patching In A Playlist
LiveTouch User Guide 8 Turn the jog wheel to position the red playhead at the new out point at which you want the audio track to stop. 9 Press to set the new out point for the audio track. You will see that the vertical height of the audio track adjusts to the new out point. - Page 238 LiveTouch Desktop Application Switching Camera Angles in a Playlist 2 Scroll to the desired camera angle, and release.
-
Page 239: Entering Data In The Livetouch Fields
LiveTouch User Guide Entering Data in the LiveTouch Fields LiveTouch provides a soft alphanumeric keypad and a soft numeric keypad, which you can use to enter the required data into the LiveTouch input fields. Entering Alphanumeric Text Blank fields that require text entry such as a name or category, when pressed, display a soft keyboard allowing you to enter text. - Page 240 Decrement Value Increment Value Numeric Entry Field Cancel Entry Fig. 6-44: Soft Numeric Keypad on LiveTouch Desktop For a table listing the keyboard shortcuts available for many LiveTouch functions, see the section Keyboard Shortcuts on page 241.
-
Page 241: Keyboard Shortcuts
LiveTouch User Guide Keyboard Shortcuts The following keyboard shortcuts are available for many LiveTouch functions: Keyboard Shortcut Action LiveTouch Navigation Shortcuts Arrow Up Navigate up or down library/playlist storage. Arrow Down Arrow Left Navigate between banks in a page. Arrow Right Alt + Left-Arrow When focus on clips library, cycle through library Pages. - Page 242 Create new playlist with selected clips in the order of selection. Ctrl + P Send selected clip(s) to the active playlist in the order of selection. Alt + P Publish selected clips to the LiveTouch server. R or r Rename and/or renumber the selected clip. Save selected clip(s).
- Page 243 Press records that length into the future. Application Interface Shortcuts E or e Take selected entries to the LiveTouch Edit timeline. Take selected entries to I/O menu. Clip Tagging Shortcuts Shift + Tab Cycle focus of previous list in tag window.
- Page 244 LiveTouch Desktop Application Keyboard Shortcuts Keyboard Shortcut Action Ctrl + C on empty slot Clear copy buffer. Shift + Ctrl + Tab Toggle the port window lock on or off.
-
Page 245: Configuring The Livetouch Desktop Settings
In addition to the Settings configuration on the Panel (see the chapter Configuring the LiveTouch Panel Settings, on page 151) the elements described in this section need to be configured either in the <F1> menu or the Desktop Settings menu. -
Page 246: Edit Mark Settings
Configuring the LiveTouch Desktop Settings Edit Mark Settings To close the <F1> Configuration Window, either press <F1> again or press at the top right of the window. Edit Mark Settings The Edit Mark settings are as follows: Setting Description In Save -... -
Page 247: Transition Settings (Playlist And Port)
A negative number steps backward, and a positive number steps forward. Changing the units of Step 1 in the LiveTouch section of the <F1> page also changes the setting of the step-through softkeys on the Panel. -
Page 248: Opening The Livetouch Settings Menu
Configuring the LiveTouch Desktop Settings Opening the LiveTouch Settings Menu Opening the LiveTouch Settings Menu • If not done already, select LiveTouch from the drop-down menu at the top of the window. Fig. 7-2: LiveTouch Settings Menu LiveTouch Input Device Options If you have not already done so, select the Enable LiveTouch Panel checkbox to use the LiveTouch Panel. -
Page 249: Workflow Options
Workflow Options When the option Create clip when saving marked segment is selected, LiveTouch creates a new ISA clip, as well as a new playlist entry, when a marked segment is saved to a playlist. The other Workflow options are as follows:... -
Page 250: Network Connections
Configuring the LiveTouch Desktop Settings Network Connections Network Connections The Network section is used to set up a seat for connection to the LiveTouch Manager as part of a network-wide configuration. Select Network from the scroll box at the top of the window. -
Page 251: Configuring The Livetouch Output On The Server
TOD out. To configure the overlays: 1 Open the LiveTouch Dashboard and open the Status Summary web page for the server providing the ports to which you are connected. 2 Select Configure, then SDI Channels, see Figure 7-4. - Page 252 Configuring the LiveTouch Desktop Settings Using Output Overlays Server Configuration Selected Server Menu Video Fig. 7-4: Server Summary Page- Selecting SDI Channel Configuration This opens the SDI Channel Configuration page for the selected server. 3 Scroll down to the Output Overlay Settings section of the page: Activate/Deactivate Overlay &...
-
Page 253: Up-Scaling
Play-through A recording from another server on the network can be streamed to the LiveTouch server, and used by the LiveTouch operator, in the same way as a local recording. The play-through feature is subject to bandwidth calculations/ Note: limitations. - Page 254 Configuring the LiveTouch Desktop Settings Play-through...
- Page 255 1-800-547-8949 (US and Canada) or +1 530 478 4148. To obtain a local phone number for the support center nearest you, please consult the Contact Us section of Grass Valley’s website ( www.grassvalley.com An online form for e-mail contact is also available from the website.
Need help?
Do you have a question about the LIVETOUCH and is the answer not in the manual?
Questions and answers