Advertisement
Quick Links
Please Contact Moen First
For Installation Help, Missing or
Replacement Parts
(USA)
1-800-BUY-MOEN (1-800-289-6636)
WWW.MOEN.COM
(Canada)
1-800-465-6130
WWW.MOEN.CA
Por favor, contáctese primero
con Moen
Para obtener ayuda de instalación, piezas
faltantes o de recambio
011 52 (800) 718-4345
WWW.MOEN.MX
Veuillez d'abord contacter Moen
En cas de problèmes avec l'installation, ou pour
obtenir toute pièce manquante ou de rechange
1-800-465-6130
WWW.MOEN.CA
HELPFUL TOOLS
HERRAMIENTAS ÚTILES
For safety and ease of
Para que el cambio de la
faucet replacement, Moen
llave sea fácil y seguro,
recommends the use of
Moen le recomienda usar
these helpful tools.
estas útiles herramientas.
Icon Legend/Leyenda de Iconos/
Légende des icônes
Above sink
Encima del lavabo
Au-dessus de l'évier
OUTILS UTILES
Par mesure de sécurité et
pour faciliter l'installation,
Moen suggère l'utilisation
des outils suivants.
Sealant
Sellador
Mastic
Below sink
Debajo del fregadero
Sous l'évier
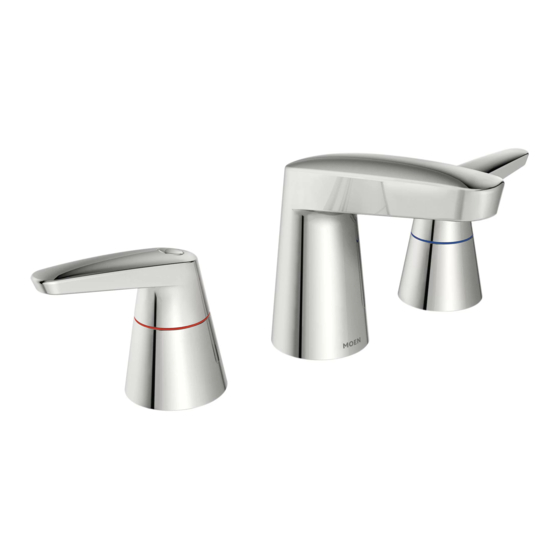
TWO-HANDLE LAVATORY FAUCET
MEZCLADORA PARA LAVABO DE
DOS MANERALES
ROBINET DE LAVABO À
DEUX POIGNÉES
9921
Image is for reference only
(Style varies by model)
La imagen es sólo como referencia
(El estilo varía por el modelo)
Cette image n'est offerte qu'à titre indicatif seulement
(Le style varie selon le modèle)
Record Purchased Model Number:
Registro del número de modelo comprado:
Consigner ici le numéro du modèle acheté :
_______________________
(Save instruction sheet for future reference)
(Guarde la hoja de instrucciones para futura referencia)
(Garder ces directives pour référence ultérieure)
Register Online:
Regístrese en línea:
S'enregistrer en ligne :
www.moen.com/product-registration
CAUTION — TIPS FOR REMOVAL OF OLD FAUCET:
Always turn water supply OFF before removing existing faucet or disassembling the valve. Open faucet
handle to relieve water pressure and ensure that complete water shut-off has been accomplished.
PRECAUCIÓN — CONSEJOS PARA CAMBIAR LA VIEJA MEZCLADORA:
Siempre CIERRE la toma de agua antes de quitar la llave existente o desmontar la válvula. Abra la
llave para liberar la presión, y asegúrese de que esté bien cerrada el agua.
ATTENTION — SUGGESTIONS POUR ENLEVER L'ANCIEN ROBINET:
Toujours couper l'alimentation en eau avant d' e nlever ou de démonter le robinet. Ouvrir le robinet
pour libérer la pression d' e au et pour s'assurer que l'alimentation en eau a bien été coupée.
INS10467A - 10/18
9922
Advertisement

Subscribe to Our Youtube Channel
Related Manuals for Moen 9921


Summary of Contents for Moen 9921
- Page 1 INS10467A - 10/18 TWO-HANDLE LAVATORY FAUCET Please Contact Moen First For Installation Help, Missing or MEZCLADORA PARA LAVABO DE Replacement Parts DOS MANERALES (USA) 1-800-BUY-MOEN (1-800-289-6636) ROBINET DE LAVABO À WWW.MOEN.COM DEUX POIGNÉES (Canada) 1-800-465-6130 WWW.MOEN.CA Por favor, contáctese primero...
-
Page 2: Parts List
x2 x2 x2 x2 x2 x2 Parts List Lista de piezas Liste des pièces A. Handles (x2) Q. Mounting Plate A. Manerales (2) aireador A. Poignées (2) S. Corps de soupape B. Hex Wrench R. Mounting Nut B. Llave hexagonal P. - Page 3 INS10467A - 10/18 Sealant Sellador Mastic Apply a bead of sealant to the base of the Spout (N) as shown. Turn Spout upright. Place the Spout (N) into center opening in sink. Hold Waterway (G) and Mounting Shank (P) together when installing. Aplique una gota de sellador a la base del surtidor (N) como se muestra.
- Page 4 Clip Groove Ranura del clip Rainure de l'étrier 1. Slide Mounting Tool (M) onto Mounting Nut (R). Thread Lower Mounting Nuts (K) onto the Hot and Cold Valve Bodies (L & S) far enough to 2. Insert screwdriver into hole of Mounting Tool (M). allow the Valve Body Clip groove to be 1/2"...
- Page 5 INS10467A - 10/18 Red = Hot Blue = Cold Rojo = Caliente Azul = Frio Rouge = Chaud Bleu = Froid Push the Hot Valve Body w/Red Stem (L) on the left side up from below the sink. Use one hand Slide Valve Clip (H) into the groove on each Valve Body.
- Page 6 Click Clic Clic Install ends of Duralock Hose (T) to the Valve Bodies (L & S). Push in as far as possible until a Attach the Duralock Hose (T) to the bottom of the Waterway (G). Push Duralock Hose (T) up as "click"...
- Page 7 INS10467A - 10/18 1. Place Handle Adapter (E) onto Hot Valve Body w/Red Stem (L). 2. Thread Handle Adapter (E) onto Hot Valve Body w/Red Stem (L), flat side of splines to face away from Spout (N). 3. Hold splines while threading adaptor base onto Hot Valve Body w/Red Stem (L). 4.
- Page 8 Sealant Sellador Mastic Place Set Screws (D) on Hex Wrench (B) and insert into Handles (A). 1. Clean drain opening in the bottom of sink. Tighten Set Screws. 2. Apply a generous amount of sealant to the underside of the Waste Seat (BB). Insert Plug Buttons (C) into handle screw holes.
- Page 9 INS10467A - 10/18 Thread Seal Tape Cinta para sellar roscas Ruban pour joints letés 1. Apply thread seal tape to threads on Tail Piece (GG). 1. Install Lift Rod (U) into opening on the top of the Spout (N). 2. Install Tail Piece (GG) to Drain Body (FF) and hand tighten. 2.
- Page 10 1/2" (12.5mm) 1/8" (3.1mm) 1. Loosen nut on Lift Rod Strap (V) to allow Lift Rod (U) to rest in faucet. 1. Tighten Pivot Rod (Y) with Pivot Rod Nut (X). 2. Push Pivot Rod (Y) down. 2. Lower Lift Rod (U), allowing at least 1/8" gap in between. Allow 1/2" gap for pop up in 3.
- Page 11 INS10467A - 10/18 Aerator Flushing / Enjuague del aireador / Rinçage de l’aérateur Cold Frio Froid Caliente Chaud 1. Align Aerator Tool (O) to aerator in Spout. 1. Attach faucet supply lines to shut off stops. 2. Using an adjustable wrench, tighten lines to stops. 2.
- Page 12 Moen le proporcionará SIN COSTO ALGUNO las piezas Si ce robinet fuit ou dégoutte durant la période de garantie, Moen s’ e ngage Period, Moen will FREE OF CHARGE provide the parts necessary to put the necesarias para que vuelva a funcionar en perfectas condiciones y reemplazará...
Need help?
Do you have a question about the 9921 and is the answer not in the manual?
Questions and answers