
Related Manuals for ZyXEL Communications ZyXEL PLA-407


Summary of Contents for ZyXEL Communications ZyXEL PLA-407
- Page 1 PLA-407 Powerline Pass-Thru Ethernet Adapter Firmware Version 4.0.1 Edition 1, 8/2009 www.zyxel.com www.zyxel.com Copyright © 2009 ZyXEL Communications Corporation...
-
Page 3: About This User's Guide
About This User's Guide Intended Audience This manual is intended for people who want to configure the PLA-407 using the web configurator. Tips for Reading User’s Guides On-Screen When reading a ZyXEL User’s Guide On-Screen, keep the following in mind: •... -
Page 4: Documentation Feedback
About This User's Guide Documentation Feedback Send your comments, questions or suggestions to: techwriters@zyxel.com.tw Thank you! The Technical Writing Team, ZyXEL Communications Corp., 6 Innovation Road II, Science-Based Industrial Park, Hsinchu, 30099, Taiwan. Need More Help? More help is available at www.zyxel.com. -
Page 5: Customer Support
About This User's Guide Customer Support Should problems arise that cannot be solved by the methods listed above, you should contact your vendor. If you cannot contact your vendor, then contact a ZyXEL office for the region in which you bought the device. See http://www.zyxel.com/web/contact_us.php for contact information. -
Page 6: Document Conventions
Document Conventions Document Conventions Warnings and Notes These are how warnings and notes are shown in this User’s Guide. Warnings tell you about things that could harm you or your device. Note: Notes tell you other important information (for example, other things you may need to configure or helpful tips) or recommendations. - Page 7 Icons Used in Figures Figures in this User’s Guide may use the following generic icons. The PLA-407 icons used may not be an exact representation of your device. PLA-407 Modem / Router PLA-407 User’s Guide Computer Internet Printer Notebook Document Conventions...
-
Page 8: Safety Warnings
Safety Warnings • Do NOT use this product near water, for example, in a wet basement or near a swimming pool. • Do NOT expose your device to dampness, dust or corrosive liquids. • Do NOT store things on the device. •... -
Page 9: Table Of Contents
About This User's Guide ... 3 Document Conventions... 6 Safety Warnings... 8 Table of Contents... 9 Part I: Introduction... 13 Chapter 1 Introducing the PLA-407 ...15 1.1 Overview ... 15 1.1.1 Data Transfer ... 16 1.1.2 Pass-Through Design ... 16 1.1.3 Noise Filter ... - Page 10 Table of Contents Chapter 4 The ENCRYPT Button...31 4.1 ENCRYPT Button Overview ... 31 4.2 Set Up a HomePlug AV Network with ENCRYPT ... 31 4.2.1 Expanding the Network with ENCRYPT ... 33 4.3 Setting Up Multiple Networks ... 33 4.4 ENCRYPT Button Behavior ...
- Page 11 7.0.5 Setting Up a New Network with a New Adapter ... 65 7.0.6 Splitting a Network into Two Networks ... 67 7.1 Troubleshooting ... 70 Chapter 8 PLA Compatibility ... 71 8.1 Overview ... 71 8.2 Firmware and Utility Compatibility ... 71 8.3 Compatibility Diagrams ...
- Page 12 Table of Contents PLA-402 v3 User’s Guide...
-
Page 13: Part I Introduction
Introduction Introducing the PLA-407 (15) Installing the Utility (23) -
Page 15: Introducing The Pla-407
H A P T E R Introducing the PLA-407 1.1 Overview This chapter introduces the main applications and features of the PLA-407 HomePlug AV compliant Powerline adapter. In this User’s Guide the electrical wiring network is referred to as the “Powerline network”. The HomePlug AV standard specifies how network devices communicate using standard electrical wiring. -
Page 16: Data Transfer
Chapter 1 Introducing the PLA-407 1.1.1 Data Transfer The PLA-407 securely communicates with each other at high data transfer rates of up to 200 Mbps. The theoretical maximum channel data rate is 200 Mbps on the physical layer. The actual channel data rate will vary depending on noise on the electrical wires and the quality of your electrical installation. -
Page 17: Quality Of Service
interference from the electrical devices so that it does not affect the Powerline network. This is shown in the following figure. Figure 2 Noise Filter on PLA-407 Home Appliances This setup maximizes the PLA-407’s performance and ensures that the Powerline network is stable. -
Page 18: Low Power Mode
Chapter 1 Introducing the PLA-407 1.1.5 Low Power Mode Your PLA-407 is a certified green product. It goes into Low Power mode when there is no Ethernet connection. When you plug the PLA-407 into an electric socket, it waits for an Ethernet connection. -
Page 19: Ways To Manage The Pla-407
Your network can be further expanded by plugging additional PLA-407s into other power outlets in your home and connecting other computers or network devices (for example, a printer) to them. Refer to your Quick Start Guide for hardware connection information. 1.3 Ways to Manage the PLA-407 Use the ENCRYPT button to add Powerline devices to your Powerline network if they have this button. -
Page 20: Passwords
Chapter 1 Introducing the PLA-407 1.4.1 Passwords You use two types of passwords in the HomePlug AV Powerline network. The following table describes the differences between the passwords. Table 1 Password Summary PASSWORD Network Name DAK (Data Access Key) Password 1.4.2 Setting Up Security The ENCRYPT feature automatically sets up security on your Powerline network. -
Page 21: Multiple Networks
You may need to change the Network Name to create multiple Powerline networks. See the next section for more information on how to set up a multiple network. 1.5 Multiple Networks Multiple powerline networks can coexist on a single powerline circuit. You might want to implement multiple powerline networks in a small office environment where you have two separate Ethernet networks. - Page 22 Chapter 1 Introducing the PLA-407 PLA-407 User’s Guide...
-
Page 23: Installing The Utility
H A P T E R 2.1 Overview This chapter guides you through the installation of the configuration utility for your PLA-407. The installation of the configuration utility does the following: Checks for and installs Microsoft’s .NET Framework version 2.0 software on your computer. - Page 24 Chapter 2 Installing the Utility Insert the included CD-ROM into your computer’s CD-ROM drive. The Setup utility runs automatically. Alternatively this can also be done manually by double clicking the setup.exe file on the CD. A prompt appears asking you to install the .NET Framework version 2.0.
- Page 25 The Setup utility runs automatically. Click Yes or Next to continue through the initial screen. Click Cancel only if you want to abort the installation. Figure 7 InstallShield Wizard Start Screen If you want the utility to be only available to the currently logged in user, select Only for me(...).
- Page 26 Chapter 2 Installing the Utility When the installation is finished, a screen appears to confirm that the PLA-4xx Series Configuration Utility has been successfully installed on your computer. Click Close to exit the wizard. Figure 9 Installation Complete Note: You may be asked to restart your computer when the installation is complete. Click “Yes”...
-
Page 27: Part Ii: Managing The Pla-407
Managing the PLA- Firmware Tool (29) The ENCRYPT Button (31) The Configuration Utility (37) Powerline Network Setup Tutorial (61) PLA Compatibility (71) -
Page 29: Chapter 3 Firmware Tool
H A P T E R 3.1 Overview Use the Firmware Upgrade Tool to ensure you have the latest firmware (version 4.0.1 or later) on your PLA-407(s). You need to upgrade all your PLA-407s to the latest firmware to ensure they can connect with each other and they are compatible with the latest version Utility. - Page 30 Chapter 3 Firmware Tool PLA-407 User’s Guide...
-
Page 31: Chapter 4 The Encrypt Button
H A P T E R The ENCRYPT Button 4.1 ENCRYPT Button Overview The ENCRYPT button allows you to set up a secure Powerline connection with other HomePlug AV compliant Powerline devices which also support the ENCRYPT feature. No other setting changes are required to connect. You can use the ENCRYPT button to: •... - Page 32 Chapter 4 The ENCRYPT Button Press the ENCRYPT button on your second Powerline device for 1~2 seconds. The power ( ) light will blink as the PLA-407 tries to set up a connection. Figure 10 ENCRYPT Connection Procedure press for 2 seconds within 2 minutes Note: The ENCRYPT button’s location varies for each Powerline device.
-
Page 33: Expanding The Network With Encrypt
4.2.1 Expanding the Network with ENCRYPT If you want to add more Powerline devices to your network after the initial setup (refer to Section 4.2 on page To add more Powerline devices to your network, press the ENCRYPT button on device C (shown below) for more than 10 seconds until the power ( flashes. - Page 34 Chapter 4 The ENCRYPT Button For example, you have already set up a Powerline network in your home (A) which accesses a printer (B). Now you want a separate Powerline network connection from your laptop (C) to your printer. Figure 12 One Existing Powerline Network Click the ENCRYPT button on (A) for more than 10 seconds until the power ( light flashes.
- Page 35 Check the LEDs on both (A) and (C). When the power ( lights stop blinking and the power ( connected. Figure 13 Two Separate Powerline Networks Congratulations. You now have two separate Powerline networks as shown above. If the HomePlug ( ) lights on both Powerline devices do not light up, the Powerline devices are not connected.
-
Page 36: Encrypt Button Behavior
Chapter 4 The ENCRYPT Button 4.4 ENCRYPT Button Behavior The following table summarizes the actions that occur when the ENCRYPT button is pressed for specific lengths of time. Table 2 Time ENCRYPT Button is Pressed and Action TIME ACTION less than The device joins a network. -
Page 37: The Configuration Utility
H A P T E R The Configuration Utility 5.1 Overview This chapter shows you how to use the Configuration Utility (or Utility) to secure, manage and set up Quality of Service (QoS) on your Powerline network. The PLA-407 is designed as a plug-and-play network expanding solution. This means that once you complete your hardware connections, the PLA-407s in your network (without additional configuration) are able to communicate with each other by sending and receiving information over your home’s electrical wiring. -
Page 38: Device Access Key (Dak)
Chapter 5 The Configuration Utility By default the PLA-407s are all configured with the network name HomePlugAV, this allows you to simply plug the devices in and not worry about setting up security. If you want to enhance the security on your Powerline network, you can change the network name on the Powerline adapters you want to allow to communicate in your Powerline network. -
Page 39: Configuration Screen
5.3 Configuration Screen Use the Configuration screen to see which devices are recognized by your Powerline network, to configure your PLA-407 and to set up a secure Powerline network by changing the Powerline network name. This screen opens up when you launch the utility. - Page 40 Chapter 5 The Configuration Utility Table 3 Configuration Screen (continued) LABEL DESCRIPTION Site This field displays • Local - This shows if PLA-407 is identifying the Powerline adapter directly connected to the computer running the configuration utility. • Remote - This shows if PLA-407 is a Powerline adapter in your Powerline network but not directly connected to the computer running the configuration utility.
-
Page 41: Firmware Screen
5.4 Firmware Screen Firmware is the software which is embedded in the PLA-407. This software contains processing instructions for how the PLA-407 sends and receives information in a secure way. You can check the ZyXEL website for firmware upgrades for your PLA-407. Note: To upgrade to the latest firmware, use the firmware upgrade tool available from the ZyXEL website (www.zyxel.com), or from the CD included with your PLA- 407. - Page 42 Chapter 5 The Configuration Utility Click Network Info to display the following screen. Figure 18 Network Info Screen The following table describes the labels in this screen. Table 4 Network Info Screen LABEL DESCRIPTION Adapter This field identifies which Powerline network information is displayed. Different Powerline networks are identified by the Ethernet interface (network card) connected directly to the PLA-407.
-
Page 43: Advanced Screen
Table 4 Network Info Screen (continued) LABEL DESCRIPTION Transmit This field displays how fast information is sent from the Powerline adapter Rate (Mbps) selected in the Configuration screen to this Powerline adapter. Receive Rate This field displays how fast information is received from the Powerline (Mbps) adapter selected in the Configuration screen to this Powerline adapter. - Page 44 Chapter 5 The Configuration Utility The figure below shows an example Powerline home network connected to the Internet. Figure 19 Priority Settings • Device A is a printer and does not handle traffic with high importance, so the Powerline adapter connected to it can be set to low priority. •...
- Page 45 Use this screen to configure priority settings for traffic from the Powerline adapters on your network. Figure 20 Advanced Screen The following table describes the labels in this screen. Table 6 Advanced Screen LABEL DESCRIPTION Adapter This field identifies which Powerline network information is displayed. Different Powerline networks are identified by the Ethernet interface (network card) on your computer which is connected directly to a Powerline adapter.
-
Page 46: About Screen
Chapter 5 The Configuration Utility 5.7 About Screen Use the About screen to view information regarding the configuration utility and firmware version of the PLA-407 you are connected to. Click the top right corner of the utility to view the About screen. Figure 21 About Screen The following table describes the labels in this screen. -
Page 47: The Os X Configuration Utility
H A P T E R The OS X Configuration Utility 6.1 Overview This chapter shows you how to use the configuration utility on a Mac computer with the Leopard operating system. See the User’s Guide background information on some Powerline features. All HomePlug AV compliant Powerline adapters within range can join your network. -
Page 48: Start The Configuration Utility
Chapter 6 The OS X Configuration Utility 6.1.2 Start the Configuration Utility Drag the utility application from the CD (or download it from the ZyXEL download library) to the Applications folder on your computer. Double-click it to open it. Figure 22 Utility Main Screen 6.1.3 Add a Device To add a device, click Add a Device in the configuration utility main screen. -
Page 49: Change Nickname
To enter the NMK for a Powerline adapter, select the device icon in the left panel of the main utility screen and then click Change Network Name (NMK) in the main utility screen. Figure 23 Change Network Name (NMK) The following table describes the labels in this screen. Table 8 Change Network Name (NMK) LABEL Network Name... - Page 50 Chapter 6 The OS X Configuration Utility The following table shows some example priority settings based on application type. Table 9 Priority Settings PRIORITY LEVEL Highest High Figure 25 QoS Settings The following table describes the labels in this screen. Table 10 QoS Settings LABEL IP Port Priority...
-
Page 51: Set Homeplug Light Color
Table 10 QoS Settings (continued) LABEL Port # Priority Cancel 6.1.7 Set HomePlug Light Color Use this screen to define which color the HomePlug light shines at various speeds. For example, configure the light to shine red when the speed is slow enough to warrant your attention, amber for ‘near slow’... -
Page 52: Link Information
Chapter 6 The OS X Configuration Utility 6.1.8 Link Information Use the Link Info screen to find out more information on the connection between two Powerline adapters on your Powerline network. The link information screen shows the MAC addresses of connected Powerline adapters and statistics on the links. - Page 53 Table 11 Link Information (continued) LABEL Avg. Source PB CRC Error Rate Avg. Destination PB CRC Error Rate Avg. Bits/Carrier Avg. SNR/Carrier PLA-407 User’s Guide Chapter 6 The OS X Configuration Utility DESCRIPTION This field displays the average CRC (Cyclic Redundancy Check) error rate of transmission from the source device (as shown in the screen) received by destination Powerline device.
-
Page 54: Download Firmware
Chapter 6 The OS X Configuration Utility Table 11 Link Information (continued) LABEL Avg. Attentuation/ Carrier Avg. Output Power/ Carrier Clear Statistics Close 6.1.9 Download Firmware Use this screen to go to the ZyXEL download library from where you can download firmware to your computer. - Page 55 use the same firmware version. Use the Firmware Upgrade Tool to upload new firmware. You cannot run the Firmware Detection Tool, the Firmware Upgrade Tool or the Configuration Utility at the same time, as only one of these applications can access the PLA-407 connected to your computer at any time Figure 29 Firmware Detection Tool The following table describes the labels in this screen.
-
Page 56: Firmware Upgrade Tool
Chapter 6 The OS X Configuration Utility 6.3 Firmware Upgrade Tool Use the firmware upgrade tool to upgrade firmware to the Powerline device directly connected to your computer. To upgrade to the latest firmware, use the firmware upgrade tool on the CD included with your PLA-407. - Page 57 Open the Firmware Upgrade Tool application. Click Next to begin the firmware upgrade process. Figure 30 Firmware Upgrade Tool: Start If you already have the latest version firmware, you’ll see a warning screen. Click No unless you want to re-upload the firmware. Figure 31 Firmware Upgrade Tool: Start PLA-407 User’s Guide Chapter 6 The OS X Configuration Utility...
- Page 58 Chapter 6 The OS X Configuration Utility Select the region where your Powerline network is located in the following screen. Make sure you upload the correct firmware for your region as different regions have differnt firmware characteristics. Figure 32 Firmware Upgrade Tool: Start The firmware upgrade may take several minutes.
- Page 59 If your firmware is successfully upgraded, a successful screen appears. Click OK, then Finish to close the application. Your device automatically restarts. Figure 34 Firmware Upgrade Tool: Finish To check if your firmware is successfully upgraded, run the Firmware Detection Utility again and check your firmware version.
- Page 60 Chapter 6 The OS X Configuration Utility PLA-407 User’s Guide...
-
Page 61: Powerline Network Setup Tutorial
After setting up your first home Powerline network (instructions for that are in the Quick Start Guide for your ZyXEL PLA-407) you may want to extend the network or create a new one by adding additional Powerline adapters. This tutorial shows you the following. -
Page 62: Important Terms
Chapter 7 Powerline Network Setup Tutorial 7.0.2 Important Terms Network Name DAK Password 7.0.3 Accessing Your Powerline Adapter Plug the Powerline adapter you want to add to your network into a Powerline socket. Figure 35 Plug Your Powerline Adapter into the Powerline Socket Connect the Powerline adapter to your computer. -
Page 63: Adding A Powerline Adapter
You are now ready to extend your Powerline network or set up a second network. • See Section 7.0.4 on page 63 network. • See Section 7.0.5 on page 65 adapters. • See Section 7.0.6 on page 67 adapters. 7.0.4 Adding a Powerline Adapter This section shows you how to add a new Powerline adapter to expand your existing network. - Page 64 Chapter 7 Powerline Network Setup Tutorial The utility should open to the configuration tab. On this screen in the Site column your new Powerline adapter should appear as Local (A). Check the Local adapter’s MAC address (B). It should match the MAC address listed on the label on the back of your Powerline adapter.
-
Page 65: Setting Up A New Network With A New Adapter
Select your adapter by selecting Local and type the network name for your existing network in the Network Name field (C). Figure 40 Adding an Adapter to an Existing Network Select Set NMK to this device and click Write. Click OK on the pop-up. Figure 41 Network Name Pop-up Your new adapter will now have the same Network Name as your existing network and so has now joined your existing network. - Page 66 Chapter 7 Powerline Network Setup Tutorial the ZyXEL DMA-1100P you can use with your TV to watch movies and play games which are stored on a computer. Figure 42 Add New Powerline Adapters to Make a Second Network Connect your new Powerline adapter and open the configuration utility as shown Section 7.0.5 on page 65.
-
Page 67: Splitting A Network Into Two Networks
After you have set up a new network, you are ready to connect each Powerline adapter on your new network to devices, for example, a computer or a games console. 7.0.6 Splitting a Network into Two Networks This section shows you how to split your existing network into two networks. This is useful if you want to set up a second Powerline network in your home, for example, in your study connecting a laptop and printer. - Page 68 Chapter 7 Powerline Network Setup Tutorial • Then type the new network name in the Network Name field (B). Figure 45 Adding an Adapter to Your New Network Click Save. • If you do not type the DAK password or type it incorrectly either of the following pop-ups appear.
- Page 69 The settings for the adapter will now grey out and the adapter will disappear from the table after a few minutes. Figure 48 An Adapter on Your New Network Go back to step in this section to set the same, new Network Name for all remote adapters you want to add to your new network.
-
Page 70: Troubleshooting
Chapter 7 Powerline Network Setup Tutorial 7.1 Troubleshooting The HomePlug ( successfully connects to other adapters on your network. If it does not, try the following measures. • Make sure the adapter is plugged in to a power socket and the power socket is turned on. -
Page 71: Chapter 8 Pla Compatibility
H A P T E R 8.1 Overview Your PLA-407 can work with different PLA models that have a firmware version of at least 3.0.5 as shown in the following figure. Figure 50 PLA Setup PLA-407 8.2 Firmware and Utility Compatibility The following table shows a quick summary of firmware and utility versions compatible with the different PLA models. -
Page 72: Compatibility Diagrams
Chapter 8 PLA Compatibility • For PLA v1 models (for example, PLA-400, PLA-401, PLA-470, PLA-491 and so on) upgrade the firmware version from 1.4.5 to at least version 3.0.5. Refer to the PLA-4XX series User’s Guide for instructions on how to do this. •... -
Page 73: Chipset Compatibility
The diagram below shows a Powerline network where each PLA has the correct firmware. Use Configuration Utility v 3.3.4 to manage the PLAs in this Powerline network. Figure 52 Correct Powerline Network 3.0.5 3.0.5 8.4 Chipset Compatibility Your PLA-407 uses INT4600 chipset. Table 14 Chipset Compatibility PLA MODEL v 1.4.5... - Page 74 Chapter 8 PLA Compatibility PLA-407 User’s Guide...
-
Page 75: Part Iii: Appendices And Index
Appendices and Index LEDs and Troubleshooting (77) Product Specifications (85) Legal Information (89) Index (93) -
Page 77: Leds And Troubleshooting
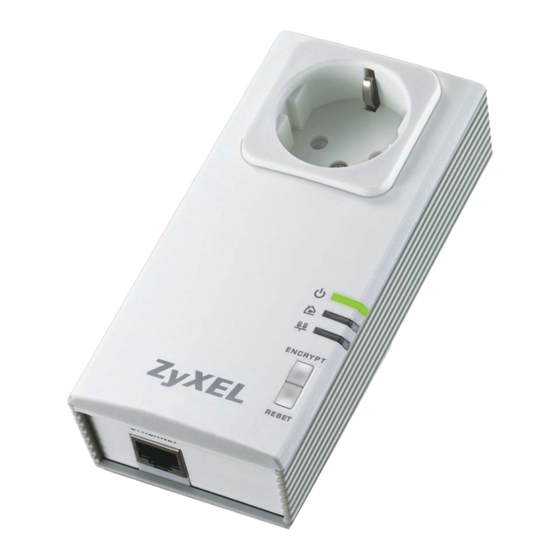
H A P T E R LEDs and Troubleshooting This chapter describes the behavior of the LEDs (lights) and offers some suggestions to solve problems you might encounter. 9.1 LEDs The following sections describes the lights on the PLA-407. The following figure is the front panel of the PLA-407. Use the lights to determine if the PLA-407 is behaving normally or if there are some problems on your Powerline network. - Page 78 Chapter 9 LEDs and Troubleshooting The following table describes the behavior of the lights on the PLA-407. Table 15 PLA-407 Lights LIGHTS ICON COLOR POWER HomePlug ETHERNET STATU DESCRIPTION PLA-407 Green PLA-407 Blinking It also indicates the connect with another device using the ENCRYPT function.
-
Page 79: Power And Light Problems
9.2 Power and Light Problems The PLA-407 does not turn on. None of the lights turn on. Make sure you are using the power cord included with the PLA-407. Make sure the power cord is connected to the PLA-407 and plugged in to an appropriate power source. - Page 80 Chapter 9 LEDs and Troubleshooting Use the PLA-4xx Series Configuration Utility to detect all other HomePlug devices on your Powerline network. Make sure that the network name (sometimes called the network password) is the same on all of your Powerline adapters. See Section 5.3 on page 39 Check the DAK password and MAC address for all Powerline adapters are typed correctly in the utility.
-
Page 81: Configuration Utility Problems
9.3 Configuration Utility Problems The PLA-4xx Series Configuration Utility displays an error during installation. • Make sure your computer is using Windows XP or Windows Vista (32-bit) operating system. At the time of writing, this is the only compatible operating system for the configuration utility. -
Page 82: Encrypt Button Problems
Chapter 9 LEDs and Troubleshooting Your Powerline adapters may be placed close to electrical devices such as electrical insect-killers which produce radio waves. These may interfere with the Powerline signals. Move the adapters further away from such electrical devices. Your wiring may be old and/or low quality or with a long wiring path. 9.5 ENCRYPT Button Problems This section applies only to PLA-407s with the ENCRYPT button. - Page 83 • Wait for about a minute while the devices set up a connection. • If that does not work, try again with both devices connected to a power strip next to each other. If they now connect, then the devices were not on the same electrical circuit before.
- Page 84 Chapter 9 LEDs and Troubleshooting PLA-407 User’s Guide...
-
Page 85: Product Specifications
H A P T E R Product Specifications The following tables summarize the PLA-407’s hardware and firmware features. Table 16 Hardware Specifications Dimensions (W x D x Weight Power Input Extra Power Input ( power socket) Ethernet Port RESET ENCRYPT Operation Environment Storage Environment... - Page 86 Chapter 10 Product Specifications Table 17 Firmware Specifications FEATURE Powerline Functionality Encryption Frequency Band Certifications Device Management Network Name Firmware Upgrade Low Power mode DESCRIPTION The HomePlug AV standard specifies how network devices communicate using standard electrical wiring. It is compliant with IEEE 802.3, 802.3u 10/100 Ethernet standards.
-
Page 87: Cable Pin Assignments
The following list, which is not exhaustive, illustrates the standards supported in the PLA-407. Table 18 Standards Supported STANDARD HomePlug AV RFC 868 RFC 1112 RFC 1157 RFC 1901 RFC 2236 Cable Pin Assignments RJ-45 Connector Pin Assignments Figure 54 RJ-45 Connector Pins Table 19 RJ-45 Connector Pin Assignments PIN NO RJ-45 SIGNAL ASSIGNMENT... - Page 88 Chapter 10 Product Specifications PLA-407 User’s Guide...
-
Page 89: Appendix A Legal Information
ZyXEL Communications Corporation. Published by ZyXEL Communications Corporation. All rights reserved. Disclaimers ZyXEL does not assume any liability arising out of the application or use of any products, or software described herein. -
Page 90: Federal Communications Commission (Fcc) Interference Statement
Appendix A Legal Information Trademarks ZyNOS (ZyXEL Network Operating System) is a registered trademark of ZyXEL Communications, Inc. Other trademarks mentioned in this publication are used for identification purposes only and may be properties of their respective owners. Certifications Federal Communications Commission (FCC) Interference Statement The device complies with Part 15 of FCC rules. -
Page 91: Zyxel Limited Warranty
Cet appareil numérique de la classe B est conforme à la norme NMB-003 du Canada. Viewing Certifications Go to http://www.zyxel.com. Select your product on the ZyXEL home page to go to that product's page. Select the certification you wish to view from this page. ZyXEL Limited Warranty ZyXEL warrants to the original end user (purchaser) that this product is free from any defects in materials or workmanship for a period of up to two years from the... - Page 92 Appendix A Legal Information PLA-407 User’s Guide...
-
Page 93: Index
Symbols .NET Framework about screen Advanced Encryption Standard, see AES 20, 37 AES (Advanced Encryption Standard) applications cabling type certifications 86, 90 notices viewing configuration screen connections overview copyright 37, 39 DAK (Data Access Password) Data Access Password, see DAK dimensions disclaimer electrical and cable wiring... - Page 94 Index MAC address management multiple networks overview managing the device using the web configurator. See web configurator. multiple networks network example network information network ports passwords 37, 39, 40 types of plug-and-play power specification priority settings application type 43, 50 priority levels private network problems and solutions...
Need help?
Do you have a question about the ZyXEL PLA-407 and is the answer not in the manual?
Questions and answers