Table of Contents
Advertisement
Quick Links
Advertisement
Table of Contents

Related Manuals for Magnasonic FS52


Summary of Contents for Magnasonic FS52
- Page 1 FS52 User Manual v1.0 All-In-One High Resolution 22MP Film Scanner Thank you for your purchase of this Magnasonic product. Please read this user manual carefully before using product to ensure proper use. Keep this manual in a safe place for future reference.
- Page 2 At Magnasonic, our mission is a simple one – create people-driven products that make life’s daily adventures easier and more fun. We believe everyday experiences should be extraordinary.
-
Page 3: Table Of Contents
Viewing Your Scanned Images............... 13 Downloading Images To Your Computer ........... 13 Watching Saved Images From a TV Screen ........13 FAQ / Troubleshooting ..................14 Specifications ......................15 Important Safety Instructions ................16 FCC Information ..................... 17 Magnasonic® Warranty ..................18... -
Page 4: What's Included
What’s Included Film Scanner Power Adapter USB Cable TV Out Cable Cleaning Brush User Manual Negative Adapter Slide Adapter 110 Slide Insert 110 Film Insert Super 8/8mm Insert... -
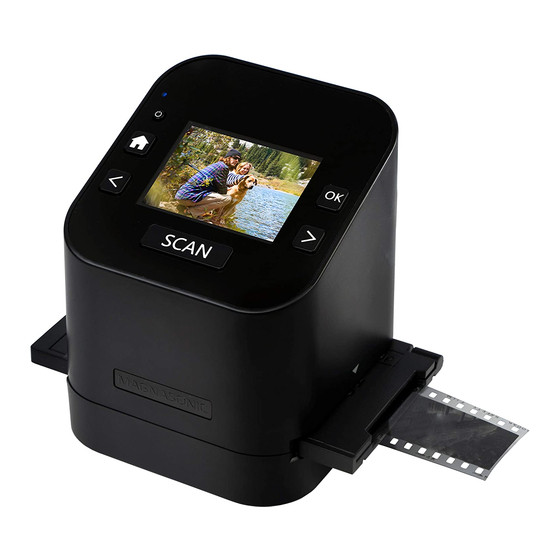
Page 5: Product Information
Product Information Front LCD Screen Power Button Home Button OK Button Back/Flip Button Forward/Mirror Button Scan Button Film/Slide Adapter Slot Back SD Card Slot TV Out USB/Power Port... -
Page 6: Operating Instructions
Operating Instructions Powering on the Scanner Connect the USB cable to the USB port on the film scanner. Connect the other end of the USB cable into the included USB wall adapter. Plug the wall adapter into a power outlet. Press and hold the Power button on the scanner to turn it on. -
Page 7: Prepping Your Film/Slides
Prepping Your Film/Slides IMPORTANT: Ensure your slides/film are clean and free of dirt or debris. Open the appropriate slide/film adapter and insert your slide/film. Each adapter is labelled to identify it. If you are not certain of your slide/film type refer to the images below. Ensure the slide/film is facing the correct way and is not bent. - Page 8 Slide Adapters 35mm Slide (135) 110 Slide 126 Slide 110 Slide...
- Page 9 Negative Adapters 135 Negative (35mm) 110 Negative 126 Negative Super 8...
-
Page 10: Preparing The Film Scanner
Preparing the Film Scanner Press and hold the Power button on the scanner to turn it on. Insert the prepared film or slide adapter into the slot on the right side of the film scanner. In the Main Menu use the arrow keys to highlight the FILM TYPE option and press the OK button to select it. -
Page 11: Using An Sd Card
Using an SD Card Note: This scanner has 64MB of built-in memory for saving scanned images. This film scanner will also accept SD, SDHC, and SDHX cards with a maximum of 128GB for extra memory. If you are using a 128GB SD card, it may need to be formatted before using for the first time. -
Page 12: Scanning Your Images
Once ready, press the SCAN button to capture and save your image to the internal memory or SD card if one is inserted. The FS52 cannot scan directly to a computer. If you have multiple slides/negatives you can push/pull them through the adapter without removing it. -
Page 13: Viewing Your Scanned Images
Viewing Your Scanned Images To view your saved images, go to GALLERY and press the OK button. Your images will play automatically in Slideshow mode. To manually review your saved images and stop the auto-play, press the OK button. Use the left and right buttons to scroll through each saved image. Press the OK button again to open the Gallery options. -
Page 14: Faq / Troubleshooting
The FS52 uses NTSC for it’s video output format. If TV Out image is not your TV requires a PAL signal, disconnect the TV Out showing on my TV... -
Page 15: Specifications
Specifications 1/3.06" 13.2 Mega CMOS Sensor Image Sensor 2.36" Color TFT Display Display Automatic & Manual Adjustment Exposure Control EV Adjustment 22 Mega Pixels Scanned Resolution Resolution 3:2, 4:3, 1:1 Picture Aspect Ratio 4,100 dpi for 35mm film Scan Quality Single Pass Scan Method 3-5 seconds... -
Page 16: Important Safety Instructions
Important Safety Instructions Safety Alerts If any of the following conditions are present, stop using immediately, unplug the power cord, and refer to a qualified service professional for servicing: If there is any smoke or unusual smell while using. If the product has been exposed to rain, water, or other liquids. If the product does not operate normally by following the operating instructions. -
Page 17: Fcc Information
We reserve the right to change models, configurations, or specifications without notice or liability. Product may not be exactly as shown. © MAGNASONIC®, MAGNASONIC®, the MAGNASONIC® marks may be registered. All other trademarks are property of their respective owners. -
Page 18: Magnasonic® Warranty
Magnasonic® Warranty Thank you for choosing Magnasonic. We guarantee your investment in our products is a solid one! Extensive thought, research, planning, and design goes into every product we make. High quality components combined with precision manufacturing allows us to maintain the highest possible production standards. All items are guaranteed against defects in materials and craftsmanship. - Page 19 Notes...
- Page 20 magnasonic.com...
Need help?
Do you have a question about the FS52 and is the answer not in the manual?
Questions and answers