Advertisement
Quick Links
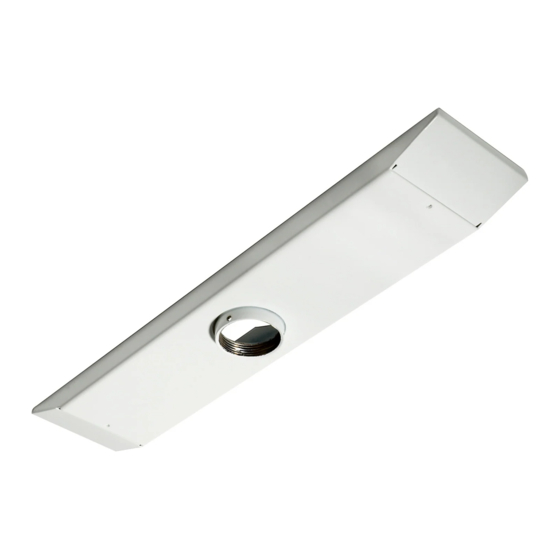
Installation and Assembly - Ceiling Plate for
IMPORTANT!
Read entire instruction sheet before beginning installation and assembly.
IMPORTANT!
Certain ceilings require additional mounting hardware...
CEILING CONSTRUCTION
Wood Joist, Wood Beam
Concrete
Other or unsure?
PARTS LIST
PART #
QTY.
128-2039
1
128-2086
1
128-2087
1
5S1-015-C03
4
2PT-22CA01F
2
520-9250
1
From the top thread the Flush Mount Tube
(included with your Jumbo Mount Bracket)
through the threaded fitting in the ceiling plate.
IMPORTANT: If you will install an extension
column DO NOT INSTALL THE FLUSH
MOUNT TUBE. Begin with step 2.
For Wood Joist Finished Ceiling, Exposed
Wood Joists, or Wood Beam Ceiling. (See
step 3 for concrete ceilings). Drill four 5/32" (4
mm) dia. holes to a minimum depth of 2.5" (64
mm). Attach with four #14 x 2.5" (6 mm x 65
mm) wood screws as shown using 3/8" (10
mm) socket wrench. Tighten wood screws so
ceiling plate is firmly attached.
Visit the Peerless Web Site at www.peerlessindustries.com
Jumbo Mounts
ADDITIONAL HARDWARE REQUIRED
none
Concrete Anchor Kit - order accessory kit ACC 204.
Call Peerless Customer Service.
DESCRIPTION
ceiling plate (CMJ 470W only)
ceiling plate (CMJ 480W only)
ceiling plate (CMJ 490W only)
#14 x 2.5" (6 mm x 65 mm) wood screw
end cap (white models only)
M5 x .8 x 10 mm phillips screw (for use
with extension column if applicable)
This Ceiling Plate is intended for use only to support
Jumbo Mount TV Brackets or other products as
specified by Peerless Industries, Inc. Combine only
as specified (see specifications on page 2). Fasten-
ers provided are for attachment to wood structural
members (joists or beam). Order additional fastener
kit ACC 204 if attaching to a solid concrete ceiling.
• Installer must verify that the ceiling will safely support
four times the combined weight of all attached equip-
ment and hardware.
• Tighten wood screws so that ceiling plate is firmly
attached, but do not overtighten. Overtightening can
damage the screws, greatly reducing their holding
power.
• Never tighten in excess of 80 in • lb (9 N.M.).
• Make sure that mounting screws are anchored into the
end
center of the studs. The use of an "edge to edge" stud
cap
finder is highly recommended.
1 of 2
For customer service call 1-800-729-0307 or 708-865-8870.
Models: CMJ 470W, CMJ 480W,
CMJ 490W
This product is intended for use with UL
Listed products and must be installed by a
qualified professional installer.
R
MAXIMUM LOAD CAPACITY:
300 lb (137 kg)
flush mount tube
(included with Jumbo
Mount Bracket)
ceiling
plate
WARNING
WARNING
ISSUED: 08-12-04 SHEET #: 128-9152-1
Advertisement

Related Manuals for PEERLESS CMJ 470W


Summary of Contents for PEERLESS CMJ 470W
- Page 1 PARTS LIST Jumbo Mount TV Brackets or other products as PART # QTY. DESCRIPTION specified by Peerless Industries, Inc. Combine only 128-2039 ceiling plate (CMJ 470W only) as specified (see specifications on page 2). Fasten- 128-2086 ceiling plate (CMJ 480W only)
- Page 2 Visit the Peerless Web Site at www.peerlessindustries.com For customer service call 1-800-729-0307 or 708-865-8870. © 2004 Peerless Industries, Inc. All rights reserved. Peerless is a registered trademark of Peerless Industries, Inc. All other brand and product names are trademarks or registered trademarks of their respective owners.