Table of Contents
Advertisement
Quick Links
Advertisement
Table of Contents
Troubleshooting

Related Manuals for BOXLIGHT CD-454m


Summary of Contents for BOXLIGHT CD-454m
- Page 1 Copyright © 2001 by B OXLIGHT Poulsbo, Washington. All rights reserved.
- Page 2 FCC Warning This equipment has been tested and found to comply with the limits for a Class A digital device, pursuant to part 15 of the FCC Rules. These limits are designed to provide reasonable protection against harmful interference when the equipment is operated in a commercial environment.
- Page 3 Declaration of Conformity Manufacturer: B OXLIGHT 19332 Powder Hill Place, Poulsbo, Washington, USA We declare under our sole responsibility that the CD-454m/455m/555m projec- tors conform to the following directives and norms: Directive 89/336/EEC, Amended by 93/68/EEC EMC: EN 55022 EN 55024...
-
Page 5: Table Of Contents
If You Need Assistance Warranty Setting up the Projector Connecting a Computer Connecting a Video Player Powering up the Projector and Adjusting the Image Turning Off the Projector Using the Projector Basic Image Adjustment Using the Remote Control Adjusting the Projector... - Page 6 Appendix Specifications Accessories Portable and Laptop Activation Chart Using Video Mirroring with a PowerBook Computer Projected Image Size Index...
-
Page 7: Safety Instructions
(earth) ground terminal. Warning: Refer all service to qualified service personnel. Ser- • vicing your own projector will void the warranty. See the fol- lowing page for the customer service contact information. Caution: Don’t block ventilation openings. •... - Page 8 Caution: Don’t set liquids on the projector. Spilled liquids may • damage your projector. Caution: Don’t place the projector on a hot surface or in direct • sunlight. Caution: Do not drop the projector. Transport the projector in a •...
-
Page 9: Introduction
They generate crisp, clear images using Digital Light Process- ing™ (DLP) technology. They are easy to connect, easy to use, easy to transport, and easy to maintain. The CD-454m and CD-455m have native SVGA 800x600 resolution, the CD-555m has XGA 1024x768 resolution. The user interfaces of the products are identical except where noted;... -
Page 10: Compatibility
• ers and laser disc players. Unpacking the Projector The projector comes with the items shown in Figure 1. Check to make sure all are included. Contact B anything is missing. If you are experienced in setting up presentation systems, use the Quick Start card that was included in the shipping box. - Page 11 Projector + lens cap Soft carry case User’s Guide and quick start card Power cord Remote control Shipping box contents Computer cable Audio cable adapter Audio cable Composite video cable IGURE...
-
Page 12: Usage Guidelines
Do not look directly into the projection lens when the lamp is • turned on. The bright light may harm your eyes. Do not block the grills on the projector. Restricting the air flow • can cause it to overheat and turn off. If this happens, you must wait a minute before attempting to turn it back on. -
Page 13: If You Need Assistance
If You Need Assistance The first place to look for help is in this manual. Be sure to check the guidelines in “Troubleshooting” on page 37. If this manual doesn’t answer your question, call B OXLIGHT 1-800-762-5757 360-779-7901 Warranty This product is backed by a limited two-year warranty. The details of the warranty are printed at the back of this manual. -
Page 15: Setting Up The Projector
SETTING UP THE PROJECTOR 1 Place the projector on a flat surface. The projector must be within 10 feet (3 m) of your power • source and within 6 feet (1.8 m) of your computer. If you want to project from behind a translucent screen, set •... - Page 16 If you’ r e connecting a computer, make sure the distance between it and the projector is 6 feet or less. NOTE: The CablePro connector is used with the optional CablePro, a connection hub containing mouse, audio, monitor and computer connectors.
-
Page 17: Connecting A Computer
Connecting a Computer The projector ships with an analog computer cable. If your com- puter has a digital output, you can order the optional digital com- puter cable for use with the CD-455m and CD-555m only. 1 Plug the end of the computer cable with one cable into the connector on the projector. - Page 18 USB mouse to use it (it is hot- pluggable). Do you want to control the computer’s mouse from the projector’s remote or keypad? 1 Plug the USB cable into the USB mouse connector on your computer.
-
Page 19: Connecting A Video Player
Connecting the projector to a video player using the standard video cable (with com- posite video connector) and the audio cable and adapter on the projector (Figure 8). IGURE NOTE: HDTV sources must be... - Page 20 IGURE Connecting the projector to a video player using an S-video cable and the audio cable and adapter 4 Plug the audio adapter’s white connector into the left “audio out” connector on your video player. Plug the adapter’s red connector into the right “audio out”...
-
Page 21: Powering Up The Projector And Adjusting The Image
Powering up the Projector and Adjusting the Image 1 Remove the lens cap. 2 Plug the power cord into the side of the projector, then plug it into your electrical outlet. A surge-protected power strip is recommended. 3 Press the Power button on the side of the projector. -
Page 22: Turning Off The Projector
Turning Off the Projector If you want to turn off the projector for a short period of time, press the button on the keypad or remote. This blanks the standby screen for fifteen minutes, but keeps the projector running. -
Page 23: Using The Projector
(page 17), adjust the height of the projector (page 17) or center the image by adjusting its horizontal or vertical position (page 26). Be sure the projector lens is at a 90 degree angle to the screen. 3 If the image is out of focus, rotate the focus lens (page 17). - Page 24 NOTE: If the remote is inactive for several minutes, it “sleeps” to conserve battery life. Press any button except the disk mouse to re-activate the remote. left mouse button (on underside of remote) IGURE Remote control Press anywhere on the edge of the disk mouse to move the cursor on the screen.
-
Page 25: Adjusting The Projector
To raise the projector: 1 Press and hold the elevator button (Figure 11). 2 Raise the projector to the height you want, then release the button to lock the elevator foot into position. If necessary, turn the leveling knob at the rear of the projector to adjust the angle of the projected image. -
Page 26: Using The Keypad And Remote Buttons
“Using the On-Screen Menus” on page 20. Source (keypad only) or Computer and Video (remote only) When you have more than one source (computer and video) con- nected to the projector, select between them by pressing the button on the keypad or the source the remote. - Page 27 , the display and audio turn off and a standby blank screen is displayed for 15 minutes. You can change the amount of time the projector stays in standby mode; see “Standby Time” on page 27 for details. The LED lights orange while the projector is in standby.
-
Page 28: Using The On-Screen Menus
Manual Tracking is not available until Auto Image is turned off). Using the On-Screen Menus The projector has six drop-down menus that allow you to make image adjustments and change a variety of settings. Most of these adjustments aren’t available directly from the keypad. -
Page 29: Display Menu
Display Menu Display Audio Image > > Brightness Contrast Tint Color Sharpness Blank screen blue Reset all Brightness Adjusting the brightness changes the intensity of the image. Press the left mouse button to darken the image. • Press the right mouse button to lighten the image. •... - Page 30 • Blank Screen Blank Screen determines what color is displayed when there is no active source and when the projector is in standby. Click the left or right mouse button to toggle between blue and black. Reset All Click the left or right mouse button to reset all the options (except Language, Video Standard, Rear and Ceiling Projection, Plug and Play, and Standby Time) in all the menus to their original settings.
-
Page 31: Audio Menu
Audio Menu Display Audio Image > > Volume Treble Bass Volume Press the left mouse button to decrease the volume. • Press the right mouse button to increase the volume. • Volume adjustments you make are saved for each source. Treble The treble setting controls the high frequencies of your audio source. -
Page 32: Image Menu
To adjust the keystone, highlight Keystone, then click the left or right mouse button. This option is available for computer sources displaying their native resolutions only, SVGA 800x600 for the CD-454m/455m and XGA 1024x768 for the CD-555m. Overscan This option crops all the edges of the image to remove noise gen- erated on the edges by your source. - Page 33 Manual Tracking The projector adjusts tracking automatically to match the video signal from your computer. However, if the display shows evenly spaced, fuzzy, vertical lines or if the projected image is too wide or too narrow for the screen, try turning on again.
- Page 34 Horizontal position Follow these steps to manually adjust the horizontal position: 1 Turn Auto Image off. 2 Highlight Horizontal position, then press the left mouse but- ton to move the image right or press the right mouse button to move the image left. Positioning adjustments are saved when you power off the pro- jector.
-
Page 35: Controls Menu
PAL-60, or SECAM) automatically based on the input signal it receives. (The video standard options may vary depending on your region of the world.) If the projector is unable to detect the correct standard, the colors might not look right or the image might appear “torn.”... - Page 36 You need to set the Plug and Play setting to Off for the projector to display properly on some older computers. The Plug and Play setting does not affect video images.
-
Page 37: Language Menu
Display Startup Screen This setting toggles between On and Off. When this feature is On, the startup screen appears when the projector starts up and remains until an active source is detected. The startup screen con- tains information on contacting B mouse button to turn this feature off and display a plain black or blue screen instead of the startup screen. -
Page 38: Status Menu
After 2,000 hours of use, the message “Change Lamp” tem- porarily appears on the screen when the projector is turned on. Change the lamp within the next 50 hours. After 2,050 hours, the LED flashes orange and the lamp will not light. - Page 39 Indicates the active source, Computer 1 analog, Computer 1 digi- tal, Computer 2, and Video. Software version Indicates the projector’s software version. This information is useful when contacting Technical Support. Startup screen version Indicates the projector’s startup screen version. This information is useful when contacting Technical Support.
-
Page 41: Maintenance & Troubleshooting
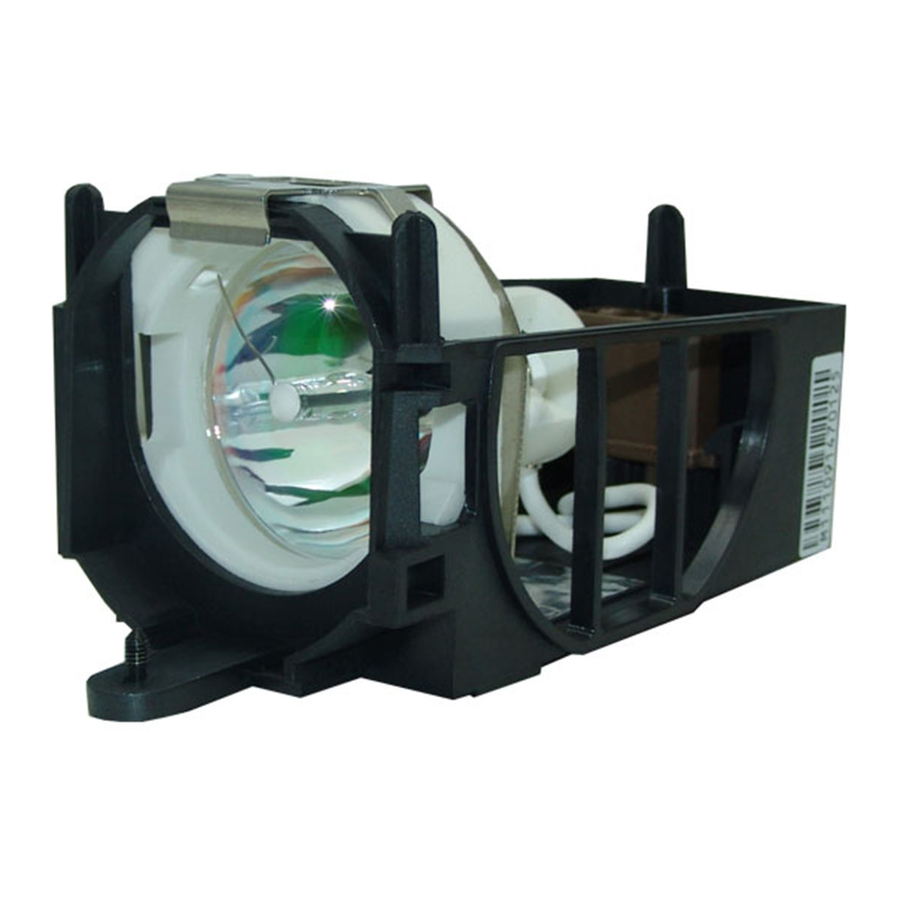
After 2,000 hours of use, the mes- sage “Change Lamp” temporarily appears on the screen when the projector is turned on. Change the lamp within the next 50 hours. After 2,050 hours, the LED flashes orange and the lamp will not light. - Page 42 & 3 Invert the projector on a soft flat surface, then insert a small screwdriver or other flat object into the tabs on the lamp mod- ule door (Figure 20) and gently pry the door up.
- Page 43 9 Tighten the screws on the outside of the module. 10 Replace the lamp door by inserting the hooks on the lamp door into the slots on the projector and pressing the lamp door into place. If the lamp door does not fit properly or bulges out, remove the door and re-seat the lamp module.
-
Page 44: Replacing The Batteries In The Remote Control
5 Slide the battery cover back on the remote. Using the Security Lock The projector has a security connector for use with a PC Guardian Cable Lock System (Figure 23). See “Optional Accessories” on page 43 for ordering information. Refer to the information that came with the lock for instructions on how to use it to secure the projector. -
Page 45: Troubleshooting
• functional AC electrical outlet. Make sure that the power cord is also properly connected to the projector. If the projector is plugged into a power strip, make sure the • power strip is turned on. Make sure the projector is turned on. - Page 46 Reposition the image using the menu. Refer to “Horizontal • position” on page 26 and “Vertical position” on page 26. Be sure the projector lens is at a 90 degree angle to the screen. • Problem: Image is too wide or narrow for screen Adjust the zoom or projector placement.
- Page 47 • tion off in the Controls menu. The image should immediately return to forward projection. See “Rear Projection” on page 28. Problem: the projector displays vertical lines, “bleeding” or spots Adjust the brightness. See “Brightness” on page 21. • Check the projection lens to see if it needs cleaning.
- Page 48 Problem: Lamp shuts off A minor power surge may cause the lamp to shut off. Unplug • the projector, wait at least a minute, then plug it back in. Make sure the vents are not blocked. • Make sure the lamp has not been in use for over 2,050 hours.
-
Page 49: Appendix
APPENDIX Specifications The projector must be operated and stored within the tempera- ture and humidity ranges specified. Temperature Operating 50 to 104 50 to 95 Non-operating -4 to 158 Humidity Operating and non-oper. 10% to 95% relative humidity, non-condensing Dimensions 3.9 x 10.9 x 11.2 inches (9.9 x 27.7 x 28.6 cm) -
Page 50: Accessories
Computer Audio Cable 6 ft (1.8 m) Audio Adapter (RCA to 3.5mm) Executive Plus Remote Projection Lamp Module Lens Cap Power Cords (one ships with projector, type depends on country) North American Power Cord Australian Power Cord UK Power Cord European Power Cord... - Page 51 Canada, UK only) Two-button Executive Remote Control Executive Remote IR Receiver Remote Point RF Remote with LaserPointer (US, Mexico, Canada only) PC Guardian Projector Cable Lock S-Video Cable 40” Portable Projection Screen 50” Portable Projection Screen 60” Deluxe Insta-Theatre Screen...
-
Page 52: Portable And Laptop Activation Chart
Portable and Laptop Activation Chart Many laptop computers do not automatically turn on their exter- nal video port when a projector is connected. Activation com- mands for some laptop computers are listed in the following table. (If your computer is not listed or the given command does not work, refer to the computer’s documentation for the appro-... - Page 53 Key command to Computer activate port Bondwell LCD or CRT options after bootup Chaplet** setup screen FN-F6 FN-F4 Chembook FN-F6 Commax Ctrl-Alt-#6 Compaq* ** Ctrl-Alt-< FN-F4 automatic mode/? (for setup option) Compuadd* ** automatic Alt-F for screen setup option Data General Ctrl-Alt-Command Data General 2 CRT/X at DOS prompt...
- Page 54 Key command to Computer activate port Grid* ** FN-F2, choose auto or simultaneous Ctrl-Alt-Tab Hitachi FN-F7 Honeywell FN-F10 Hyundai setup screen option IBM 970* automatic IBM ThinkPad** reboot, enter setup menu FN-F7, select choice from setup menu FN-F1, select choice FN-F5, select choice PS/2 SC select choice (CRT, LCD, etc.)
- Page 55 Key command to Computer activate port Mitsubishi SW2 On-Off-Off-Off setup screen option NEC* ** setup screen option CRT at the DOS prompt FN-F3 Olivetti* automatic FN-O/* Packard Bell* ** FN-F0 Ctrl-Alt-< Panasonic FN-F2 Prostar Ctrl-Alt-S at bootup Samsung* setup screen option Sanyo setup screen option Sharp...
- Page 56 Key command to Computer activate port FN-F1 Zeos** Ctrl-Shift-D FN-F1 * These manufacturers have models that automatically send video to the external CRT port when some type of display device is attached. ** These manufacturers offer more than one key command depend- ing on the computer model.
-
Page 57: Using Video Mirroring With A Powerbook Computer
If this happens, perform the following steps: 1 Turn off video mirroring. 2 Open the Monitors control panel. 3 Move the white menu bar to Monitor 2 to set the projector as the primary monitor. 4 Restart the PowerBook. -
Page 58: Projected Image Size
NOTE: Use the graph and tables to help you determine projected image sizes. Projected Image Size IGURE Projected image size Image Size, Width and Height-maximum image size Distance to Diagonal Screen (ft/m) (ft/m) 4.9/1.5 3.0/0.9 8.0/2.4 5.0/1.5 12.0/3.7 7.4/2.3 16.0/4.9 9.9/3.0 20.0/6.1 12.4/3.8... -
Page 59: Index
42, 43 activation commands for laptop com- puters 44 adjusting brightness 21 color 22 contrast 21 height of the projector 17 tint 21 volume 19, 23 altitude limits 41 assistance. See Technical Support audio adapter, connecting 12 audio cable, connecting 10... - Page 60 Default Source 28 Display menu 21 Display menu options Blank Screen 22 Brightness 21 Color 22 Contrast 21 Reset All 22 Sharpness 22 Tint 21 Display Messages 28 Display Startup Screen 29 displaying on-screen menus 18 startup screen 29 status messages 28 elevator button/foot 17 extension cable 43 focusing the image 17...
- Page 61 9 LED 13, 18, 19, 30, 33 lens cap 42 cleaning 33 leveling knob 17 leveling the projector 17 M1-DA analog computer cable 3, 8, 9 Macintosh computers compatibility 2 connecting 9 Menu button 20 menus. See on-screen menus monitor, projected colors don’t match...
- Page 62 37 text not visible 38 tint, adjusting 21 treble 23 troubleshooting 37 turning off the projector 14 turning on the projector 13 USB mouse 10 vertical lines displayed 25, 39 video mirroring on a PowerBook 49 video resizing 24...
-
Page 63: Limited Warranty
THAT EXTEND BEYOND THE FACE HEREOF AND THE FOREGOING WARRANTY SHALL NOT BE EXTENDED, ALTERED OR VARIED EXCEPT BY WRITTEN INSTRUMENT SIGNED BY BOXLIGHT. SOME STATES DO NOT ALLOW LIMITATIONS ON HOW LONG AN IMPLIED WARRANTY MAY LAST, SO SUCH LIMITATIONS MAY NOT APPLY TO YOU. - Page 64 FOR SPECIAL, INDIRECT, INCIDENTAL OR CONSEQUENTIAL DAMAGES OR LOST PROFITS, LOST REVENUES OR LOST SAVINGS. THE PRICE STATED FOR THE PRODUCT IS A CONSIDERATION IN LIMITING BOXLIGHT’S LIABIL- ITY. NO ACTION, REGARDLESS OF FORM, ARISING OUT OF THE AGREEMENT TO PURCHASE THE PRODUCT MAY BE BROUGHT BY PURCHASER MORE THAN ONE YEAR AFTER THE CAUSE OF ACTION HAS ACCRUED.
Need help?
Do you have a question about the CD-454m and is the answer not in the manual?
Questions and answers