LG LFXS28596 Series Manual
Hide thumbs
Also See for LFXS28596 Series:
- Owner's manual (71 pages) ,
- Technical manual (183 pages) ,
- Service manual (122 pages)
Table of Contents
Advertisement
Quick Links
8
PRODUCT SPECIFICATIONS
PRODUCT SPECIFICATIONS
The appearance and specifications listed in this manual may vary due to constant product improvements.
Electrical requirements: 115 V, 60 Hz
Min. / Max. water pressure: 20 - 120 psi (138 - 827 kPa)
Model
Description
Net weight
Model
Description
Net weight
Model
Description
Net weight
LFXS28596*
Standard-depth, Door-in-Door French door refrigerator, bottomfreezer
322 lb (146 kg)
LFXS26596*
Standard-depth, Door-in-Door French door refrigerator, bottomfreezer
309 lb (140 kg)
LFXC22596*
Standard-depth, Door-in-Door French door refrigerator, bottomfreezer
299 lb (136 kg)
Advertisement
Table of Contents

Subscribe to Our Youtube Channel
Related Manuals for LG LFXS28596 Series


Summary of Contents for LG LFXS28596 Series
- Page 1 PRODUCT SPECIFICATIONS PRODUCT SPECIFICATIONS The appearance and specifications listed in this manual may vary due to constant product improvements. Electrical requirements: 115 V, 60 Hz Min. / Max. water pressure: 20 - 120 psi (138 - 827 kPa) Model LFXS28596* Description Standard-depth, Door-in-Door French door refrigerator, bottomfreezer Net weight...
-
Page 2: Product Overview
PRODUCT SPECIFICATIONS PRODUCT OVERVIEW The images in this guide may be different from the actual components and accessories, which are subject to change by the manufacturer without prior notice for product improvement purposes. Exterior Control Panel Door button Sets the refrigerator and freezer temperatures, Opens the Door-in-Door Compartment. - Page 3 10 PRODUCT SPECIFICATIONS Interior Door-in-Door: LFXS26596*/LFXS28596*/LFXC22596*...
- Page 4 PRODUCT SPECIFICATIONS LED Interior Lighting Door-in-Door Case Lights up the inside of the refrigerator. Store frequently used items that require easy access. Water filter Adjustable Refrigerator Shelf Purifies water. Adjusts shelves to meet individual storage needs. NOTE • The filter should be replaced every 6 months.
-
Page 5: Installation Overview
12 INSTALLATION INSTALLATION Installation Overview Please read the following installation instructions first after purchasing this product or transporting it to another location. Disassembling/ Unpacking the Choosing the Proper Assembling Refrigerator Location Connecting the Water Leveling and Door Line Alignment CAUTION •... -
Page 6: Unpacking The Refrigerator
INSTALLATION Unpacking the Refrigerator Choosing the Proper Location WARNING Water Water supply must be easily connected for the • Use two or more people to move and install the automatic icemaker. refrigerator. Failure to do so can result in back injury or other injury. -
Page 7: Dimensions And Clearances
14 INSTALLATION Dimensions and Clearances • Check the dimensions of the appliance and the installation path to ensure there is sufficient room to move the refrigerator through doors or narrow openings. • If an opening is too narrow to fit the refrigerator through, the doors must be removed. •... -
Page 8: Removing/Assembling Handles
INSTALLATION Removing/Assembling Removing the Refrigerator Handles Handles Loosen the set screws (1) with a 3/32 in. Allen wrench and remove the handle. • When moving the refrigerator through a narrow opening, removing the doors is preferred. • The appearance of the handles may vary from what Loosen the mounting fasteners (2) that connect is shown. -
Page 9: Removing/Assembling The Doors And Drawers
16 INSTALLATION Removing/Assembling the Removing the Freezer Drawer Handle Doors and Drawers Loosen the set screws (1) located on the lower side of the handle with a 1/8 in. Allen wrench and If the entrance door is too narrow for the refrigerator remove the handle. -
Page 10: Removing The Right Refrigerator Door
INSTALLATION Remove the screw (1) from the hinge cover at the Lift the door from the middle hinge pin and top of the refrigerator. Lift the hook (not visible), remove the door. located at the bottom of the front side of the cover (2) with a flat-head screwdriver. -
Page 11: Assembling The Right Refrigerator Door
18 INSTALLATION Assembling the Right Refrigerator Rotate the hinge lever (1) clockwise. Lift the top Door hinge (2) free of the hinge lever latch. Install the right-side door first. Hinge Lever Latch Make sure that the plastic sleeve is inserted in the bottom of the door. -
Page 12: Assembling The Left Refrigerator Door
INSTALLATION Assembling the Left Refrigerator Hold the water supply connection and gently push Door in the collet to connect the water supply line as shown. Insert the tube at least 5/8 inch (15 mm) Install the left refrigerator door after the right door is into the connector. -
Page 13: Removing The Freezer Drawers
20 INSTALLATION Removing the Freezer Drawers Lift the front of the drawer up, then pull it straight out. For models with two freezer drawers, remove both drawers in the same way. The Pullout Drawer located above the freezer drawer is not shown for clarity. WARNING To reduce the risk of electric shock, injury to persons, and death, follow basic precautions,... -
Page 14: Assembling The Freezer Drawers
INSTALLATION Hold both rails and push them in simultaneously. Lower the door into its final position and tighten the screws located on both sides. Assembling the Freezer Drawers Push the drawer back until it clicks into place. Pull out both rails simultaneously, until they are fully extended. -
Page 15: Connecting The Water Line
22 INSTALLATION Connecting the Water Line If the water pressure from the reverse osmosis system is less than 20 psi or 138 kPa or 1.4 kgf/ cm (takes more than 4 seconds to fill a cup of 7 oz or Before Beginning 198 cc capacity): This water line installation is not covered by the... -
Page 16: Water Line Installation Instructions
INSTALLATION • Shutoff valve to connect to the cold water line. Drill the hole for the valve. The shutoff valve should have a water inlet with a • Drill a ¼ in. hole in the water pipe using a sharp minimum inside diameter of 5/32 in. - Page 17 24 INSTALLATION Route the tubing. Connect the tubing to the refrigerator. Route the tubing between the cold water line and the refrigerator. NOTE Route the tubing through a hole drilled in the wall • Before making the connection to the refrigerator, be or floor (behind the refrigerator or adjacent base sure that the refrigerator power cord is not plugged cabinet) as close to the wall as possible.
-
Page 18: Leveling And Door Alignment
INSTALLATION Leveling and Door Alignment Door Alignment Standard Door Leveling Both the left and right refrigerator doors have an The refrigerator has two front leveling legs. Adjust the adjustable nut, located on the bottom hinge, to raise legs to alter the tilt from front-to-back or side-to side. and lower them to align properly. -
Page 19: Turning On The Power
26 INSTALLATION Turning on the Power The right refrigerator door does not have an adjustable nut. After installing, plug the refrigerator’s power cord into If the space between the doors is uneven, follow the a 3-prong grounded outlet and push the refrigerator instructions below to align the right door: into the final position. -
Page 20: Operation
OPERATION OPERATION Before Use Clean the refrigerator. Clean the refrigerator thoroughly and wipe off all dust that accumulated during shipping. CAUTION • Wipe adhesive residue off with your thumb or dish detergent. Do not use sharp objects or abrasive, flammble, or a alcohol-based cleaners. •... -
Page 21: Control Panel Features
28 OPERATION Control Panel Depending on the model, some of the following functions may not be available. When the refrigerator is in the Power Saving Mode, the display remains off until a door is opened or a button is pressed. Once on, the display remains on for 20 seconds. Control Panel Features Ice Plus This function increases both ice making and freezing capabilities. - Page 22 • To change the temperature mode from °F * Wi-Fi to °C (or vice versa) press and hold the The Wi-Fi button, when used with the LG Refrigerator and Freezer Temperature SmartThinQ, allows the refrigerator to connect buttons simultaneously for approximately five to a home Wi-Fi network.
-
Page 23: Ice And Water Dispenser
To deactivate / activate: • If ice or water dispenses unexpectedly, turn off the water supply and contact an LG Electronics • With either refrigerator door opened, press and Customer Information Center. hold the Refrigerator and Ice Plus buttons at the same time for five seconds. -
Page 24: Locking The Dispenser
OPERATION Locking the Dispenser In-Door Ice Bin Press the Lock button on the control panel for 3 The icemaker stops producing ice when the in-door seconds to lock or unlock the dispenser and all of the ice bin is full. control panel functions. -
Page 25: Automatic Icemaker
32 OPERATION Automatic Icemaker Assembling the In-Door Ice Bin Carefully insert the in-door ice bin, slanting the In-Door Icemaker top slightly to fit it under the icemaker. Icemaker Power Switch Ice-detecting Sensor Gently push the handle to close the ice NOTE compartment. -
Page 26: Preparing For Vacation
OPERATION Freezer Icemaker Turning the Automatic Icemakers On or Off To turn off one of the automatic icemakers, set the icemaker switch to OFF (O). To turn on the automatic icemaker, set the switch to ON (I). Normal Sounds You May Hear Auto shutoff (feeler arm) Power Switch •... -
Page 27: Storing Food
34 OPERATION Storing Food Food Storage Tips Wrap or store food in the refrigerator in airtight and Each compartment inside the refrigerator is designed moisture-proof material unless otherwise noted. This to store different types of food. Store food in the prevents food odor and taste transfer throughout the optimal space to enjoy the freshest taste. -
Page 28: Storing Frozen Food
OPERATION Humidity Controlled Crispers Storing Frozen Food (On Some Models) Check a freezer guide or a reliable cookbook for further information about preparing food for freezing The crispers provide fresher tasting fruit and or food storage times. vegetables by letting you easily control humidity inside the drawer. -
Page 29: Detaching/Assembling The Storage Bins
36 OPERATION Durabase Crisper Cover ® To remove, lift the front of the cover up until it The Durabase divider allows you to organize the ® detaches from the back wall of the cabinet, then pull Durabase area into sections. It can be adjusted from ®... -
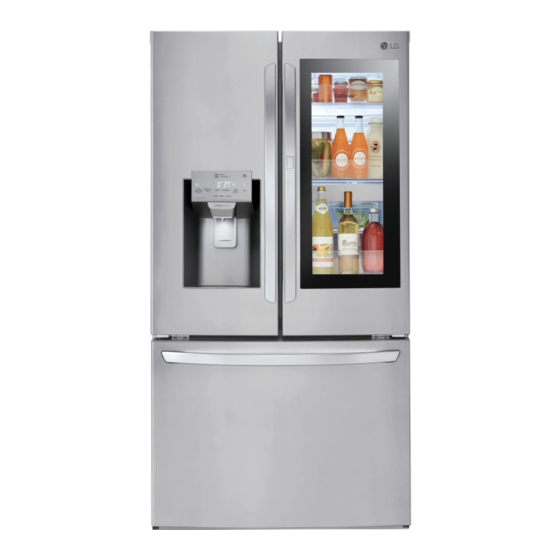
Page 30: Instaview Door-In-Door (On Some Models)
OPERATION InstaView Door-in-Door (On Door-in-Door Case Some Models) To open the Door-in-Door case, pull evenly on the marked area. The Door-in-Door case is removable for The InstaView function on the Door-in-Door lets you easy cleaning and adjustment. see if you’re running low on frequently used items like beverages and snacks, without opening the refrigerator door. -
Page 31: Adjusting The Refrigerator Shelves
38 OPERATION Adjusting the Refrigerator Shelves CAUTION The shelves in the refrigerator are adjustable to meet • Make sure that shelves are level from one side individual storage needs. Your model may have full or to the other. Failure to do so may result in the split shelves. -
Page 32: Smart Functions
To check your network frequency, contact your Internet service provider or refer to your wireless router manual. • LG SmartThinQ is not responsible for any network connection problems or any faults, malfunctions, or errors caused by network connection. • The surrounding wireless environment can make... - Page 33 40 SMART FUNCTIONS LG SmartThinQ Application Features Connecting to Wi-Fi The Wi-Fi button, when used with the LG Firmware Update SmartThinQ application, allows the refrigerator Keep the appliance performance updated. to connect to a home Wi-Fi network. The Wi-Fi icon shows the status of the refrigerator’s network Energy Monitoring (On Some Models) connection.
-
Page 34: Fcc Rf Radiation Exposure Statement
LG Electronics will also provide open source code FCC RF Radiation Exposure to you on CD-ROM for a charge covering the cost Statement... -
Page 35: Smart Grid Function
LG Open API If the refrigerator receives a Demand Response signal from the utility company, the refrigerator will You can manage Smart Grid features for the LG turn on the Grid LED on the refrigerator display and Smart Refrigerator. control its power consumption according to the signal. -
Page 36: Smart Diagnosis™ Function
LG Customer Information Center. NFC or Wi-Fi equipped models can also transmit data to a smartphone using the LG Smart ThinQ application. Smart Diagnosis™ through the Customer Information Center...
Need help?
Do you have a question about the LFXS28596 Series and is the answer not in the manual?
Questions and answers