Table of Contents
Advertisement
OWNER'S MANUAL
FRENCH DOOR
REFRIGERATOR
Read this owner's manual thoroughly before operating the
appliance and keep it handy for reference at all times.
ENGLISH
LFXS28596* / LMXS28596* / LMRS28596* / LFXS26596* / LFXC22596*
www.lg.com
MFL70761702
Copyright © 2019-2020 LG Electronics Inc. All Rights Reserved.
Rev.06_072020
Advertisement
Table of Contents

Related Manuals for LG LRMVS2806D


Summary of Contents for LG LRMVS2806D
- Page 1 Read this owner's manual thoroughly before operating the appliance and keep it handy for reference at all times. ENGLISH LFXS28596* / LMXS28596* / LMRS28596* / LFXS26596* / LFXC22596* www.lg.com MFL70761702 Copyright © 2019-2020 LG Electronics Inc. All Rights Reserved. Rev.06_072020...
-
Page 2: Table Of Contents
Ice and Water Dispenser Ice Compartment Automatic Icemaker Storing Food Humidity Controlled Crispers Glide‘N’Serve Refrigerator Shelves InstaView Door-in-Door Door Bins Durabase 42 SMART FUNCTIONS LG ThinQ Application Smart Grid Function Smart Diagnosis™ Feature 47 MAINTENANCE Cleaning Air Filter Water Filter 53 TROUBLESHOOTING FAQs... -
Page 3: Important Safety Instructions
IMPORTANT SAFETY INSTRUCTIONS IMPORTANT SAFETY INSTRUCTIONS READ ALL INSTRUCTIONS BEFORE USE Safety Messages Your safety and the safety of others are very important. We have provided many important safety messages in this manual and on your appliance. Always read and follow all safety messages. - Page 4 IMPORTANT SAFETY INSTRUCTIONS • Do not bend or pinch the power cord excessively or place heavy objects on it. Operation • This appliance is intended to be used in household and similar applications such as: - staff kitchen areas in shops, offices and other working environments; - farm houses and by clients in hotels, motels and other residential type environments;...
- Page 5 IMPORTANT SAFETY INSTRUCTIONS Maintenance • Do not use a hair dryer to dry the inside of the refrigerator. • Do not light a candle to remove odors in the refrigerator. • In the event of a refrigerant leak, move flammable objects away from the refrigerator. Ensure the area is adequately ventilated and contact an authorized service center.
- Page 6 IMPORTANT SAFETY INSTRUCTIONS Risk of Fire and Flammable Materials This appliance contains a small amount of isobutane refrigerant (R600a), which is combustible. When transporting and installing the appliance, care should be taken to ensure that no parts of the refrigerating circuit are damaged. Refrigerant squirting out of the pipes could ignite or cause an eye injury.
-
Page 7: Product Overview
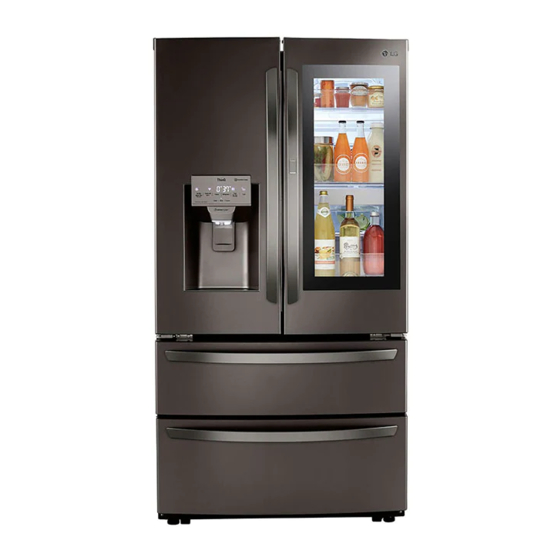
PRODUCT OVERVIEW PRODUCT OVERVIEW Product Features The images in this guide may be different from the actual components and accessories, which are subject to change by the manufacturer without prior notice for product improvement purposes. Exterior † This feature is only available on some models. Control Panel Sets the refrigerator temperature and freezer temperature, the water filter condition and the dispenser mode. - Page 8 PRODUCT OVERVIEW Interior InstaView Door-in-Door: LFXS28596* / LFXS26596*/ LFXC22596* InstaView Door-in-Door: LMXS28596* / LMRS28596* LED Interior Lighting Lights up the inside of the refrigerator. Water filter Purifies water. The filter should be replaced every 6 months. Air Filter Reduces odors inside the refrigerator compartment.
- Page 9 PRODUCT OVERVIEW In-Door Icemaker (Refrigerator) This is where ice is automatically produced and stored. Door Mullion Prevents the cold air in the refrigerator from escaping when the doors are closed. CAUTION • To reduce the risk of scratching the door or breaking the center door mullion, make sure that the folding door mullion is folded in before closing the left-hand door.
- Page 10 10 PRODUCT OVERVIEW Product Specifications The appearance and specifications listed in this manual may vary due to constant product improvements. Electrical requirements: 115 V, 60 Hz Min. / Max. water pressure: 20 - 120 psi (138 - 827 kPa) Model Description Net weight LFXS28596*...
-
Page 11: Installation
INSTALLATION INSTALLATION Before Installing Installation Overview Please read the following installation instructions first after purchasing this product or transporting it to another location. Unpacking the Refrigerator Choosing the Proper Location Disassembling/Assembling Connecting the Water Line Leveling and Door Alignment WARNING •... - Page 12 12 INSTALLATION Unpacking the Refrigerator WARNING • Use two or more people to move and install the refrigerator. Failure to do so can result in back injury or other injury. • The refrigerator is heavy. Protect the floor when moving the refrigerator for cleaning or service. Always pull the refrigerator straight out when moving it.
-
Page 13: Choosing The Proper Location
INSTALLATION Choosing the Proper Location Water The refrigerator must be located where a water supply can be connected for the automatic icemaker. NOTE • The water pressure must be 20 - 120 psi or 138 - 827 kPa or 1.4 - 8.4 kgf/cm . - Page 14 14 INSTALLATION Dimensions and Clearances • Check the dimensions of the appliance and the installation path to ensure there is sufficient room to move the refrigerator through doors or narrow openings. • If an opening is too narrow to fit the refrigerator through, remove the refrigerator doors. See Removing/ Assembling the Doors and Drawers in this manual.
-
Page 15: Removing/Assembling Handles
INSTALLATION Removing/Assembling Assembling Refrigerator Handles Handles If needed, reassemble the mounting fasteners on the door with a 1/4 in. Allen When moving the refrigerator through a narrow wrench. opening, removing the doors is preferred. If you must remove the handles, be very careful not to scratch the doors. -
Page 16: Removing/Assembling Doors And Drawers
16 INSTALLATION fasteners and tightening the set screws The water supply is connected to the upper with a 1/8 in. Allen wrench. right part of the rear surface of the refrigerator. Remove the clip in the joint area. Hold the water supply connection and gently push the collet to detach the water supply line as shown. - Page 17 INSTALLATION Remove the cover and pull out the tube Disconnect all wire harnesses . Unscrew the Removing the Right Refrigerator ground wire Door NOTE • The number of wire harnesses may vary depending on the model. • Ground wire is only present on some models. Remove the top hinge cover screw .
- Page 18 18 INSTALLATION Lift the door from the middle hinge pin and remove the door. Lift the front of the drawer up, then pull it CAUTION straight out. • Place the door, inside facing up, on a nonscratching surface. Remove the Durabase basket from the rails. Remove the screws from the rails at both Removing the Freezer Drawer ends.
- Page 19 INSTALLATION Hold both rails and push them in simultaneously. Lower the door into its final position and insert the screws in the rails on both sides. Assembling the Freezer Drawer NOTE Insert the drawer into the frame, and push the drawer back until it clicks into place. •...
- Page 20 20 INSTALLATION Set the hinge cover in place. Insert and tighten the cover screw Assembling the Right Refrigerator Door CAUTION • Install the right-side door first. NOTE • The number of wire harnesses may vary depending on the model. • Ground wire is only present on some models. Assembling the Left Refrigerator Door Make sure that the plastic sleeve is inserted in...
- Page 21 INSTALLATION † Type B † Type C Connect all the wire harnesses and the ground screw. NOTE • Disassembling/Assembling the Water Lines Push the water supply tube into the hole on the top case and pull it through the backplate. Collet Tube Insert line...
-
Page 22: Connecting The Water Line
22 INSTALLATION Connecting the Water Line • If the water pressure remains low, call a licensed, qualified plumber. • All installations must be in accordance with local Before Beginning plumbing code requirements. This water line installation is not covered by the refrigerator warranty. - Page 23 INSTALLATION a saddle-type valve complies with your local NOTE plumbing codes. • The hookup line cannot be white, plastic tubing. Licensed plumbers must use only copper tubing (NDA tubing #49595 or #49599) or Cross Link Polyethylene (PEX) tubing. NOTE • A self-piercing saddle type water valve should not be used.
- Page 24 24 INSTALLATION Outlet Valve Ferrule (sleeve) Flush out the tubing. • Turn the main water supply on and flush out the tubing until the water is clear. Shut the water off at the water valve after about one quart of water has been flushed through the tubing.
-
Page 25: Leveling And Door Alignment
INSTALLATION Door Alignment (Standard Door CAUTION Model) • Check to see if leaks occur at the water line Both the left and right refrigerator doors have an connections. adjustable nut, located on the bottom hinge, to raise and lower them to align properly. If the space between the doors is uneven even after the door bins are filled, follow the instructions below to align the doors evenly:... -
Page 26: Turning On The Power
26 INSTALLATION If the space between the doors is uneven, follow °C) or below. It will then begin operation the instructions below to align the right door: automatically if the icemaker power switch is in the ON (I) position. With one hand, lift up both the inner and outer door sections of the right door to raise them at the middle hinge. -
Page 27: Operation
OPERATION OPERATION Before Use Checklist Clean the refrigerator. Clean the refrigerator thoroughly and wipe off all dust that accumulated during shipping. CAUTION • Do not scratch the refrigerator with a sharp object or use a detergent that contains alcohol, a flammable liquid or an abrasive when removing any tape or adhesive from the refrigerator. -
Page 28: Control Panel
28 OPERATION Control Panel Depending on the model, some of the following functions may not be available. The actual control panel may differ from model to model. Control Panel Features Ice Plus This function increases both ice making and freezing capabilities. Press the Ice Plus button to illuminate the icon and activate the function for 24 hours. - Page 29 Wi-Fi The Wi-Fi button, when used with the LG ThinQ app, allows the refrigerator to connect to a home Wi-Fi network. Refer to Smart Functions for information on the initial setup of the application. icon shows the status of the refrigerator's network connection. The icon illuminates when the refrigerator is connected to the Wi-Fi network.
- Page 30 30 OPERATION Press and hold the Freezer button for 3 seconds until the control panel beeps and the current ice mode appears. Press the Freezer button repeatedly to toggle between the 3 ICE and 6 ICE modes. After 5 seconds of idle time, the last mode set will be saved, and the display will return to normal.
-
Page 31: Sabbath Mode
• If ice or water dispenses unexpectedly, turn off the display. the water supply and contact an LG Electronics • To turn Sabbath mode off manually, press and Customer Information Center. hold the Freezer and Wi-Fi buttons for 3 •... -
Page 32: Ice Compartment
32 OPERATION NOTE NOTE • Keep containers at an appropriate distance from • Lint from a cloth may adhere to the outlets. the dispensers. Tall, narrow glasses should be held far enough from the ice outlet to prevent ice from jamming in the ice chute. A container Cleaning the Dispenser Tray with a very small opening should be held as Wipe the entire area with a damp cloth. -
Page 33: Automatic Icemaker
Detaching the In-Door Ice Bin CAUTION • Only qualified service personnel from an LG Electronics service center should disassemble or repair the icemaker. Gently pull the handle to open the ice Gently push the handle to close the ice compartment. - Page 34 34 OPERATION • The amount and shape of ice may vary according NOTE to the environment (ambient temperature around the appliance, frequency of the door • To increase ice production, use the Ice Plus being opened, amount of food stored in the function.
-
Page 35: Storing Food
OPERATION • The icemaker water valve buzzes as the CAUTION icemaker fills with water. If the icemaker power button is in the ON position, it will buzz even if it • Do not insert round ice into the in-door ice bin, has not yet been hooked up to water. - Page 36 36 OPERATION • Cheese package are normal. This simply means that moisture in the food and air inside the package - Store in original wrapping until used. Once have condensed, creating ice crystals. opened, rewrap tightly in plastic wrap or aluminum foil.
-
Page 37: Humidity Controlled Crispers
OPERATION • If the refrigerator is kept in a hot and humid place, frequent opening of the door or storing a lot of vegetables in the refrigerator may cause condensation to form. Wipe off the condensation with a clean cloth or a paper towel. •... -
Page 38: Glide'n'serve
38 OPERATION Line up the tabs on the Door-in-Door case Press the Select button to choose between with the slots on the door and push down Produce (Cold), Deli (Colder) and Meat (Coldest). until it snaps into place. NOTE • The Door-in-Door feature is only available on some models. -
Page 39: Instaview
OPERATION underneath the back half of the shelf. Pull the Lower the front of the shelf so that the hooks front of the shelf forward to return to a full shelf. drop into the slots. CAUTION • Make sure that shelves are level from one side to the other. -
Page 40: Door-In-Door
40 OPERATION To access the InstaView Door-in-Door compartment, lightly press the button on the right refrigerator door handle. To replace the door bins, slide the door bin in above the desired support and push down until it snaps into place. Door-in-Door Door-in-Door Case This feature is only available on some models. -
Page 41: Door Bins
OPERATION from side to side to accommodate items of different sizes. WARNING • If the Durabase divider is removed, there is enough open space for children or pets to crawl Door Bins inside. To prevent accidental child and pet entrapment or suffocation risk, DO NOT allow children or pets to touch or go near the drawer. -
Page 42: Smart Functions
Internet service provider or refer to your wireless router manual. • Settings • LG ThinQ is not responsible for any network - Allows you to set various options on the connection problems or any faults, malfunctions, refrigerator and in the application. - Page 43 This equipment has been tested and found to comply with the limits for a Class B digital device, The Wi-Fi button, when used with the LG ThinQ pursuant to Part 15 of the FCC Rules. These limits application, allows the appliance to connect to a are designed to provide reasonable protection home Wi-Fi network.
-
Page 44: Smart Grid Function
FCC RF Radiation Exposure LG Electronics will also provide open source code Statement to you on CD-ROM for a charge covering the cost of performing such distribution (such as the cost of... -
Page 45: Smart Diagnosis™ Feature
LG Open API according to the signal. The refrigerator will You can manage Smart Grid features for the LG respond to the signals received from the utility Smart Refrigerator. company as long as product performance is Please check the detailed specifications on the maintained. - Page 46 Follow the instructions below to use the audible diagnosis method. • Launch the LG ThinQ application and select the Smart Diagnosis feature in the menu. Follow the instructions for audible diagnosis provided in the LG ThinQ application.
-
Page 47: Maintenance
MAINTENANCE MAINTENANCE Cleaning To help remove odors, wash the inside of the refrigerator with a mixture of baking soda and warm water. Mix 2 tablespoons of baking soda to 1 WARNING quart of water (26 g soda to 1 liter water.) Be sure the baking soda is completely dissolved so it does •... -
Page 48: Water Filter
48 MAINTENANCE Water Filter Before Replacing the Water Filter Remove the filter from the inside of the cover by pressing the side of the filter in and pulling WARNING the center out. • To reduce the risk associated with choking, do not allow children under 3 years of age to have access to small parts during the installation of this product. - Page 49 • To purchase a replacement water filter: - Visit your local dealer or distributor Replace with a new water filter. - Search using "water filter" on lg.com • Take the new water filter out of its packing and remove the protective cover from the o- - Use replacement cartridge: LT1000P, rings.
- Page 50 After changing the filter, press and hold the Water Filter button for three seconds to reset the indicator light. CAUTION • LG strongly recommends that you use LG- authorized water filters to prevent water quality issues, water leakage and appliance malfunction.
- Page 51 MAINTENANCE Performance Data Sheet Model: LT1000P, LT1000PC, LT1000PCS NSF System Trade Name Code: MDJ64844601 The concentration of the indicated substances in water entering the system was reduced to a concentration less than or equal to the permissible limit for water leaving the system as specified in NSF/ ANSI Standard 42, Standard 53 and Standard 401.
- Page 52 NOTE • While the testing was performed under standard laboratory conditions, actual performance may vary. For replacement filters, visit your local dealer or distributor or search under "water filters" on the lg.com website. For further assistance, contact the LG Electronics Customer Information Center.
-
Page 53: Troubleshooting
TROUBLESHOOTING TROUBLESHOOTING FAQs Frequently Asked Questions What are the best temperature settings for my refrigerator and freezer? The default setting for the refrigerator is 37° Fahrenheit (3° Celsius). The default setting for the freezer is 0° Fahrenheit (-18° Celsius). Adjust these settings as necessary to keep food at desired temperatures. - Page 54 54 TROUBLESHOOTING Before Calling for Service Review this section before calling for service; doing so will save you both time and money. Cooling Problem Possible Cause & Solution Refrigerator is not A fuse in your home may be blown or the circuit breaker tripped. Or the appliance is cooling or has no connected to a GFCI (Ground Fault Circuit Interrupter) outlet, and the outlet's circuit power.
- Page 55 TROUBLESHOOTING Problem Possible Cause & Solution Cooling system runs Refrigerator is replacing an older model. too much. • Modern refrigerators require more operating time but use less energy due to more efficient technology. Refrigerator was recently plugged in or power restored. •...
- Page 56 56 TROUBLESHOOTING Problem Possible Cause & Solution Refrigerator or Incorrect temperature control settings. Freezer section is too • If the temperature is too cold, adjust the control one increment at a time and wait for the cold. temperature to stabilize. Refer to the Control Panel for more information. Frost or ice crystals Condensation from food with a high water content has frozen inside of the food form on frozen food...
- Page 57 TROUBLESHOOTING Problem Possible Cause & Solution Icemaker is not Demand exceeds ice storage capacity. making enough ice. • The icemaker will produce approximately 70-184 cubes in a 24 hour period. House water supply is not connected, valve is not turned on fully, or valve is clogged. •...
- Page 58 58 TROUBLESHOOTING Problem Possible Cause & Solution Icemaker is not Refrigerator was recently installed or icemaker recently connected. making ice • It may take up to 24 hours for each compartment to reach the desired temperature and for the icemaker to begin making ice. Icemaker is not turned on.
- Page 59 TROUBLESHOOTING Problem Possible Cause & Solution Ice is not dispensing. Unable to hear the sound of ice coming out? • In the control panel, select the modes for cubed ice and crushed ice alternately to dispense the ice. Doors are not closed completely. •...
- Page 60 60 TROUBLESHOOTING Water Problem Possible Cause & Solution Water is dispensing Water filter has been exhausted. slowly. • Replacing the water filter is recommended: - Approximately every six months. - When the water filter indicator turns on. - When the water dispenser output decreases. - When the ice cubes are smaller than normal.
- Page 61 TROUBLESHOOTING Problem Possible Cause & Solution Dispensing warm Refrigerator was recently installed. water. • Allow 24 hours after installation for the water storage tank to cool completely. The water dispenser has been used recently and the storage tank was exhausted. •...
- Page 62 62 TROUBLESHOOTING Problem Possible Cause & Solution Refrigerator wobbles Leveling legs are not adjusted properly. or seems unstable • Refer to the Leveling and Door Alignment section. Floor is not level. • It may be necessary to add shims under the leveling legs or rollers to complete installation. Lights do not work.
- Page 63 TROUBLESHOOTING Problem Possible Cause & Solution Dripping Water running into the drain pan during the defrost cycle. • Normal Operation Pulsating or high- Your refrigerator is designed to run more efficiently to keep your food items at the pitched sound desired temperature.
- Page 64 Should your LG Refrigerator ("Product") fail due to a defect in materials or workmanship under normal and proper use, during the warranty period set forth below, LG will, at its option, repair or replace the Product. This limited warranty is valid only to the original retail purchaser of the Product (“You”) and applies only when purchased lawfully and used within the United States...
- Page 65 Or by mail: LG Electronics Customer Service P.O. Box 240007 Huntsville, AL 35813 ATTN: CIC PROCEDURE FOR RESOLVING DISPUTES: ALL DISPUTES BETWEEN YOU AND LG ARISING OUT OF OR RELATING IN ANY WAY TO THIS LIMITED WARRANTY OR THE PRODUCT SHALL BE RESOLVED EXCLUSIVELY THROUGH BINDING ARBITRATION, AND NOT IN A COURT OF GENERAL JURISDICTION.
- Page 66 Notice of Dispute. In the event you intend to commence an arbitration proceeding, you must first notify LG in writing at least 30 days in advance of initiating the arbitration by sending a letter to LG at LG Electronics, USA, Inc. Attn: Legal Department- Arbitration 111 Sylvan Avenue, Englewood Cliffs, NJ 07632.
- Page 67 Opt Out. You may opt out of this dispute resolution procedure. If you opt out, neither you nor LG can require the other to participate in an arbitration proceeding. To opt out, you must send notice to LG no later than 30 calendar days from the date of the first consumer purchaser’s purchase of the product by...
- Page 68 ARE NOT PERMITTED. PLEASE SEE THE SECTION TITLED “PROCEDURE FOR RESOLVING DISPUTES” BELOW. Should your LG Refrigerator ("Product") fail due to a defect in materials or workmanship under normal and proper use, during the warranty period set forth below, LG Electronics Canada, Inc. (“LGECI”) will, at its option, repair or replace the Product upon receipt of proof of the original retail purchase.
- Page 69 (ASC), as determined by LG Canada. If your Product is located outside a 150 km radius from a ASC, as determined by LG Canada, it will be your responsibility to bring the Product, at your sole expense, to the ASC for in-warranty repair.
- Page 70 If you and LG are unable to resolve the dispute within 30 days of LG’s receipt of the Notice of Dispute, the dispute shall be resolved by binding arbitration in accordance with the procedure set out herein.
- Page 71 Except as otherwise provided for, LG waives any rights it may have to seek attorneys’ fees and expenses from you if LG prevails in the arbitration.
- Page 72 72 Memo...
- Page 73 Memo...
- Page 74 74 Memo...
- Page 75 Memo...
- Page 76 LG Customer Information Center For inquiries or comments, visit www.lg.com or call: U.S.A. 1-800-243-0000 1-888-542-2623 CANADA Register your product Online! www.lg.com...
Need help?
Do you have a question about the LRMVS2806D and is the answer not in the manual?
Questions and answers