
Related Manuals for Larson Electronics EXP-EMG-EXT-LE6-4L


Summary of Contents for Larson Electronics EXP-EMG-EXT-LE6-4L
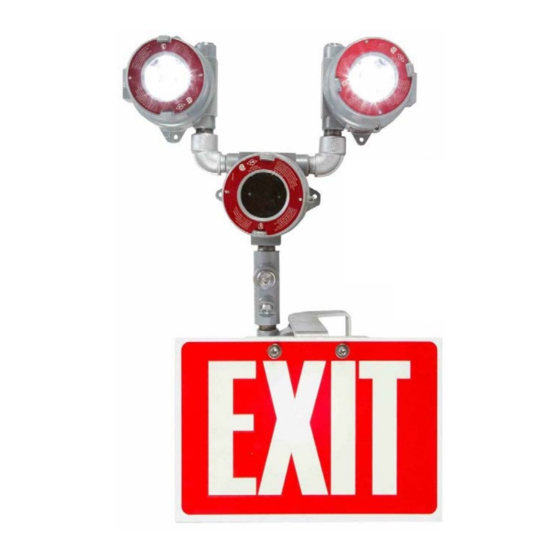
- Page 1 EXP-EMG-EXT-LE6-4L Explosion Proof Bug Eye Emergency LED Fixture Instruction Manual...
-
Page 2: Table Of Contents
Congratulations on the purchase of your new Explosion Proof Bug Eye Emergency LED Exit Fixture. Please read these instructions carefully to familiarize yourself with the safe operation and maintenance of your new emergency fixture. Following these instructions will insure many years of safe and dependable service. Table of Contents I. -
Page 3: Installation & Operation
I. Installation & Operation NOTE: The EXP-EMG-EXT-LE6-4L is designed to be surface mounted to flat surfaces such as walls. I. Installation Mounting for this fixture is achieved via mounting tabs located on the back side of the light. The EXP-EMG-2L-LE6 explosion proof emergency self-testing LED fixture is NOT a factory sealed fixture. -
Page 4: Trouble-Shooting & Maintenance
II. Trouble-Shooting and Maintenance CAUTION: Always turn AC power to the equipment OFF before servicing. Servicing should be performed only by a qualified service technician. I. Trouble-Shooting 1. Problem: Emergency lights do not operate. If the charge indicator light is OFF, check that the circuit breaker for AC supply is ON. -
Page 5: Iii.safety Warnings & Ratings
II I. Safety Warnings and Ratings I. Warnings Cap unused wires with enclosed wire nuts or WARNING: Risk of electric shock - never other approved method. connect to, disconnect from or service while equipment is energized. Make sure wire terminations are secure and leads are properly tucked in appropriate wire WARNING: Risk of fire - Lamps are hot. - Page 6 Voltage: 12V DC Tighten all electrical connections. 5. Close cover module, making sure that all wires are safely inside driver. Tighten captive closing screw. 6. Turn power on and aim light. Larson Electronics, LLC Phone: (800) 369-6671 Fax: (903) 498-3364 www.larsonelectronics.com...
- Page 7 5. Electrically check to make sure that all connections are clean and tight. 6. Mechanically check that all parts are properly assembled. Larson Electronics, LLC Phone: (800) 369-6671 Fax: (903) 498-3364...
- Page 8 These fittings are approved for use only with Killark "SC" Sealing Compound. NOTE: CONDUIT SIZE MIN. POUR APPROX. AMOUNT MIXED DEPTH COMPOUND REQ'D. (OZ.) ½" " ¾" ¾" 1" 1" 1¼" 1¼" 1½" 1½" 2" 2" 10.5 Larson Electronics, LLC Phone: (800) 369-6671 Fax: (903) 498-3364 www.larsonelectronics.com...
- Page 9 BUG EYE RED 277VAC (HOT) FIXTURE BLACK 120VAC (HOT) WHITE (COMMON) GREEN (GROUND) REMOTE YELLOW +++ (REMOTE HEAD POSITIVE) HEAD PURPLE --- (REMOTE HEAD NEGATIVE) BATTERY CONNECT JUNCTION BATTERY CONNECT Larson Electronics, LLC Phone: (800) 369-6671 Fax: (903) 498-3364 www.larsonelectronics.com...
Need help?
Do you have a question about the EXP-EMG-EXT-LE6-4L and is the answer not in the manual?
Questions and answers