
Related Manuals for AllSportSystems SkyRail Plus


Summary of Contents for AllSportSystems SkyRail Plus
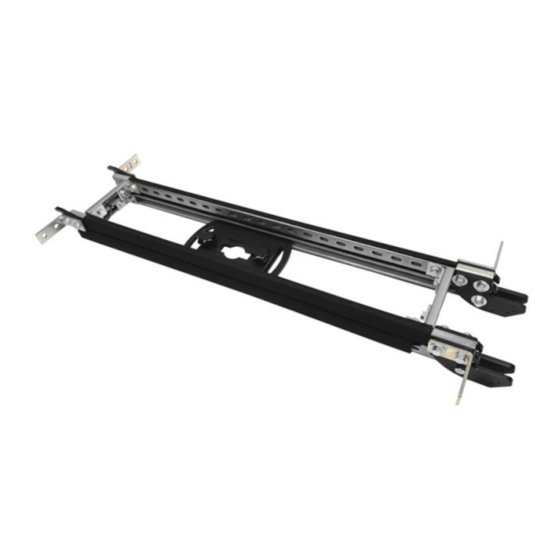
- Page 1 All S portSystems, Inc. © 2020. Setup Guide Click here to view our video setup guide. Page 1 of 10...
-
Page 2: Tools Needed
All S portSystems, Inc. © 2020. Required Using SkyBridge brackets (included): Install Unistrut, replacing front width pole and screen pole with open Unistrut channels facing towards each other. SkyBridge Bracket Installation Guide Unistruts must be spaced 4’ apart. Tools Needed: ●... - Page 3 2020. Step 1: Attach back of SkyRail Plus ● Hook the back of the SkyRail Plus downwards into the screen Unistrut channel. The long protruding tabs rest above the Unistrut for extra support, while the hooked end goes inside the Unistrut channel...
- Page 4 ● With the back of the SkyRail Plus hooked into the screen Unistrut, bring the front of the SkyRail Plus up. The brackets on the front of the SkyRail Plus will slightly push and hook into the Unistrut on the front of the cage.
- Page 5 2020. Steps 1 & 2 Together ● By hooking the back of the SkyRail Plus and raising the front up to lock it in place, the SkyRail Plus can easily be bolted into the cage without having to hold it in place.
- Page 6 2020. Step 3: Secure to cage ● On all 4 corners of the SkyRail Plus, secure it to the cage using the included ½” bolts and ½” Unistrut cone nuts with a ¾” wrench or socket. Page 6 of 10...
- Page 7 All S portSystems, Inc. © 2020. Step 4: Remove Stops ● Remove the arm stops from the front of the SkyRail PLUS Page 7 of 10...
- Page 8 All S portSystems, Inc. © 2020. Step 5: Set Arm Height ● Remove the safety strap and swing the projector arms out to your desired angle, then replace the arm stops back though the corresponding holes which will hold the projector arms in place. Page 8 of 10...
- Page 9 2020. Step 7: Attach and assemble Universal Projector Mount ● Drop the universal projector mounting frame through the SkyRail PLUS sliding frame and attach using the included carriage bolts and wing nuts. Continue assembling projector mount following the universal projector mount instructions.
- Page 10 2020. Step 8: Adjust projector to match screen ● Slide your projector along the SkyRail PLUS arms to position it properly for your hitting screen. Use the two black knobs on the underside of the sliding plate to secure it in place.
Need help?
Do you have a question about the SkyRail Plus and is the answer not in the manual?
Questions and answers