Table of Contents
Advertisement
Advertisement
Table of Contents

Related Manuals for Abbott m-PIMA


Summary of Contents for Abbott m-PIMA
- Page 1 ANALYSER ™ USER GUIDE...
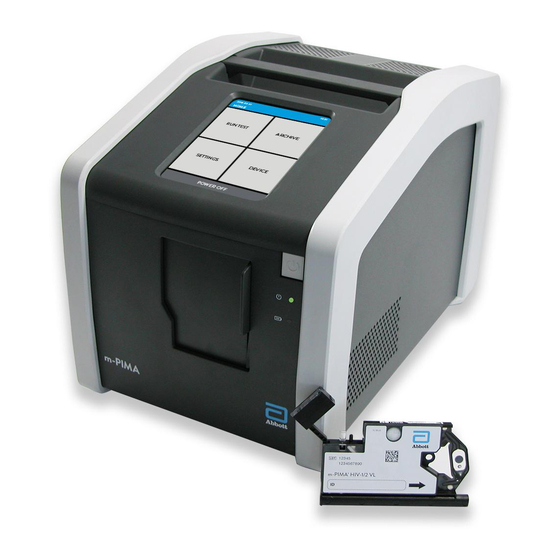
- Page 2 Analyser The m-PIMA™ Analyser is a portable automated bench-top analyzer for processing m-PIMA™ test cartridges and may be used in any laboratory and non-laboratory environment that meets the requirements specified in this document. The m-PIMA™ Analyser can be operated on external power, with an internal rechargeable battery protecting it against power fluctuations and is also suitable for near-patient testing.
-
Page 3: Table Of Contents
1 INTRODUCTION 2 GETTING STARTED 3 HOME 4 RUNNING A TEST 5 ARCHIVE 6 SETTINGS 7 DEVICE 8 POWER OFF & STORAGE 9 TECHNICAL SUPPORT & ERROR CODES 10 WARNINGS & ERROR MESSAGES m-PIMA™ ANALYSER USER GUIDE... - Page 4 22 3 HOME 22 Menu Overview 23 4 RUNNING A TEST 23 How to initiate a Test 24 How to insert an m-PIMA™ Test Cartridge 25 How to enter an Operator 27 How to enter a Sample ID 28 Analysis in Progress...
- Page 5 56 Service Export 58 Software Update 59 8 POWER OFF & STORAGE 60 Deinstallation 60 m-PIMA™ Analyser Storage and Recharging Intervals 61 9 TECHNICAL SUPPORT & ERROR CODES 61 Technical Support 62 Error Codes 66 10 WARNINGS & ERROR MESSAGES...
-
Page 6: Introduction
During processing of the test, data is recorded, analysed and interpreted using software embedded within the instrument. Upon completion of the test the cartridge is removed from the m-PIMA™ Analyser and a test result is displayed. For detailed information on the test principle of the individual assay, please refer to the respective Cartridge Guides. -
Page 7: M-Pima™ Analyser Specifications
Analyser Specifications Device Dimensions W 20 cm × H 22 cm × D 31 cm Weight 8 kg Detection system LED illumination and CCD-based detection sample detection, control of cartridge Controls expiry date, automated cartridge identification, internal process controls Display graphical display, colour, VGA 480 ×... -
Page 8: Declaration Of Conformity
IEC 61010-1, IEC 61010-2-101, IEC 61326-1 and IEC 61326-2-6. Unpacking, Installation and Transport Unpack the m-PIMA™ Analyser and place it safely on a clean, flat, level and stable surface. Inspect for any obvious sign of damage. Report any damage immediately to your local distributor. -
Page 9: Maintenance And Cleaning
Never clean the inside of the m-PIMA™ Analyser. Always turn off the m-PIMA™ Analyser and disconnect it from any external power source and accessories before cleaning. Follow the instructions on the clearance certificate included in the instrument box before shipping the m-PIMA™... -
Page 10: Safety Warnings And Precautions
Place the m-PIMA™ Analyser where you can easily disconnect it from mains A/C power at any time. Turn the back of the m-PIMA™ Analyser to the front for easy access to ports and main switch. Do not tilt forward the instrument for better access since this may result in considerable damage to the front door and housing. - Page 11 Only trained and authorized personnel may use the m-PIMA™ Analyser. Abbott is not responsible for any injury or damage caused by improper use. The m-PIMA™ Analyser must not be moved while an analysis is in progress. Do not autoclave the m-PIMA™ Analyser! Follow proper infection control guidelines for handling all human specimens and related items.
-
Page 12: The M-Pima™ Analyser At A Glance
Analyser at a Glance Device handle Touch screen Power On Power Status Light Charging Status Light Process Status Light m-PIMA™ Analyser door 2 × USB ports Main power switch Power connector port LAN port 1 INTRODUCTION... -
Page 13: Getting Started
• Connect the power cord to the corresponding A/C power socket. Illumination of the power supply LED indicates the connection to mains power. • Switch on your m-PIMA™ Analyser using the main power switch on the back of the instrument (position ( I )). Power connector... -
Page 14: Charging The M-Pima™ Analyser
Note: Make sure to remove all storage devices before you switch on the m-PIMA™ Analyser. • Then press the grey Power On button located on the front of the m-PIMA™ Analyser. The EP-mode of the internal battery is now deactivated. An automated initialization procedure 2019-11-07... -
Page 15: Power Status Light
Analyser Status Lights Your m-PIMA™ Analyser is equipped with a number of LED indicators to inform you about the current state of the instrument. Power Status Light Charging Status Light Process Status Light m-PIMA Power Status Light The green power status light on the front of the instrument indicates whether the m-PIMA™... -
Page 16: Charging Status Light
(see page 21). Process Status Light On the right side of the m-PIMA™ Analyser door you find the process status light. It is only illuminated during an active analysis process. No cartridge inserted/ m-PIMA™... - Page 17 Analyser User Interface Your m-PIMA™ Analyser is equipped with a resistive touch screen for displaying information and to interact with the instrument. The touch screen is precalibrated and you may use it with bare or gloved hands alike. In case the touch screen loses its calibration go to page 49 to learn more about how the touch screen of your m-PIMA™...
-
Page 18: Navigation
Test Report in the archive entries and Test Reports m-PIMA™ Analyser archive View Down to confirm all entries or selections to print m-PIMA™ Test Reports or to confirm a message (Information, Warning, Error) Confirm Print to go back to the previous screen... -
Page 19: Data Entry
* # % & Z X C V B N M . Screen Type Description Throughout the m-PIMA™ Analyser menu structure different types of screens will be displayed. You will find a brief overview in the following. The different screen types can easily be distinguished by the color of their title/ status line (header). - Page 20 Analyser. Information screens provide you with further details to continue with your processes. As a precautionary measure your m-PIMA™ 2019-11-07 15:33 CONFIRMATION Analyser will ask you to confirm certain decisions, like cancelling active processes.
-
Page 21: The Battery Symbol
Connect to A/C power immediately. Warning screens and actions. The Battery Symbol As soon as your m-PIMA™ Analyser is disconnected from mains A/C the internal battery will instantaneously continue to supply the instrument with power. A fully charged battery will provide you with electrical power for the completion of an already started test. -
Page 22: Home
3 HOME After the initial startup process the «HOME» screen will be displayed as your entry point to the various menu options. Pressing will guide you directly to the initial «HOME» screen. Note: During an active test run the option is not available. Menu overview Test RUN TEST... -
Page 23: Running A Test
4 RUNNING A TEST How to initiate a Test The m-PIMA™ test consists of a disposable test cartridge, containing all test reagents, and the m-PIMA™ Analyser. The m-PIMA™ test cartridges are supplied in boxes containing a product insert detailing instructions for sample collection as well as the test specific performance characteristics. -
Page 24: How To Insert An M-Pima™ Test Cartridge
How to insert an m-PIMA™ Test Cartridge To insert a test cartridge you first need to manually slide the m-PIMA™ Analyser door to the left to get full access to the cartridge slot. Since the door will automatically close you need to hold it open while inserting the cartridge. -
Page 25: How To Enter An Operator
While it is not necessary to enter Operator and Sample ID immediately after the analysis has started, the m-PIMA™ Analyser will NOT display a result until you have entered the respective information. How to enter an Operator The «OPERATOR»... - Page 26 Your attempt to save an Operator which 2019-11-07 15:33 INFORMATION already exists in the Operator List will trigger the following Information screen. Operator already exists. • Press to return to the Operator List. The attempt to save an empty entry field will 2019-11-07 15:33 INFORMATION...
-
Page 27: How To Enter A Sample Id
The attempt to save an empty entry field will 2019-11-07 15:33 INFORMATION trigger the following Information screen. Enter Sample ID. • Press to return to the Sample ID entry field. Note: An isolated "Space" is not accepted as valid character. m-PIMA™ ANALYSER USER GUIDE... -
Page 28: Analysis In Progress
The result screen will not be displayed until the cartridge is removed. All m-PIMA™ test cartridges are for single use only and must be discarded as biohazard waste after use. -
Page 29: Printing Results Immediately After Analysis
You may print an m-PIMA™ Test Report immediately after the test analysis is finished by pressing If the USB Printer is not attached to the m-PIMA™ Analyser via one of the USB ports at the back of the instrument the print option is not enabled. -
Page 30: The M-Pima™ Test Report
Test Report The m-PIMA™ Test Report contains all m-PIMA HIV-1/2 VL information displayed on the result screen. Sample ID 07-11-2019-ABC An example of a printed m-PIMA™ Test Report is 7425 cp/mL shown to the right. HIV-1 M/N Undetected HIV-1 O... -
Page 31: During Analysis
To change the Operator or Sample ID during 2019-11-07 14:56 ANALYSIS analysis, press in the «ANALYSIS» screen; this opens the «SAMPLE ID» screen again m-PIMA HIV-1/2 VL allowing you to change your previous Sample ID entry. Sample ID 07-11-2019-ABC • Confirm your changes with nd the «ANALYSIS»... -
Page 32: How To Abort An Analysis
• Press to initiate the aborting procedure or press to return to the «ANALYSIS» screen. Note: m-PIMA™ test cartridges are single use devices and CANNOT be reused after you aborted an analysis. The m-PIMA™ Analyser will prompt you to 2019-11-07 14:56 ABORT ANALYSIS remove the cartridge (see details at “Analysis... - Page 33 «RUN 123400089-ABF TEST» screen and to start the next analysis. Error Code 18006 • Press to continue with other menu options. Result No. • Press to print an m-PIMA™ Test Report. m-PIMA™ ANALYSER USER GUIDE...
-
Page 34: Archive
All results stored in the Archive can be viewed, printed and exported or deleted. You can only access the Archive, if there is no analysis currently in progress. Up to 1000 test results can be stored in the m-PIMA™ Analyser archive. • To open the list with all results archived,... -
Page 35: View Results
12345-ABG-123 2019-11-05 123456789-ABF 2019-11-05 89-FG 2019-11-04 Alternatively you can choose the «SELECT ALL» 1-AH-35 2019-11-02 option in the Action Menu to select all results 62-GU-1 2019-10-30 currently stored in the archive (see next page for details). m-PIMA™ ANALYSER USER GUIDE... -
Page 36: Action Menu
Acti on Menu Pressing will open the Acti on Menu. Here you will fi nd the respecti ve acti on items and the «SELECT ALL» opti on. Acti on Menu: Print You need to att ach the USB Printer to one of the USB ports of the instrument to print results from the archive. - Page 37 If you print more than one result the printing process can be aborted at any time this screen is shown. The printed m-PIMA™ Test Report contains all information displayed on the result screen of the m-PIMA™ Analyser. After successful print, the display automatically returns to the result list.
-
Page 38: Action Menu: Export
Please also refer to the respective mobile modem product information. Local Network The m-PIMA™ Analyser is equipped with a LAN port (LAN) on the back of the instrument. If you want to transfer result data into a local network or via the CONNECT Universal Gateway (see page 9) make sure a respective LAN cable is connected and the m-PIMA™... - Page 39 As a default opti on the export of data via USB Storage Device is available. Depending on the confi gurati on your m-PIMA™ Analyser can also provide data export via Mobile Network and/or to a Local Network and the CONNECT Universal Gateway, respecti vely.
- Page 40 You can go back to the «HOME» screen or return to the result list by pressing Note: The storage medium does not need to be removed to continue, however, removal is recommended, especially when the m-PIMA™ Analyser operates on the integrated battery. 5 ARCHIVE...
-
Page 41: Action Menu: Delete
2019-11-06 123456789-ABD-576123 2019-11-06 12345-ABG-123 2019-11-05 123456789-ABF 2019-11-05 89-FG 2019-11-04 1-AH-35 2019-11-02 The m-PIMA™ Analyser will ask for your 62-GU-1 2019-10-30 confirmation to proceed. • Press either to ultimately delete the 2019-11-07 15:33 CONFIRMATION selected results or to exit this action and return to the result list. -
Page 42: Settings
6 SETTINGS You can change the general settings of your 2019-11-07 14:51 HOME m-PIMA™ Analyser. • Press the [SETTINGS] tile in the lower left RUN TEST ARCHIVE corner of the «HOME» screen. A list of all available setting options is... -
Page 43: Enter An Operator
Operator on top. Q W E R T Y U Press to return to the «OPERATOR LIST» A S D F G H J K L without saving any changes. Z X C V B N M . m-PIMA™ ANALYSER USER GUIDE... -
Page 44: Delete An Operator
Delete an Operator You can only delete an existing Operator when no analysis is running. • To delete entries in the «OPERATOR LIST» 2019-11-07 14:51 OPERATOR LIST select the entry of interest by pressing New Operator the respective line which will then be LOTTE MUELLER highlighted in mint. -
Page 45: Date And Time
• Use the up and down arrows to adjust the 2019-11-07 14:56 DATE AND TIME numbers. Confirm with to return to the Year Month «SETTINGS» list. 2019 Press to return to the «SETTINGS» list without saving any changes. Hour Minute m-PIMA™ ANALYSER USER GUIDE... -
Page 46: Languages
Languages The m-PIMA™ Analyser provides you with different language options for the User Interface. The default language setting is English. • Press the «Language» line in the 2019-11-07 14:56 SETTINGS «SETTINGS» list. This opens a list with all Operator List available languages. -
Page 47: Advanced Settings
Change language to Français? • To return directly to the «SETTINGS» list without saving any changes press Advanced Settings This sub menu provides you with additional 2019-11-07 14:56 SETTINGS setting options. Operator List Date and Time Language Advanced Settings m-PIMA™ ANALYSER USER GUIDE... -
Page 48: Connectivity
CONNECT Universal Signal Tone Gateway by connecting a LAN cable to the LAN port at the back of your m-PIMA™ Analyser. All options available in the sub menus are only relevant in combination with the respective hardware. - Page 49 The m-PIMA™ Analyser will ask for an acti ve 2019-11-07 15:33 CONFIRMATION confi rmati on at that point. Calibrate screen? • Press to open the calibrati on screen or press to return to the «ADVANCED SETTINGS» list. • Use a stub pen or the like and carefully...
-
Page 50: Test Mode
Test Mode The default Test Mode on your m-PIMA™ 2019-11-07 14:56 ADVANCED SETTINGS Analyser is called Regular Mode and allows for Connectivity processing of m-PIMA™ test cartridges. Calibrate Screen As an additional option your m-PIMA™ Test Mode Analyser can be operated in Demo Mode... - Page 51 Your m-PIMA™ Analyser will ask for an active 2019-11-07 15:33 CONFIRMATION confirmation before the change of Test Mode is initiated. Switch to Demo Mode? • Press to continue or to return to the «TEST MODE» screen without saving any changes.
- Page 52 DEMO Regular Mode for the respective assay, though m-PIMA HIV-1/2 VL no diagnostic results are given (see example). Demo Sample ID Your m-PIMA™ Analyser remains in Demo 07-11-2019-ABC Mode until manually switched back to Regular Demo HIV-1 M/N Mode. Demo...
-
Page 53: Signal Tone
Signal Tone Your m-PIMA™ Analyser is equipped with 2019-11-07 14:56 ADVANCED SETTINGS acoustic signals to alert the operator of actions Connectivity requested by the instrument. Calibrate Screen Test Mode • If you want to turn off certain acoustic Signal Tone signals press the respective line and choose “Off”... -
Page 54: Device
The Device Info screen provides you with a 2019-11-07 14:56 DEVICE quick overview of some important Device Info characteristics of your m-PIMA™ Analyser. Service Export Software Update • Select «Device Info» from the «DEVICE» screen to view the status data of the m-PIMA™ Analyser. - Page 55 Atm pressure 1013 hPa Category Information Serial Number of the m-PIMA™ Analyser IP address Network address used by the m-PIMA™ Analyser Software Software version installed on the m-PIMA™ Analyser Number of total test runs performed on this Total tests instrument...
-
Page 56: Service Export
Service Export The Service Export function assists Technical 2019-11-07 14:56 DEVICE Support in trouble shooting the m-PIMA™ Device Info Analyser. Service Export Software Update Detailed test data collected with every test run are provided for further examination in a separate Service Export Archive. - Page 57 Successful export will be indicated by the 2019-11-07 14:56 SERVICE EXPORT ARCHIVE following screen. Export completed. For more informati on about exporti ng data please refer to “Acti on Menu: Export” on page 38. m-PIMA™ ANALYSER USER GUIDE...
-
Page 58: Software Update
Software Update Individual software updates on the 2019-11-07 14:56 DEVICE m-PIMA™ Analyser can be done via Device Info USB (storage device) or LAN connection Service Export (CONNECT Universal Gateway). Software Update Software updates must only be installed in cooperation with qualified and authorized technical support personnel. -
Page 59: Power Off & Storage
8 POWER OFF & STORAGE • If you want to turn off the m-PIMA™ 2019-11-07 14:51 HOME Analyser, press the [POWER OFF] tile on the lower part of the «HOME» screen. RUN TEST ARCHIVE SETTINGS DEVICE POWER OFF A «CONFIRMATION» screen will open. -
Page 60: Deinstallation
If for any reason it is not possible to turn off the m-PIMA™ Analyser via the described route or it does not react to any input from the touch screen, press the grey Power On button on the front of the instrument until the screen turns black. -
Page 61: Technical Support & Error Codes
9 TECHNICAL SUPPORT & ERROR CODES The m-PIMA™ Analyser performs a series of 2019-11-07 14:51 TEST REPORT checks to ensure that all steps of the analysis m-PIMA HIV-1/2 VL process are completed successfully. Sample ID Should one of these checks discover an error,... -
Page 62: Error Codes
Error Codes On the following pages possible Error Codes are listed. Due to the complex nature of the m-PIMA™ Analyser testing system (including interactions between instrument, cartridge, user, sample and other factors) one Error Code might be triggered by different events. - Page 63 Cartridge or sample related errors. Please refer to the test cartridge guides PI- 23020 m-PIMA-04 or PI-m-PIMA-05 for further information about sample storage and handling. Unexpected amplification curve, e.g. due to individual sample properties.
- Page 64 Error Code Action Cartridge related errors. Repeat test with new 23021-23205, cartridge. 23207/23208, 23211, Contact your local distributor or your regional 23213-23216 Technical Support if the error persists. Repeat test with new cartridge. 23212, 23217, 23026 Contact your local distributor or your regional Technical Support if the error persists.
- Page 65 21001-21305, 21403, Check if a cartridge is still inserted in your 21404, 30001, 51015, m-PIMA™ Analyser. Remove cartridge. 51016, 51272-51274, If the error persists restart your m-PIMA™ 51307, 51512-51772, Analyser. 51774-51781, 51790- Contact your local distributor or your regional 52007, 52009, 52011- Technical Support if the error persists.
-
Page 66: Warnings & Error Messages
Pressing the inactive [RUN TEST] tile results in 2019-11-07 15:33 the following Information screen. INFORMATION The m-PIMA™ Analyser archive is full. Make sure to save, download or export all required data before you delete results Clear archive to proceed with testing. from your m-PIMA™ Analyser archive. -
Page 67: Power Warnings
At this point the instrument is fully functional Connect to A/C power. and ongoing activities can be continued. As long as your m-PIMA™ Analyser is powered by the internal battery the battery symbol will be displayed in the status line of every screen (see also page 21). -
Page 68: Export Errors
2019-11-07 15:33 ERROR unspecified error has occurred during the export of results. This may have been caused by either the storage device or the m-PIMA™ Analyser. EXPORT FAILED • Press and repeat the export of results. Should this fail a second time insert a different USB storage device and export results. - Page 69 If during export the storage capacity of the 2019-11-07 15:33 ERROR storage device is reached, the following screen appears. • Press and remove the storage device. STORAGE DEVICE FULL. Insert another storage device with adequate storage capacity and repeat export. m-PIMA™ ANALYSER USER GUIDE...
-
Page 70: Printer Warning
• After a new roll of paper has been inserted, confirm continuation of printing with In case the error occurred during printing of an m-PIMA™ Test Report, the last report will be printed again. For more information on the USB Printer, please refer also to the USB Printer User Guide. - Page 71 ANALYSER USER GUIDE...
- Page 72 Abbott Rapid Diagnostics Jena GmbH Orlaweg 1 D-07743 Jena, Germany www.abbott.com/poct © 2020 Abbott. All rights reserved. Version 09 All trademarks referenced are trademarks UG-m-PIMA-01-09-EN of either the Abbott group of companies or their respective owners. Revision date: 28-Jan-2020...
Need help?
Do you have a question about the m-PIMA and is the answer not in the manual?
Questions and answers
What could be the cause of Error code 52007 while using m pima hiv 1/2 detect bad it solution