
Related Manuals for Apec Water Ultimate Ro-Lite Commercial Series


Summary of Contents for Apec Water Ultimate Ro-Lite Commercial Series
- Page 1 ULTIMATE REVERSE OSMOSIS SYSTEM RO-LITE COMMERCIAL SYSTEM INSTALLATION INSTRUCTION & OWNER’S MANUAL Ver 2.3 All Rights Reserved © APEC Water Systems...
- Page 3 Please keep this Owner’s Manual for future reference. It contains helpful information on how to maintain and care for your APEC Reverse Osmosis water filter system.
- Page 4 Thank you for choosing APEC reverse osmosis systems. You now own the finest water filter in America. Please read and become familiar with instructions and parts needed before pro- ceeding with the installation. BEFORE INSTALLATION: Inspect the system: Please take the system and all the components out of the box. Inspect the system and all the connection fittings carefully, make sure nothing is damaged during shipping.
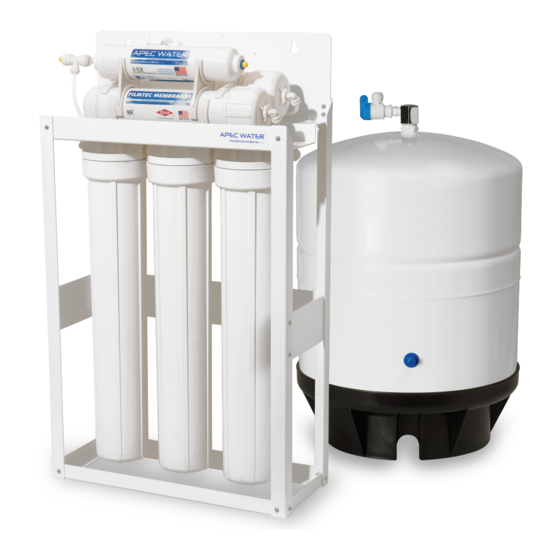
- Page 5 Components included with the Ro system: 1 RO system 3 Pre-filters in 3 Housings 1 Storage tank 2 - 4 RO membranes (depends on model) Pre inserted in membrane housing Installation Kit includes 1 Faucet with 1 Feed water adaptor with 1 Drain saddle for washers, nuts and feed water ball valve kit...
- Page 6 Component Itemization: #1) Bracket #9) ASO #2) Membranes inside their housings #10) Check valve #3) In-line carbon filter (last-stage filter) #11) T-fitting (Last-stage filter) #4) Sediment pre-filter and housing (1st stage #12) Feed water inlet filter) #13) Filtered water outlet #5) Carbon block pre-filter and housing (2nd- stage filter) #6) Carbon block pre-filter and housing (3rd-...
- Page 7 Fitting Types: The Ro Lite Commercial System comes standard with Quick-Connect (QC) Fittings. Quick-Connect (QC) Fittings: (no insert, sleeve, or nut), most of the fittings on the RO unit are this type. To connect: See Fig.1 Push the tubing into the Quick-Connect fitting tightly, gently pull back on the tubing to make sure connection was secure.
-
Page 8: Installing The System
INSTALLING THE SYSTEM *All filters are already pre-installed inside their housings, please follow the installation steps listed below. The Ro Lite Commercial system can be installed in any location where there is a cold water supply with suffi- cient water pressure for your chosen RO model, and an outlet to drain off the waste water generated by the system. - Page 9 Fig. 2 Fig. 2C Sink Sink Faucet Faucet Shank Shank Riser Riser Tube Tube Feed Water Adaptor Feed Water Adaptor Main Water Main Water Supply Supply Shut-off Shut-off Valve Valve For Solid Line For Flexible Line Fig. 2B Fig. 2A Fig.
- Page 10 4. Test for leaks at this point: Close the Ball Valve by turning the “handle” to the vertical position, this will shut-off the feed water. Then, turn ON the cold water supply, watch to see if there is water leaking at the connection.
- Page 11 2. See Fig. 4. Mark the position of the hole on the drain pipe and drill a 1/4” hole through one side of the drain pipe. There is a piece of self-adhesive sponge provided. Glue this sponge to the inside of the saddle, this will cushion any gap between the saddle and the pipe.
- Page 12 Step 3: Drilling A Hole For The RO Faucet The RO dispensing faucet can be mounted on the sink, on the counter top, or simply hang at a location where it’s convenient for you to dispense the filtered water. You will need to drill a hole only if you choose to mount the faucet on a surface.
- Page 13 For Porcelain Sink: Porcelain enameled sinks can readily be chipped if care is not exercised when drilling the hole. Before starting the drill motor, apply firm downward pressure on the bit until a crunching occurs. This will help keep the drill bit from walking when starting the hole.
- Page 14 Step 5: Positioning The System The RO system can stand on the ground or be secured to the wall. The storage tank may be laid on its side if needed. This position does not affect the tank’s performance. If there is not enough room near the RO system, you can put the tank away from the system, up to about 20 feet horizontal without much pressure loss.
- Page 15 1. Point Z Faucet connections: Tubing color: Clear tubing. Connect the 3/8” CLEAR tubing to the base of the RO faucet. Fitting type: Quick-Connect fitting. No Teflon tape needed here. 2. Point X Feed water connection: Tubing color: Red tubing. Connect the 3/8” RED tubing to the Feed Water Ball Valve. Fitting type: Metal compression nut fitting.
- Page 16 7. Point Y Tank’s input & output connection: Fig. 7 Tank Shut-Off Valve Kit: The tank-shut off kit includes 2 parts. A Shut-off valve and a Tank Output Adap- tor. They are NOT tightened when we ship out the tank. At this point, wrap Teflon tape onto threaded parts on the tank adaptor.
- Page 17 Step 7: System Start-Up Turn on feed water: Slowly, turn on your cold water supply. Open the Feed Water Ball Valve to allow the raw water to enter the system. Turn the “handle” to the horizontal position. Check for leaks! Turn on tank valve: Turn on the tank’s ball valve to allow water to enter the tank.
-
Page 18: Filter Change Schedule
FILTER CHANGE SCHEDULE The system requires very little maintenance. Just change the filter cartridges regularly as suggested below. Keep the system sheltered from the weather elements, and run the system within its reasonable output ca- pacity (i.e. allow the system to rest a few hours a day). Stages-1,2,3 Pre-filters: City water usage: Replace the pre-filters at least once a year (annually), or about 8000 gallons of filtered water produced, whichever comes first. -
Page 19: Filter Change Instructions
FILTER CHANGE INSTRUCTIONS How To Replace Stages 1, 2, 3 Pre-Filters: Turn OFF cold water supply to RO system. Turn OFF tank’s ball-valve. Lift up RO faucet lever briefly to relief the built-up pressure inside the RO system. This will make opening the hous- ings easier. - Page 20 How to Replace Stage-4 Membrane: There are several membranes (2 to 4 depending on model) provided with your system. Please insert the membrane into each housing one-by-one to prevent mis-connecting the tubing. Locate the Membrane housings on the system. See Fig 8 The number of housing matches with the number of membranes provided.
- Page 21 How to Replace Last Stage Post Carbon Filter: Replace this last filter at the same time you replace the stage-4 membrane. Locate the last stage carbon filter. See Fig 8 on Page 16. Remove the OLD filter: Disconnect the input 3/8” tubing at Point G. and output 3/8” tubing at Point H.
- Page 22 OWNER’S MANUAL This section provides explanation and basic concepts on how an RO system works, and how it performs in relation to your input water’s condition. We hope this information helps keep your RO system running at top performance for years to come. 1).
- Page 23 4). How Long Does It Take to Fill Tank? Depending on your water pressure and RO model, the standard tank will fill up in about 2-3 hours. After the tank is filled, the RO will shut off automatically. 5). Ro Delivery Pressure. The Ro’s delivery pressure depends on how full the storage tank is.
- Page 24 8). How to Test Your Water Pressure: Get a water pressure gauge that adapts onto your sink or garden faucet (from hardware store), attach gauge onto faucet, turn water on to FULL, then take a reading. For some areas, water pressure is lower during the day and higher at night when less people are using water.
- Page 25 11). Premature Membrane Failure: There are 4 common causes that lead to premature membrane failure: Failing to replace the 3 pre-filters as frequently as needed: If you’re on city water: The over-depleted carbon pre-filters allow the chlorine to get through and damage the membrane.
-
Page 26: Limited Product Warranty
LIMITED PRODUCT WARRANTY Scope APEC takes pride in selling a superb line of products, including this reverse osmosis system (“Product”). As such, APEC expressly warrants to the original purchaser that, for a period of one (1) year from the date of purchase, the Product will be reasonably free of defects in materials and workmanship. - Page 27 CONDITIONS THAT RENDER THIS LIMITED PRODUCT WARRANTY VOID THIS LIMITED PRODUCT WARRANTY SHALL BE VOID IF: 1. The Product is not operated in compliance with normal municipal water conditions for which the particular model of this Product is intended. 2. The person seeking to invoke the warranty is not the original purchaser. That is, this Limited Product Warranty only extends to original purchasers.
- Page 28 Advanced Purification Engineering Corp. 1320 S Johnson Drive City of Industry, CA 91745 For questions or comments please visit our website at: FreeDrinkingWater.com For technical support contact us at: Techsupport@freedrinkingwater.com 1-800-880-4808...
Need help?
Do you have a question about the Ultimate Ro-Lite Commercial Series and is the answer not in the manual?
Questions and answers