
Subscribe to Our Youtube Channel
Related Manuals for Polaris Karat Flash Meter

Summary of Contents for Polaris Karat Flash Meter
- Page 1 Since 1978 Instruction Manual POLARIS Karat Flash Meter Made in Japan ASPEN CORPORATION...
-
Page 2: Table Of Contents
CONTENTS Name of Parts Before Using 2-1 Battery Installation 2-6 Light Receiving Method Setup 2-2 Power On 2-7 Shutter Speed (T) Setup 2-3 Choosing a Measurement Mode 2-8 Aperture (F) Setup 2-4 Adjusting Settings 2-9 Program Level(PL)Setup 2-5 ISO Sensitivity Value Setup Measurement-Standard Operation *Ambient Light Measurement *Flash Light Measurement... -
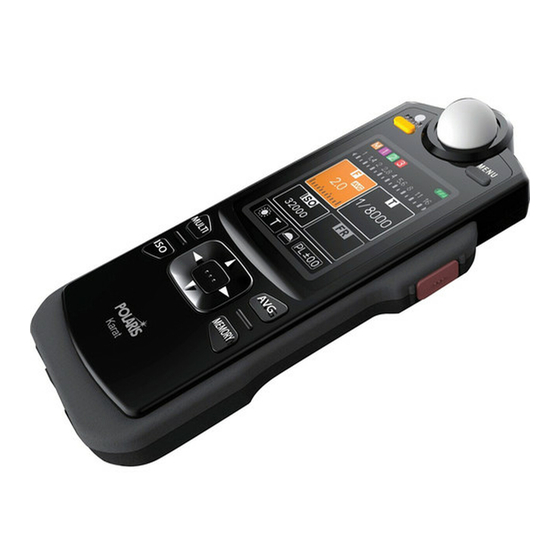
Page 3: Name Of Parts
1. Front Side Back Name of Parts ❶Incident Sphere ❹ ❶ ❷ ⓲ ❷Sensor (for Reflected light) ❺ ❸ ❸Power Button ❹Power Indicator light ❺Menu Button ❻LCD Display ⓫ ❻ ❼Multiple Flash Button ❽ISO Button ❾ ❼ ❾AVG Button ❿MEMORY Button ⓫Measuring Button ❽... -
Page 4: Before Using
Before Using 2. Battery Installation The meter is powerd by two AA alkaline batteries. ○ Remove the Battery Compartment⓱ cover by lightly pressing the ridged area and sliding the cover in the direction indicated by the arrow. ○ Insert new batteries into to the Battery Compartment⓱ following the polarity symbols. -
Page 5: Choosing A Measurement Mode
Choosing a Measurement Mode Press the Cross Key⓬ to move the cursor and then press the Select Button⓭ to choose a mode. …Ambient Light Shutter Speed (T) Priority Mode …Ambient Light Aperture (F) Priority Mode …Ambient Light EV Mode …Ambient Light AUTO ISO Mode …Flash Light Shutter Speed (T) Priority Mode …Flash Light FD (Flash Duration) Mode …Setting... -
Page 6: Iso Sensitivity Value Setup
Auto Power Off… To preserve battery life, the power is automatically turned off when the meter is left inactive for a predetermined length of time. Setting time:300s・120s・90s・60s Auto Screen Off… To preserve battery life, the display is automatically turned off when the meter is left inactive for a predetermined length of time. -
Page 7: Light Receiving Method Setup
Light Receiving Method Setup Select Incident Light Measurement or Reflected Light Measurement with Switching Dial⓲. ★Incident Light Measurement: Incident Light Measurement are made by measuring the light that is falling on the subject. Position the meter near the principle point of the subject with the sphere facing the camera lens. -
Page 8: Shutter Speed (T) Setup
Shutter Speed (T) Setup In (T) mode, press the Cross Key⓬ (UP △ / DOWN ▽) to select a Shutter Speed (T). The UP (△) Key is used to increase Shutter Speed (T), and the Down (▽) Key to decrese it. Holding down the UP (△) or DOWN (▽) Key continuously increases or decreases the Shutter Speed (T). -
Page 9: Aperture (F) Setup
Aperture (F) Setup Press the Cross Key⓬ (UP △ / DOWN ▽) to set the desired Aperture (F) in Aperture (F) Priority Mode in Ambient Light and Auto ISO Mode. The UP (△) Key is used to decrease the Aperture (F), and the DOWN (▽) Key to increase it. -
Page 10: Program Level (Pl) Setup
Program Level (PL) Setup The Program Level feature allows you to pre-set the meter to your preferred exposure readings. By adjusting the Program Level, the meter will automatically adjust readings to overexpose or underexpose by as little as a tenth of an Aperture (F) or as much as 9/10 of Aperture (F). On “MENU”... - Page 11 Once the correction value has been set, move the cursor back to “Program Level” by pressing the Select Button⓭. Move the cursor to “Return to Menu” by using the Cross Key⓭, and then press the Select Button⓭ to return to the “MENU”...
-
Page 12: Shutter Speed (T) Priority Mode
Ambient Light Measurement:Shutter Speed (T) Priority Mode Select on MENU display, and press the Select Button ⓭ . 【See 2-3】 Check and set the ISO value. 【See 2-5】 Set the Shutter Speed (T). 【See 2-7】 Press the Measuring Button⓫ to measure the Aperture (F). Measured value: F2.01 *Once the ISO and Shutter Speed (T) are set, the apeature (F) is automatically... -
Page 13: Aperture (F) Priority Mode
Ambient Light Measurement:Aperture (F) Priority Mode 1) Select on MENU display, and press the Select Button⓭. 【See 2-3】 2) Check and set the ISO value. 【See 2-5】 3) Set the Aperture (F). 【See 2-8】 4) Press the Measuring Button⓫ to measure the Shutter Speed (T). *Once the ISO and Aperture (F) are set, the Shutter Speed (T) is automatically calculated upon the pressing of the Measuring Button⓫. -
Page 14: Auto Iso Mode
Ambient Light Measurement:Auto ISO Mode Select on MENU display, and press the Select Button⓭. 【See 2-3】 Press the Cross Key⓬ (Left ◁ / Right ▷), to select either Shutter Speed (T) and Aperture (F). Setting Aperture: F1.4→F1.42 Cursor: Right Setting Shutter Speed: T1/60 Cursor: Left Select Shutter Speed (T) Measurement Result: ISO10000... -
Page 15: Shutter Speed (T) Priority Mode
Flash Measurement:Shutter Speed (T) Priority Mode ◎With synch cord Select on MENU display, and press the Select Button⓭. 【See 2-3】 Check and set the ISO value. 【See 2-5】 Set the Shutter Speed (T). 【See 2-7】 Connect the synch code from the flash unit to the meter’s Synch Port⓯. Press the Measuring Button⓫... -
Page 16: Fd Mode
*Press the Measuring Button⓫ again, “Waiting” is canceled. *Changing light receiving method by Switching Dial⓲ also cancels “Waiting”. *ISO and Shutter Speed (T) can be changed and set while “Waiting”is displayed. When the meter reads a strobe flash, Apterture (F) value is displayed. In addition, the ratio of flash to the total amount of light as a percentage (in 1% increments) in Flash Ratio (FR) Window. - Page 17 *Press the Measuring Button⓫ to fire the flash again and take a new measurement. 【Flash Amount Under】 【Flash Amount Over】 ◎Without synch cord Select on “MENU” display, and press the Select Button⓭. 【See 2-3】 Press the Measuring Button⓫, and “Waiting” is displayed. The meter is now ready to take a reading.
-
Page 18: Notes On Flash Measurement Mode
Notes on Flash Measurement Mode Use The Aperture (F) displayed, whether the measurement was taken with s synch cord or not, will display the combined value of the flash and the surrounding Ambient light.【※except FD Mode】 Once the ISO is set, the calculation of the Aperture (F) and the Flash Ratio (FR) are automatically performed when a reading is taken. - Page 19 Measurement-Functional Operation 4. Data Memory Function: Ambient Light Shutter Speed(T)Priority One Value has been sotred in the memoriy. ≪This function can be used in: Ambient Light Shutter Speed (T) Priority Mode, Ambient Light EV Mode, Flash Light Shutter Speed (T) Priority Mode≫ After a reading has been taken, press the Memory Button❿...
- Page 20 Average Function: Calculate the average exposure of two or more saved readings. This is useful in variable lighting situations where there is a great variance in readings. ≪This function can be used in: Ambient Light Shutter Speed (T), Priority Mode, Ambient Light EV Mode, Flash Light Shutter Speed (T) Mode≫...
- Page 21 Contrast Function: Calculates the difference between saved average values and a newly measured value by ΔEV. ≪This function can be used in: Ambient Light Shutter Speed (T) Priority Mode, Ambient Light EV Mode, Flash Light Shutter Speed (T) Priority Mode≫ ★Useful for checking the lighting of other locations, such as a background, and uneven lighting.
- Page 22 *In the case of Flash with synch code Press the Measuring Button⓫ to fire the flash. The difference between the average value while pressing the Measuring Button⓫ is displayed in ΔEV. Release the Measuring Button⓫ to return to the average value display. Current Measured Value M1→...
- Page 23 Multiple Flash Mode The Multiple Flash Mode is used to determine how many times the flah must be fired obtain a desired Apterture (F). This feature can be used with or without a synch cord With or without a synch code, fire the flash once and obtain an Aperture (F) reading.
- Page 24 Specifications 5. Type Hand-held meter for measuring ambient and flash light exposure Light Receiving M ethod Incident light and Reflected light Sensor Silicon Photodiode Incident Light: Retracted Lumisphere Light Receptor Reflected Light: 30 degree Ambient Light: Shutter Speed (T) Priority M ode, Aperture (F) Priority, M ode, EV M ode, Auto ISO M ode M easuring M ode Flash Light:...
- Page 25 Instrucions Notes 6. Do not put excessive pressure on the LCD display. Do not drop the meter or subject it to excessive shock, vibration or termperature extremes. Do not disassemble the meter absolutely. Remove battery and store in dry cool place when not in use. Keep the meter clean and dust-free.
Need help?
Do you have a question about the Karat Flash Meter and is the answer not in the manual?
Questions and answers