
Related Manuals for eQ-3 HomeMatic HM-TC-IT-WM-W-EU


Summary of Contents for eQ-3 HomeMatic HM-TC-IT-WM-W-EU
- Page 1 Installations- und Bedienungsanleitung (S. 2) Installation and operating manual (p. 43) Funk-Wandthermostat Wireless Room Thermostat HM-TC-IT-WM-W-EU...
-
Page 2: Table Of Contents
15 Konfigurationsmenü ......27 Dokumentation © 2013 eQ-3 Ltd., Hong Kong Kindersicherung/Bediensperre ....36 Alle Rechte vorbehalten. -
Page 3: Hinweise Zu Dieser Anleitung
Hinweise zu dieser Anleitung Lieferumfang 1 Hinweise zu dieser Anleitung Das Gerät ist kein Spielzeug, erlauben Sie Kindern nicht damit zu spielen. Lassen Sie Verpackungs- Lesen Sie diese Anleitung sorgfältig, bevor Sie Ihre Home- material nicht achtlos liegen, dies kann für Kinder Matic Komponenten in Betrieb nehmen. -
Page 4: Bedienung Und Display
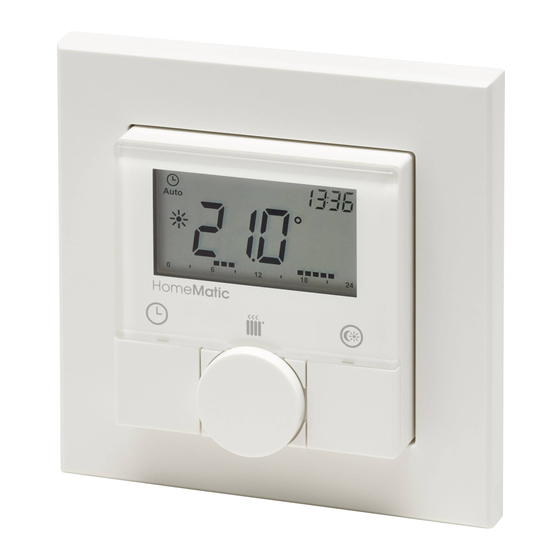
Bedienung und Display Bedienung und Display 4 Bedienung und Display Die Display-Symbole und Gerätetasten haben folgende Bedeutungen und Funktionen: Übersicht: A Auto-Modus ( ) Manu-Modus ( ), Urlaubsmodus ( ), Datum/Uhrzeit ( B Boost-Funktion ( C Comfort-/Eco-Temperatur ( D Fenster-auf-Funktion ( Balkendarstellung der programmierten Heizphasen, Anzeige der Wochentage Auto-/Manu-Taste ( ): Wechsel zwischen Auto-,... -
Page 5: Funktion
Bedienung und Display Funktion 5 Funktion Bedienelemente: Mit dem Funk-Wandthermostat von HomeMatic können Sie in Verbindung mit einem oder mehreren HomeMatic Funk-Heizkörperthermostaten (HM-CC-RT-DN) die Raum- temperatur zeitgesteuert regulieren und Heizphasen auf Ihre individuellen Bedürfnisse anpassen. Der Wandther- mostat misst die Temperatur und Luftfeuchtigkeit und gibt diese zyklisch an den Heizkörperthermostat weiter, so dass die Raumtemperatur geregelt werden kann. -
Page 6: Allgemeine Hinweise Zum Funkbetrieb
Empfangseigenschaften der Empfänger spielen Umwelteinflüsse wie Luftfeuchtigkeit oder bauliche Gegebenheiten vor Ort eine wichtige Rolle. Hiermit erklärt die eQ-3 Entwicklung GmbH, dass sich • Setzen Sie die Elektronikeinheit (M) wieder in den Rah- dieses Gerät in Übereinstimmung mit den grundlegenden men (L). Anforderungen und den anderen relevanten Vorschriften der Richtlinie 1999/5/EG befindet. - Page 7 Erste Inbetriebnahme Erste Inbetriebnahme tiblen Schalterserien siehe Abschnitt 8.4) integrieren. Vorsicht! Explosionsgefahr bei unsachge- mäßem Austausch der Batterie. 8.3.1 Klebestreifen-Montage Verbrauchte Batterien gehören nicht in den • Wählen Sie einen beliebigen Ort zur Befestigung aus. Hausmüll! Entsorgen Sie diese in Ihrer örtlichen Der Untergrund muss sauber, trocken und fettfrei sein.
- Page 8 Erste Inbetriebnahme Erste Inbetriebnahme Montage in Mehrfachkombinationen • Halten Sie die Montageplatte (K) an die gewünschte Montageposition. Achten Sie darauf, dass der Pfeil auf Sie können den Wandthermostat sowohl mit dem mitge- der Vorderseite der Montageplatte nach oben zeigt. lieferten Rahmen (L), als auch mit Rahmen anderer Her- • Zeichnen Sie zwei der Bohrlöcher 1 anhand der Monta- steller verwenden oder die Elektronikeinheit (M) in einen geplatte (K) (diagonal gegenüberliegend) mit einem Stift...
-
Page 9: Anlernen
Erste Inbetriebnahme Anlernen gungen (klassische Nullung, Schutzerdung, erforderliche Installation nur durch Personen mit einschlä- Zusatzmaßnahmen etc.). gigen elektrotechnischen Kenntnissen und Erfahrungen! (*1) 9 Anlernen Durch eine unsachgemäße Installation gefährden Sie • Ihr eigenes Leben; Bitte lesen Sie diesen Abschnitt vollständig, • das Leben der Nutzer der elektrischen Anlage. - Page 10 Anlernen Anlernen > 3 Sek. > 3 Sec. Wenn Sie bereits einen HomeMatic Heizkörperther- • Im Display wird jetzt das Antennensymbol ( ) und die mostat konfiguriert haben und den Wandthermostat verbleibende Anlernzeit in Sekunden dargestellt. Die An- mit diesem verknüpfen wollen, versetzen Sie lernzeit beträgt max. 30 Sekunden. zunächst den Heizkörperthermostat in den • Versetzen Sie jetzt das Gerät, das Sie an den Wand- Anlernmodus. Dadaurch bleiben Ihre Konfigurati-...
- Page 11 Anlernen Anlernen Anlernen an eine HomeMatic Zentrale Um Ihr Gerät softwarebasiert und komfortabel • steuern und konfigurieren, • direkt mit anderen Geräten verknüpfen oder • in Zentralenprogrammen nutzen zu können, muss es zunächst an die HomeMatic Zentrale angelernt werden. Das Anlernen neuer Geräte an die Zentrale er- folgt über die HomeMatic Bedienoberfläche „WebUI“.
-
Page 12: Ablernen/Werkseinstellungen Wiederherstellen
Anlernen Ablernen/Werkseinstellungen wiederherstellen 10 Ablernen/Werkseinstellungen wie- • Im Display wird jetzt das Antennensymbol ( ) und die derherstellen verbleibende Anlernzeit in Sekunden dargestellt. Die An- lernzeit beträgt max. 30 Sekunden. Die Werkseinstellungen des Wandthermostats können • Nach kurzer Zeit erscheint das neu angelernte Gerät im manuell wieder hergestellt werden. -
Page 13: Comfort- Und Eco-Temperatur
Comfort- und Eco-Temperatur Urlaubsfunktion einstellen 12 Comfort- und Eco-Temperatur 13 Urlaubsfunktion einstellen Die Urlaubsfunktion kann genutzt werden, wenn für einen Die Taste Comfort-/Eco-Temperatur ( ) dient zur komfor- bestimmten Zeitraum (z. B. während eines Urlaubs oder tablen und einfachen Umschaltung zwischen diesen beiden einer Party) eine feste Temperatur gehalten werden soll. -
Page 14: Boost-Funktion
Boost-Funktion Konfigurationsmenü 14 Boost-Funktion Ist die Dauer der Boost-Funktion so eingestellt, dass die Anzeige im Display eine Sekundenanzeige Mit der Boost-Funktion können kühle Räume per Knopf- von 999 Sekunden überschreitet, wird sie nicht druck innerhalb kürzester Zeit aufgeheizt werden. Beim mehr in Sekunden sondern in Minuten dargestellt. - Page 15 Konfigurationsmenü Konfigurationsmenü Wenn für mehr als 1 Minute keine Betätigung am Gerät • Drücken Sie die Auto-/Manu-Taste ( ) länger als 3 Se- erfolgt, schließt sich das Menü automatisch, ohne einge- kunden. Im Display erscheint „Pro“. Bestätigen Sie mit stellte Änderungen zu übernehmen. der Boost-Taste ( ).
- Page 16 Konfigurationsmenü Konfigurationsmenü Um mit einem Blick zu überschauen, welche Heizpha- sen für einen Tag hinterlegt sind, wird dies mit Hilfe der Balkenanzeige im Display dargestellt. Die angezeigten Balken beziehen sich dabei auf die Schaltzeiten. Bei- spielsweise werden bis zum ersten Schaltzeitpunkt keine Balken dargestellt, dann folgt eine Balkenanzeige bis zum zweiten Schaltzeitpunkt usw.
- Page 17 Konfigurationsmenü Konfigurationsmenü 15.3 Status angelernter Geräte abrufen (SFA) 15.4 Umschalten Sommer-/Winterzeit (dSt) Im Menüpunkt “SFA” können Sie den Status von ange- Für den Wandthermostat können Sie eine automatische lernten Geräten abrufen, um Fehlermeldungen direkt den Umschaltung zwischen Sommer- und Winterzeit aktivieren Geräten zuordnen zu können (z.
- Page 18 Konfigurationsmenü Konfigurationsmenü • Drehen Sie das Stellrad so lange, bis die gewünschte • Wählen Sie mit dem Stellrad den Menüpunkt „t-H“ aus Temperatur erscheint (max. ±3.5 °C). und bestätigen Sie mit der Boost-Taste ( ). • Bestätigen Sie mit der Boost-Taste ( ). • Wählen Sie mit dem Stellrad die Funktion „On“...
-
Page 19: Kindersicherung/Bediensperre
Kindersicherung/Bediensperre Zusätzliche Funktionen über die HomeMatic Zentrale 17 Zusätzliche Funktionen über die genommenen Einstellungen verloren. • Drücken Sie die Auto-/Manu-Taste ( ) länger als 3 Se- HomeMatic Zentrale kunden. • Wählen Sie mit dem Stellrad den Menüpunkt „rES“ aus 17.1 Anzeige Uhrzeit/Datum umschalten und bestätigen Sie mit der Boost-Taste ( ). -
Page 20: Zentrale
Fehlerbehebung und Wartung Fehlerbehebung und Wartung 17.5 Modus-Bediensperre Batteriesymbol Batteriespannung Batterien am Wandther- gering mostat austauschen Bei aktivierter Modus-Bediensperre kann der Wandther- Batteriesymbol Batteriespannung viel Batterien am Wandther- mostat nur im aktuell eingestellten Modus bedient werden. + F10 zu gering mostat austauschen Ein Wechsel zwischen den Betriebsmodi (Auto, Manu, Ur- Batteriesymbol... -
Page 21: Anlernbare Komponenten
Anlernbare Komponenten Technische Daten 19 Anlernbare Komponenten 20 Technische Daten Die nachfolgenden HomeMatic Geräte können an den Geräte-Kurzbezeichnung: HM-TC-IT-WM-W-EU Wandthermostat angelernt werden: Versorgungsspannung: 2 x 1,5 V LR03/Micro/AAA • max. 1 HomeMatic Zentrale (CCU oder Konfigurations- Batterielebensdauer: ca. 1 Jahr (typ.) adapter) Stromaufnahme: 40 mA max. • max. - Page 22 Manu-Modus 23 1st English edition 11/2013 Maximale Soll-Temperatur 37 Documentation © 2013 eQ-3 Ltd., Hong Kong Minimale Soll-Temperatur 37 All rights reserved. This manual may not be reproduced in any for- mat, either in whole or in part, nor may it be duplicated or edited by...
- Page 23 Information about this manual Information about this manual Table of Contents Read this manual carefully before beginning operation Information about this manual ....45 with your HomeMatic components. Keep the manual handy Hazard information .
-
Page 24: Scope Of Supply
Scope of supply Operation and display Operation and display The device is not a toy; do not allow children to play with it. Do not leave packaging material lying around, as it can be dangerous in the hands of a child. -
Page 25: Function
Operation and display Function Function Controls: In connection with HomeMatic Wireless Radiator Ther- mostats (HM-CC-RT-DN), the HomeMatic Wireless Room Thermostat can conveniently regulate the room tempera- ture according to individually tailored heating phases. The room thermostat measures the temperature and humidity and cyclically transmits the data to the radiator thermostat to regulate the room temperature. -
Page 26: General Information About Radio Operation
• Put the electronic unit (M) back into the frame (L). Hereby, eQ-3 Entwicklung GmbH declares that this device conforms with the essential requirements and other rel- A battery symbol ( ) indicates that the batteries evant regulations of Directive 1999/5/EC. - Page 27 Start-up Start-up are mounting the room thermostat must be clean, dry Caution! There is a risk of explosion if the battery is and free of grease. not replaced correctly. • For mounting of the assembled room thermostat, attach the adhesive strips to the back side of the mounting Used batteries should not be disposed of with plate (K).
- Page 28 Start-up Start-up multi-gang frame. In both cases, mounting with adhesive strips and screws is possible. For mounting with multiple combinations, make sure that the mounting plate (K) of the room thermostat is seamlessly aligned to the already fixed mounting plate/retaining ring. The HomeMatic Room Thermostat is designed to fit into frames supplied by the following manufacturers: Manufac- Frame turer...
-
Page 29: Teach-In
Start-up Teach-in: Teach-in: Incorrect installation can put • your own life at risk; Please read this entire section before starting • and the lives of other users of the electrical system. the teach-in procedure. Incorrect installation also means that you are running the To integrate the room thermostat into your HomeMatic risk of serious damage to property, e.g. because of a fire. - Page 30 Teach-in: Teach-in: If you have already configured a HomeMatic Radiator Thermostat and would like to teach-in the device to the room thermostat, please put the radiator thermostat into teach-in mode first. All your settings will be saved and transmitted to the room thermostat. The teach-in mode can be interrupted at any time > 3 Sec. by pressing the boost button ( ) again shortly.
- Page 31 Teach-in: Teach-in: • Therefore, press and hold the boost button ( ) for at A soon as a component has been taught-in to a least 3 seconds until the display switches back to teach- central control unit, it can only be connected to in mode.
-
Page 32: Teach-Out/Restore Factory Settings
Teach-out/Restore factory settings Operating modes (auto/manu/holiday) 11 Operating modes (auto/manu/ho- inbox. Here, you must configure the device and its associ- ated channels in order to make them available for operat- liday) ing and configuration tasks. Give the device a name and By pressing the auto/manu button ( ) shortly you can assign it to a room. You can also make individual param- switch between the following operating modes: eter settings. -
Page 33: Setting The Holiday Function
Setting the holiday function Boost function The set temperature will remain for the defined period of firm with the boost button ( ). the holiday function. • The display shows the symbol ( ) and the eco Otherwise, the room thermostat will change to auto mode. temperature as defined. Radio control commands like those from a window contact • Change the temperature with the handwheel and con- or the weekly de-scaling run of a radiator thermostat will firm with the boost button ( ). -
Page 34: Configuration Menu
Configuration menu Configuration menu If the room thermostat is used in connection with a Menu items can be selected with the handwheel and con- firmed with the boost button ( ). By pressing the auto/ HomeMatic Central Control Unit, the duration of the menu button ( ) again, you can return to the previous Boost function and the valve opening can also be level. - Page 35 Configuration menu Configuration menu 15.1 Setting the week programme (Pro) can change the start time with the handwheel. Confirm the setting with the boost button ( ). In the week programme, for each weekday up to 6 heating phases (13 change settings) can be set separately. The programming is carried out for the days chosen, whereby temperature settings have to be set for the entire period between 00:00 and 23:59.
- Page 36 Configuration menu Configuration menu The configured heating phases for one day are displayed • Choose the menu item “SFA” with the handwheel. • Confirm the setting with the boost button ( ). by the bars. The displayed bars refer to the change set- tings. E.g. there are no bars displayed until the first If there are no error messages, “---” appears in the display. change setting, this is followed by bars displayed until the The error messages have the following meanings: second change setting, etc.
- Page 37 Configuration menu Configuration menu • Confirm your setting using the boost button ( ). • Select “ACt” to display the actual temperature and “SEt” • Set the option „On“ to activate automatic switching or set to display the setpoint temperature. the option „OFF“ to deactivate automatic switching with • Confirm with the boost button ( ). the handwheel.
-
Page 38: Child-Proof Lock/Operating Lock
Child-proof lock/operating lock Additional functions in connection with HomeMatic Central Control Unit • Use the handwheel to select the menu item “dEL” and on the display permanently. Operation of the device is confirm this with the boost button. now locked. • The display will show “no”. Select “YES” with the hand- • To deactivate the operating lock, press both buttons wheel. Confirm with the boost button ( ) to delete all once again for at least 3 seconds. -
Page 39: Troubleshooting And Maintenance
Troubleshooting and maintenance Troubleshooting and maintenance 17.4 Global operating lock Conflict during teaching-in: perform teach-out function there have already been Operation of the device can be locked to avoid settings 8 radiator thermostats being changed unintended (e.g. through involuntary taught-in; perform teach-out function touch). -
Page 40: Components That Can Be Taught-In
Components that can be taught-in Technical specifications 20 Technical specifications Attempts to synchro- nize with known HM Device short description: HM-TC-IT-WM-W-EU device Supply voltage: 2 x 1.5 V LR03/micro/AAA CRC error after firm- Please perform firmware ware update update again Battery lifetime: approx. 1 year Firmware update is Current consumption: 40 mA (max.) in progress... -
Page 41: Technical Specifications
Technical specifications eQ-3 AG Maiburger Straße 29 D-26789 Leer www.eQ-3.de...
Need help?
Do you have a question about the HomeMatic HM-TC-IT-WM-W-EU and is the answer not in the manual?
Questions and answers