eQ-3 MAX Operating Manual
Radiator thermostat basic
Hide thumbs
Also See for MAX:
- Operating manual (100 pages) ,
- Operating manual (60 pages) ,
- Operating manual (48 pages)
Table of Contents
Advertisement
Advertisement
Table of Contents

Subscribe to Our Youtube Channel
Related Manuals for eQ-3 MAX


Summary of Contents for eQ-3 MAX
- Page 1 Radiator Thermostat basic BC-RT-TRX-CyN...
-
Page 2: Package Contents
Package contents Package contents Quantity Item MAX! Radiator Thermostat basic Danfoss RA adapter Cylinder head screw M4 x 12 mm, nut M4 Support ring 1.5 V LR6/mignon/AA batteries Brief instruction in German/English, French/ Dutch and Polish/Italian... -
Page 3: Table Of Contents
Auto/Manu ............... 19 Boost ............... 20 Comfort and reduction temperature ...... 21 Child safeguard/operating lock ......22 Configuration of the MAX! system ......22 Restore factory settings .......... 23 LED flashing sequences and transmission behaviour ..............24 Maintenance and cleaning ........26 Information about radio operation ...... -
Page 4: Information About This Manual
Information about this manual nformatIon about thIs manual Read this manual carefully before starting to use the device. Keep the manual for later consultation. If you hand over the device to other persons for use, please hand over the oper- ating manual as well. - Page 5 Safety instructions Do not use the device if there are signs of damage to the housing or control elements, for example, or if it demonstrates a malfunction. If you have any doubts, please have the device checked by an expert. For safety and licensing reasons (CE), unauthorized change and/or modification of the product is not per- mitted.
-
Page 6: Function
You have the possibility to choose between the following two variants: MAX! House solution This is the solution for the entire house. With a MAX! Cube, all settings of connected devices in your house can comfortably be made via the MAX! software. - Page 7 MAX! Wall Thermostat+. The MAX! Wall Thermostat+ has an internal sensor that measures the temperature in the room and cycli- cally transmits it to the radiator thermostats. With a MAX! Cube, the solution can be extended to a House solution.
-
Page 8: Device Overview
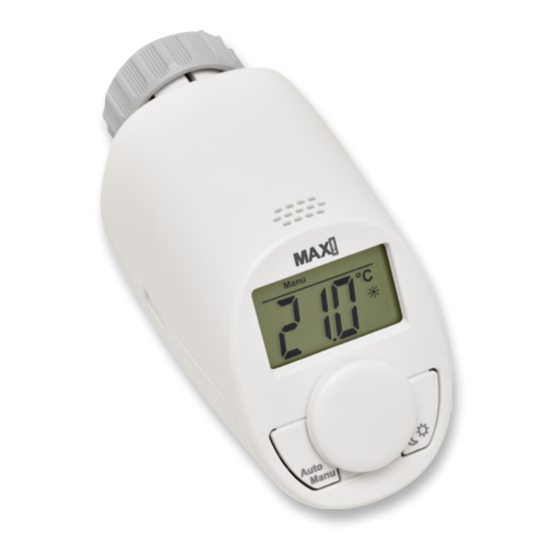
Device overview evIce overvIew Auto Manu Automatic mode (Auto), manual mode (Manu), holi- day mode ( ), boost function ( ), open window function ( ) Display of setpoint temperature Auto/Manu button, switch between automatic and man- ual mode, exit the holiday mode Control wheel: Temperature settings, activate the boost function, confirm, start teach-in procedure Switch between reduction and comfort temperature... -
Page 9: Display Content In Normal Mode
Display content in normal mode Isplay content In normal moDe The setpoint temperature is displayed during normal opera- tion, along with the mode. In the example, the MAX! Radia- tor Thermostat is in automatic mode (Auto) and the comfort temperature ( ) of 21.0°C is set. - Page 10 Start-up • Reattach the battery compartment cover and latch it into place. After inserting batteries, the radiator thermostat has to be mounted on the radiator (see sec. “6.2 Installation on the radiator” on page 11). The radiator thermostat starts an adapting run afterwards (see sec.
- Page 11 Start-up nstallatIon on the raDIator The MAX! Radiator Thermostat is easy to install and can be done without draining heating water or intervening in the heating system. No special tools are required, nor does the heating have to be switched off.
- Page 12 Start-up 6.2.1 Removing the old dial Rotate the thermostat dial to the maximum value (1) (an- ti-clockwise). The thermostat dial then no longer presses against the valve spindle, making it easier to remove. There are different ways of fixing the position of the ther- mostat dial: •...
- Page 13 Start-up 6.2.2 Danfoss RA adapter The provided adapter is required for installation on Danfoss RA valves. The Danfoss valve bodies have elongated notches (G) around their circumference (see arrow), which also en- sure that the adaptor is properly seated when it snaps on. Please ensure that you do not trap your fingers be- tween the two halves of the adapter! During installation, please ensure that the pins inside the...
- Page 14 Start-up 6.2.3 Support ring The valves from different manufacturers may have tolerance fluctuations that make the radiator thermostat more loosely seated on the valve. In this case, the provided support ring (I) should be placed into the flange before mounting the ra- diator thermostat.
- Page 15 "InS" position. Teach-in mode can be activated even whilst "InS" is still displayed. If the MAX! Radiator Thermostat has not been taught- in to a MAX! Cube or Wall Thermostat+, the device automatically switches to manual operation (Manu).
-
Page 16: Teaching-In
Teaching-in eachIng In order to be able to use the MAX! Radiator Thermostat in your installation, you must teach it in first. The teach-in pro- cedure depends on the system variant used. Choose your system variant (House or Room solution) and follow the in- structions below. - Page 17 (e.g. week programs) can be made directly via the MAX! Wall Thermostat. • Press and hold down the OK button of the MAX! Wall Ther- mostat for at least 3 seconds to activate teach-in mode (1). • Activate the teach-in mode of your MAX! Radiator Thermo- stat.
- Page 18 Manu After teaching-in has been successful, the display returns back to normal display. As soon as the MAX! Radiator Thermostat has been taught-in to the MAX! Wall Thermostat, all settings such as date, time or week program will be transmit- ted via radio.
-
Page 19: Auto/Manu
• Manu: Manual operation - the temperature set manually using the control wheelheel is maintained permanently. If the operating mode is changed on one device in a room, this change is applied on all MAX! Radiator Thermostats assigned to that room. -
Page 20: Boost
The radiant heat will not have an immediate effect if the radiator is covered or concealed (e.g. by a sofa). In the MAX! House solution you can individually configure the duration of the boost function via the MAX! software. -
Page 21: Comfort And Reduction Temperature
Comfort and reduction temperature If the duration of the boost function is set (via the MAX! Cube or the MAX! Wall Thermostat+) so that the display exceeds 999 seconds, the display value switches from seconds to minutes. If a long boost duration and a large valve opening have been set the radiator can get very hot. -
Page 22: Child Safeguard/Operating Lock
• Once the operating lock has been activated, "Loc" is dis- played for 5 s. After this, the temperature is displayed again. • The operation of the MAX! Radiator Thermostat is now locked. • To deactivate the operating lock, press both buttons once again. -
Page 23: Restore Factory Settings
Restore factory settings estore factory settIngs The factory settings of the MAX! Radiator Thermostat can be restored manually. Restoring the factory settings deletes all settings and information about taught-in devices. Before restoring the factory settings of the MAX! Ra- diator Thermostat, first delete the device from the local MAX! software if you use the radiator thermo- stat in connection with a MAX! Cube. -
Page 24: Led Flashing Sequences And Transmission Behaviour
Device already Make sure the device is no taught-in to a MAX! longer taught-in to the Cube Cube or MAX! Wall (in the software) or the Wall Thermostat+ Thermostat+ and perform a reset. - Page 25 Battery sym- Battery voltage replace batteries of radiator bol + 10 much too low thermostat Attempts to syn- chronize with known MAX! de- vices Transceiver module Replace device defect Temperature sen- replace device or operate sor defect or out of...
-
Page 26: Maintenance And Cleaning
Maintenance and cleaning aIntenance anD cleanIng The product does not require any maintenance. Enlist the help of an expert to carry out any repairs. Clean the product using a soft, lint-free cloth that is clean and dry. You may dampen the cloth a little with luke- warm water in order to remove more stubborn marks. -
Page 27: Information About Radio Operation
AG hereby declares that this device complies with the essential requirements and other relevant regulations of Di- rective 1999/5/EC. You can find the full declaration of con-... -
Page 28: Technical Data
Technical data echnIcal Data Device short description: BC-RT-TRX-CyN Supply voltage: 2x 1.5 V LR6/mignon/AA Current consumption: 100 mA max. Battery life: 2 years (typ.) Display: Radio frequency: 868.3 MHz Typ. open area RF range: > 100 m Receiver category: SRD category 2 Duty cycle: <... - Page 29 Technical data Max. number of devices to be taught-in: MAX! House solution • max. 50 devices in max. 10 rooms, • max. 4 MAX! Eco Switch , 8 MAX! ( + ) • per room max. 8 MAX! Radiator Thermostats...
- Page 30 Technical data Do not dispose of the device with regular domestic waste! Electronic equipment must be disposed of at local collection points for waste electronic equipment in compliance with the Waste Electrical and Electronic Equipment Directive. The CE sign is a free trading sign addressed exclu- sively to the authorities and does not include any warranty of any properties.
- Page 32 Bevollmächtigter des Herstellers: Manufacturer’s authorised representative: eQ-3 AG Maiburger Straße 29 26789 Leer / GERMANY www.eQ-3.de...
Need help?
Do you have a question about the MAX and is the answer not in the manual?
Questions and answers