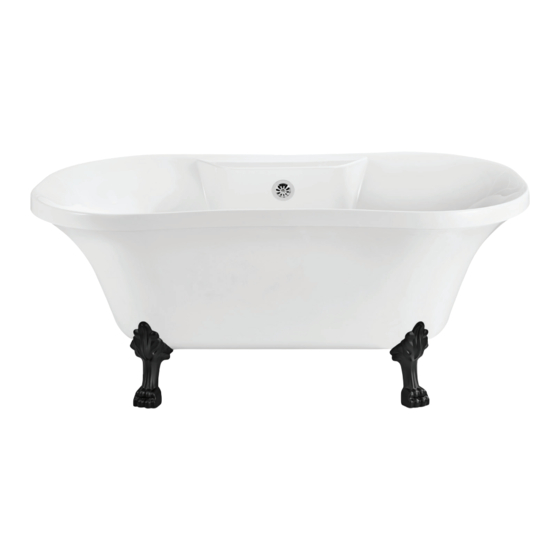
Streamline CLAWFOOT N-100-60CFWH-DM Owner's Manual & Installation Manual
Hide thumbs
Also See for CLAWFOOT N-100-60CFWH-DM:
- Owner's manual & installation manual (34 pages) ,
- Owner's manual & installation manual (13 pages)
Advertisement
Quick Links
CLAWFOOT BATHTUB SERIES
OWNER'S MANUAL &
INSTALLATION GUIDE
READ ENTIRE INSTALLATION GUIDE
PRIOR TO INSTALLING THE BATHTUB
THIS BATHTUB SHOULD ONLY BE
INSTALLED BY A CERTIFIED PLUMBER
CAUTION!
TWO PEOPLE ARE REQUIRED
TO LIFT THE BATHTUB
QUESTIONS ON PRODUCT, INSTALLATION, RETURNS? PLEASE CONTACT
support@streamlinebath.com
(310) 935-0028
streamlinebath.com
Advertisement

Related Manuals for Streamline CLAWFOOT N-100-60CFWH-DM


Summary of Contents for Streamline CLAWFOOT N-100-60CFWH-DM
- Page 1 CLAWFOOT BATHTUB SERIES OWNER'S MANUAL & INSTALLATION GUIDE READ ENTIRE INSTALLATION GUIDE PRIOR TO INSTALLING THE BATHTUB THIS BATHTUB SHOULD ONLY BE INSTALLED BY A CERTIFIED PLUMBER CAUTION! TWO PEOPLE ARE REQUIRED TO LIFT THE BATHTUB QUESTIONS ON PRODUCT, INSTALLATION, RETURNS? PLEASE CONTACT support@streamlinebath.com (310) 935-0028 streamlinebath.com...
-
Page 2: Prior To Installing
Building and plumbing codes may vary state-to-state. Streamline shall not be held liable for any and all incidental damages or flood caused due to use of this product. Streamline shall not be held liable for any and all fees stemming from cost of installation, re-installation, removal, subsequent damage, or transportation in a case of a product defect. - Page 3 DRAIN MODEL COMPATIBILITY FREESTANDING BATHTUB N-340-67CFWH-FM N-344-59CFBL-FM N-100-60CFWH-DM N-341-59CFWH-FM N-345-67CFBL-FM N-101-68CFWH-DM N-342-63CFWH-FM N-102-60CFRD-DM N-343-55CFWH-FM N-103-68CFBL-DM N-860-60CFGR-FM N-900-60CFWH-DM N-920-60CFWH-FM N-DWF-CH N-901-68CFWH-DM N-861-68CFWH-FM N-921-68CFGR-FM N-DWF-GLD N-1120-59CFBL-DM N-1121-67CFWH-DM N-1080-59CFWH-FM N-480-61FSHW-FM N-1020-62CFWH-FM N-1081-67CFWH-FM N-1021-62CFRD-FM Model Model A1840-0 N-481-61FSBL-FM N-346-55CFWHIN-FM N-1100-59CFWH-FM N-482-61FSRD-FM N-347-59CFWHIN-FM N-1101-67CFGR-FM N-348-63CFWHIN-FM N-349-67CFWHIN-FM...
- Page 4 WHAT'S INCLUDED IN THE CLAWFOOT BOX Applicable models : Applicable models: N-CFL11601-CH N-CFL1775-CH N-CFL11603-BL N-CFL11601-WH N-CFL1775-WH N-CFL11603-WH N-CFL11601-BL N-CFL1775-BL N-CFLK36572-BL N-CFL11601-GLD N-CFL1775-GLD N-CFLK36572-CH N-CFL1912-CH N-CFLK36572-GLD N-CFL1912-WH N-CFLK35672-WH N-CFL1912-BL N-CFL46572-BL N-CFL1912-GLD N-CFL46572-WH N-CFL11603-CH N-CFL46572-GLD N-CFL11603-GLD N-CFL46572-CH ITEM Leveling Feet Metal Plate Claw Feet Washer With Small Diameter Washer With Large Diameter...
- Page 5 DRAIN DIAGRAMS ITEM Pop-Up Cover O Ring Strainer Rubber Gasket Flat Rubber Gasket Cartridge Model: A1840-0 ITEM Cover Cover gasket Cartridge Strainer Waste upper gasket Waste lower gasket Connector Coupling nut Washer Pipe Overflow body Tapered rubber gasket Overflow upper gasket Overflow plate Pin Bolt Taic piece...
- Page 6 CLAWFOOT DIRAGRAM ITEM ITEM Leveling Foot Leveling Foot Metal Plate Clawfoot Bolt Hex Bolt Washer With Small Diameter Washer With Large Diameter Nut With Washer Washer With Small Diameter Clawfoot Metal Plate Washer With Large Diameter Applicable models : Applicable models: CFL1775-CH N-CFL11603-BL CFL11601-CH...
- Page 7 BATHTUB INSTALLATION Ensure that the floor at the installation site has sufficient floor support and is level. Waterproofing the floor is highly recommended. Determine the location of the drainpipe on the floor by taking measurements of the drain and waste location underneath the unit.
- Page 8 Gently place the bathtub in the upside-down position on a tarp or cardboard sheet in order to avoid contact with any rough surface. This step will be attaching the clawfeet to the bathtub. Please check the previous page to see which clawfeet model is applicable to your bathtub.
- Page 9 d) Place the metal plate on top of the bolts d) Remove the safety caps from the bolts on the that are already on the bottom of the bathtub. bathtub. e) Place the metal plate [#2] over the bolts on the bathtub as shown in the diagram below.
- Page 10 h) Check to ensure that the clawfoot is aligned h) Take (1) washer [#5] and place it over the bolt properly with the bathtub and is sitting snug on the metal plate. Then take (1) nut with washer against the bathtub. [#6] and screw it into the bolt.
- Page 11 Assemble the tee section to the tailpiece, overflow, & drain ell using the coupling nuts and O-rings that are provided. Over ow Ell O Ring Coupling Nut 10 . Attach the tapered rubber gasket to the overflow ell. Align the overflow ell with the overflow hole & secure the drain to the tub with overflow plate and screw provided.
- Page 12 The installation steps below are for drain model A1840-0. Strainer Rubber Gasket A1840-0 Flat Rubber Gasket Connector Put the rubber gasket (#4) onto the strainer (#3) Put the rubber gasket and strainer through the pre-drilled drain hole. Put the flat rubber gasket (#5) onto the connector (#7). Connect the connector with the flat rubber gasket, strainer, and rubber gasket and tighten them by hand.
Need help?
Do you have a question about the CLAWFOOT N-100-60CFWH-DM and is the answer not in the manual?
Questions and answers