Table of Contents
Advertisement
Quick Links
Advertisement
Table of Contents

Related Manuals for QSA Global OPENVISION DX


Summary of Contents for QSA Global OPENVISION DX
- Page 1 OPENVISION™ OVDX-SEC-70 HARDWARE MANUAL...
-
Page 2: Table Of Contents
Wi-Fi Tablet ..................................26 Handle Extension Assembly .............................. 26 Installation of Handle Extension Assembly ........................27 Maintenance..................................30 Troubleshooting..................................31 QSA Global, Inc. Contact Information ........................... 33 Appendix 1: Parts List................................34 Page 2 of 34 QSA Global, Inc. ... -
Page 3: Introduction
70 kV x-ray source and a digital imager allows you to observe features as small as 0.010-inch (250 μm). OpenVision DX can be quickly setup and deployed. Pictures and real-time videos are recorded and downloaded with the touch of a button for rapid review and reporting. -
Page 4: Equipment Specifications
HDMI Monitor: 7 in. LCD, 1920 x 1200 pixels WiFi Tablet: 10 in Touchscreen, 1400 x 900 Display Options PirateEye: 854 x 480 pixels Also compatible with any device that accepts an HDMI signals Recording (OpenVision DX) 128 GB Internal storage 1280 X 720 Resolution... - Page 5 Underwriters Laboratory for Canada and U.S. Revision Record Revision Date Description 06/2019 Production Release 03/2020 r3.0.0 Software updates, Tablet operation Page 5 of 34 QSA Global Inc. 40 North Avenue Burlington, MA 01803 888.272.2242 781.272.2000 F: 781.359.9179 ...
-
Page 6: Safety Precautions
Only trained and qualified individuals, or assistants working under their direct supervision, may operate the OpenVision DX system. The qualified individuals must be physically present at the site and able to control and limit access to the vicinity of the work. -
Page 7: Operating Conditions
Do not allow liquids to come into contact with any part of the OpenVision™ DX system. The main and imager housings have been made water resistant, but they are not “Waterproof”. Appropriate care should be taken to protect all cabling and connectors to ensure reliable and safe operation of the OpenVision DX system. -
Page 8: Getting To Know Your Openvision™ Dx System
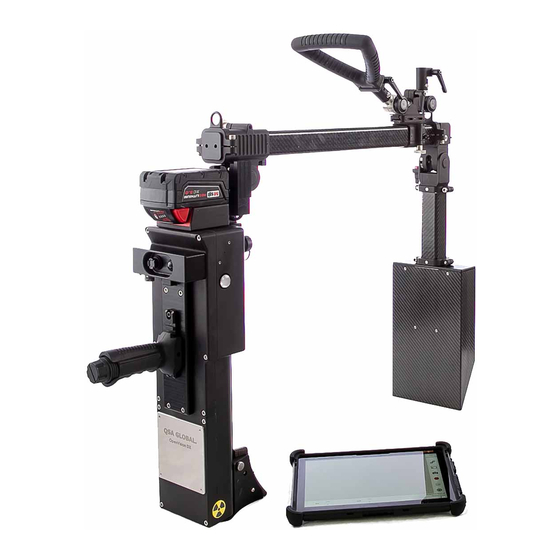
Scatter Boot Spare Milwaukee Battery Wi-Fi Tablet (optional) OVDX-SEC-70 Monitor Figure 1 OVDX-SEC as Shipped Milwaukee Battery Charger Page 8 of 34 QSA Global, Inc. 40 North Avenue Burlington, MA 01803 888.272.2242 781.272.2000 F: 781.359.9179 qsa-global.com... - Page 9 Monitor Mount – Allows mounting of monitor directly onto OVDX 313056 Controller Key – Used to turn on / power up OVDX – Removed for shipment Page 9 of 34 QSA Global Inc. 40 North Avenue Burlington, MA 01803 ...
-
Page 10: System Overview
OVDX Main Housing Assembly 415600 Backscatter Shield Assembly (optional) 415410 OVDX Monitor Assembly 415230 Large Imager Cover Figure 3 OpenVision DX Assembly Description Page 10 of 34 QSA Global, Inc. 40 North Avenue Burlington, MA 01803 888.272.2242 ... -
Page 11: Ovdx Main Housing Details
Audio Speaker 415500 Trigger Handle Assembly 415130 Trigger Adapter Port Cover Strain Relief for HDMI Connection Figure 4 OpenVision DX Main Housing Assembly (Item # 415100-SEC) Page 11 of 34 QSA Global Inc. 40 North Avenue Burlington, MA 01803 ... -
Page 12: Monitor
Figure 5 Monitor - Front View The OpenVision DX monitor is powered by both an external or internal battery. The external battery charger (Figure 7) can charge two batteries. The internal battery is charged with either a 12-volt DC charger connected to the power input jack (Figure 6, Item #5), or with the external battery (Figure 6). - Page 13 External Battery HDMI Strain Relief Power Input Jack Power Switch Figure 6 Monitor - Rear View Figure 7 Battery Charger Page 13 of 34 QSA Global Inc. 40 North Avenue Burlington, MA 01803 888.272.2242 781.272.2000 F: 781.359.9179 ...
-
Page 14: Radiographic Quality
Time calculations (as used in gamma-ray radiography exposure) are not needed for X-ray radiography. To determine exposure requirements, start on the lowest kV and mA settings and adjust to achieve the desired image quality. Page 14 of 34 QSA Global, Inc. 40 North Avenue Burlington, MA 01803 ... -
Page 15: Output Radiation Levels
(70 kV, 0.17 mA) to verify collimation and image quality. Operators must be aware of safe boundary distances while using the OpenVision DX. When the main housing is fully expanded (“D” = 53 cm [20.8 in]), the most susceptible area of high dose rate (when specimens do not block entire X-ray output beam) is immediately adjacent to imager housing. -
Page 16: Backscatter Radiation Levels
.040 in [1 mm] thick aluminum cladding 70 kV @ 0.17 mA (maximum power at the highest kV level) See the following section for additional information on backscatter. Page 16 of 34 QSA Global, Inc. 40 North Avenue Burlington, MA 01803 888.272.2242 ... -
Page 17: Backscatter
Figure 10 - Optional Backscatter Shield (Item #415600) CAUTION Whenever scanning an unknown material and/or geometry, it is recommended that operators monitor for backscatter levels to minimize operator dose. Page 17 of 34 QSA Global Inc. 40 North Avenue Burlington, MA 01803 888.272.2242 ... - Page 18 Figure 11 Example of Backscatter Figure 12 OpenVision DX with backscatter shield properly positioned against object of interest (backpack). Page 18 of 34 QSA Global, Inc. 40 North Avenue Burlington, MA 01803 888.272.2242 781.272.2000 F: 781.359.9179 ...
-
Page 19: Operation
When the System Status Indicators turn AMBER (see Figure 4), ionizing radiation is being produced. If you wish to perform extended operations with the OpenVision DX system, ensure that ambient temperatures are below 120 °F (49 °C) and above -20 °F (-29 °C). - Page 20 Monitor Mount Trigger Assembly Large Imager Bag Backscatter Shield (Optional) Figure 15 Backscatter shield installed, available handle adjustments Page 20 of 34 QSA Global, Inc. 40 North Avenue Burlington, MA 01803 888.272.2242 781.272.2000 F: 781.359.9179 ...
- Page 21 Figure 16 HDMI Cable Installation Turn monitor ON (switch located on backside of monitor). Power Switch Figure 17 Monitor Power Switch Page 21 of 34 QSA Global Inc. 40 North Avenue Burlington, MA 01803 888.272.2242 781.272.2000 ...
- Page 22 Figure 18 Indicators and Power Switch Details Verify kV and mA settings on main status screen. Safely perform test shot to verify X-ray functionality. Page 22 of 34 QSA Global, Inc. 40 North Avenue Burlington, MA 01803 888.272.2242 ...
-
Page 23: Accessories
ACCESSORIES Heads Up Display (HUD) This accessory (Item #415140) allows for an alternative to a display mounted directly to the OpenVision DX system. HUD specifications: Ballistic Protection Standards: U.S. MIL SPEC MIL-PRF-31013 ANSI Z87.1+ U.S. Federal OSHA ... - Page 24 The standard configuration provides the image to your right eye. Clear or tinted lenses can be used based on external lighting conditions: Figure 21 Example image output for HUD Page 24 of 34 QSA Global, Inc. 40 North Avenue Burlington, MA 01803 ...
- Page 25 It is not powered by the OVDX system. Expected battery life is 10 hours. 4:3 aspect ratio is recommended Figure 22 HUD controller and power supply Page 25 of 34 QSA Global Inc. 40 North Avenue Burlington, MA 01803 888.272.2242 ...
-
Page 26: Wi-Fi Tablet
The trigger assembly (Item # 415500) can be relocated to the top of the C-Arm by using the handle extension assembly (Figure 24, Item # 415510). Installation aids in inspection where the OpenVision DX is utilized in unusual orientations or tight locations. -
Page 27: Installation Of Handle Extension Assembly
Remove the trigger assembly from the main housing by removing the three allen head screws at the base of the trigger assembly (hold onto screws). Page 27 of 34 QSA Global Inc. 40 North Avenue Burlington, MA 01803 ... - Page 28 Figure 28 Handle Extension Mounting Block Attached Attach the trigger assembly to the extension mounting block using three allen head screws from before: Page 28 of 34 QSA Global, Inc. 40 North Avenue Burlington, MA 01803 888.272.2242 ...
- Page 29 Allen Head Screws Figure 29 Trigger Attached Mounting Block Page 29 of 34 QSA Global Inc. 40 North Avenue Burlington, MA 01803 888.272.2242 781.272.2000 F: 781.359.9179 qsa-global.com...
-
Page 30: Maintenance
Imager bag – Check for excessive wear. Use a soft, damp cloth to clean to remove dirt and grime from the OpenVision DX. CAUTION Do not use solvents or apply cleaning agents directly on the OpenVision DX as this can damage the components and/or corrode the electronics. -
Page 31: Troubleshooting
These checks may trigger an error code which will prevent normal operation of the OpenVision DX. Use Table 4 Error Codes as a reference guide for system error codes. NOTICE: Prior to any troubleshooting, please ensure that a fully-charged M18™ battery is installed. A low battery may cause system to report false error codes. - Page 32 Camera Communication Communication error with internal camera. Cycle system Error power to clear error. Table 4 Error Codes Page 32 of 34 QSA Global, Inc. 40 North Avenue Burlington, MA 01803 888.272.2242 781.272.2000 ...
-
Page 33: Qsa Global, Inc. Contact Information
3F Chunghae Building, 12 Sunrung-ro 103 Gil Kangnam-Ku, Seoul 06145, South Korea +82 2 558 3335 All goods and services are sold subject to the terms and conditions of QSA Global, Inc. A copy of these terms and conditions are available at www.qsa-global.com OpenVision ®... -
Page 34: Appendix 1: Parts List
Pirate Eye Head Mount Display 415140 Handle Extension Assembly 415510 Large Imager Cover Assembly 415230 Tablet Assembly 415430 Page 34 of 34 QSA Global, Inc. 40 North Avenue Burlington, MA 01803 888.272.2242 781.272.2000 F: 781.359.9179 ...
Need help?
Do you have a question about the OPENVISION DX and is the answer not in the manual?
Questions and answers