Table of Contents
Advertisement
Quick Links
L
.
R
.
B
A
G
G
S
P
I
C
K
U
P
S
i B E A M
A C T I V E
S Y S T E M
I N S T A L L A T I O N M A N U A L & U S E R ' S G U I D E
4 8 3
N .
F R O N T A G E
R D .
N I P O M O ,
C A
9 3 4 4 4
W W W . L R B A G G S . C O M
T A B L E O F C O N T E N T S
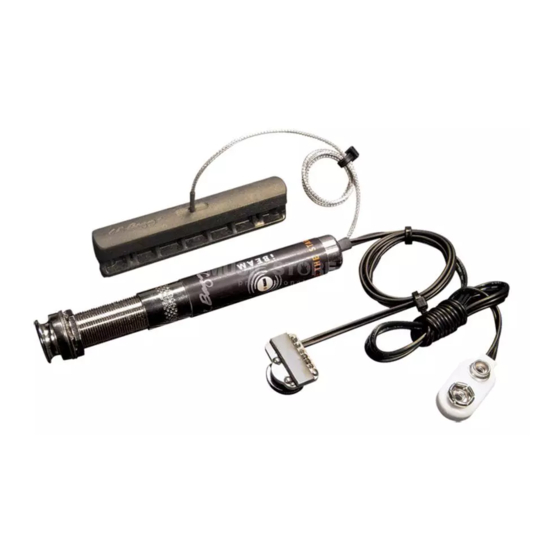
1. Package contents
2. Overview and cautions
1 . P A C K A G E C O N T E N T S
One (1) iBeam pickup and volume control wheel pre-attached to the iBeam Active Preamp
One (1) Battery Bag
Three (3) self-stick wire holders
Two (2) extra adhesive strips
One (1) pin bridge mounting kit (not included with the iBeam Active Classical)
2 . O V E R V I E W A N D C A U T I O N S
fig. 1
The iBeam Active System pairs the award-winning iBeam bridge plate
transducer with an all-discrete, class A FET preamp built into the endpin jack.
A soundhole-mounted volume control provides onboard volume adjustment
with no cutting or drilling required. The system is powered by a 9 volt battery,
and should provide approximately 1000 hours of use per battery. The battery
is not included in this package.
We recommend that this system be installed by a professional dealer/installer.
We do not provide installation advice or support for home or hobbyist
installations. Installers: please read the instructions carefully before
proceeding. We will not be responsible for any damage to the guitar or
personal injury resulting from installation, improper installation, use or
misuse of the product.
Simply plugging in the cord will turn the iBeam Active on -- be sure to have
your amp or PA muted, as there will be a plug-in "pop." The output impedance
is very low, and, at 600 ohms, the iBeam Active can drive any length of cable
and be plugged into almost any outboard gear with full frequency response. The endpin preamp is pre-contoured to get the most from the
iBeam, so very little outboard equalization should be necessary. However, because the iBeam is top-sensitive, an outboard preamp with phase
reversal and/or notch filter(s), such as our Para D.I. or Feedback Master, may be helpful for controlling feedback (especially in loud playing
situations).
The iBeam fits x-braced guitars with at least three inches of flat open space directly under the saddle (see figure 1). Verify that this requirement is
met before altering the guitar in any way.
The peel-and-stick adhesive is the best way to adhere the iBeam. It will hold the iBeam quite firmly, but will allow the pickup to be safely removed
at a later time. The use of any adhesive other than the provided self-stick pads is not recommended and will void the warranty.
3 . S T R A P J A C K / P R E A M P I N S T A L L A T I O N
Drilling the strapjack hole: For proper installation, this jack requires a clean 1/2" hole in the tail block of the instrument. If the guitar lacks this
hole, start by placing a piece of masking tape on the outside of the instrument over the drilling area (to avoid chipping the finish), drill a small
pilot hole in the tail block and then follow with a step drill. Now proceed with the installation.
Remove the strap ring, retaining nut and one washer from the end of the jack. There should still be one star locking washer, one flat washer and a
nut remaining on the jack. Bring the jack down through the soundhole into the body and insert it into the pre-drilled hole in the tail block. Using
the internal nut (be sure to include the flat and star washers), set the proper depth that will allow the entire smaller threaded section to protrude
from the instrument (see figure 2).
Advertisement
Table of Contents

Subscribe to Our Youtube Channel
Related Manuals for L.R. Baggs iBeam Active System


Summary of Contents for L.R. Baggs iBeam Active System
- Page 1 2 . O V E R V I E W A N D C A U T I O N S fig. 1 The iBeam Active System pairs the award-winning iBeam bridge plate transducer with an all-discrete, class A FET preamp built into the endpin jack.
- Page 2 With the jack in place, lay the remaining washer over the threads and attach fig. 2 tail the external retaining nut until it’s tight. Finish by attaching the strap ring (it block should cover the retaining nut and washer). Note that asserting too much pressure may crack the finish.
- Page 3 12. Restring the guitar and plug into your amp or PA. Now test the pickup fig. 6 placement. If the sound is satisfactory (see below for a definition of this), secure the wire with a wire clip and turn to the Battery Bag installation in section 8.
- Page 4 of the instrument. An unsatisfactory location will often be characterized by a fig. 9 alternate placement woofy or nasal tone, poor string balance range (light gray area) and a high sensitivity to feedback. 6 . i B E A M I N S T A L L A T I O N : C L A S S I C A L G U I T A R S 6.1 General positioning guidelines: The...
- Page 5 This requirement essentially eliminates everything but magnetic pickups (such as the M1). Do not use high- impedance pickups like the LB6 or Ribbon Transducer with the iBeam Active System. To use a passive magnetic pickup with the iBeam Active, attach the magnetic to the ring channel (with the M1, this will mean sacrificing one of its included cables by detaching the plug).
Need help?
Do you have a question about the iBeam Active System and is the answer not in the manual?
Questions and answers