Venjakob 2364 Assembly Instructions Manual
90 cm width without front extension
Hide thumbs
Also See for 2364:
- Assembly instructions manual (17 pages) ,
- Assembly instructions (5 pages) ,
- Assembly instructions manual (6 pages)
Advertisement
Quick Links
Aufbauanleitung / assembly instructions mod.
2364, 2373 - 2375 (90 cm Breite) Keramik-, Glas-Platte ohne
Frontauszug /
für 2365-2366, 2376-2377 (100 cm Breite) siehe weiter unten /
for 2365-2366, 2376-2377 (100 cm width) see farther below
1x
SW6
6x
6x
M8 x 55
14 x 43
1.Montagematerial.
1. Fitting material.
3. Die Zierblenden abschrauben.
3. Unscrew the decorative covers.
2364, 2373 - 2377 (90 cm Breite) Keramik-, Glas-Platte ohne Frontauszug
2364-, 2373-2375 (90 cm width) without front extension
4x
M10 x 575
8x
M8 x 25
4x
4x
4x
M10
30 x 10,5
1x
SW17
2. Den Oberbau umgedreht auf gepolsterten
Montageböcken ablegen.
2. Put the table top upside down onto padded
assembling trestles.
4. Die Traversen abschrauben.
4. Unscrew the traverses.
1 / 5
Änderungsdatum: 22.11.17
Advertisement

Related Manuals for Venjakob 2364


Summary of Contents for Venjakob 2364
- Page 1 2. Put the table top upside down onto padded assembling trestles. 3. Die Zierblenden abschrauben. 4. Die Traversen abschrauben. 3. Unscrew the decorative covers. 4. Unscrew the traverses. 1 / 5 2364, 2373 - 2377 (90 cm Breite) Keramik-, Glas-Platte ohne Frontauszug Änderungsdatum: 22.11.17...
- Page 2 7. Die Zierblenden wieder anschrauben. 8. In jedes Fuß-Befestigungselement eine 7. Screw on the decorative covers again. Gewindestange schrauben. 8. Screw a threaded bolt into each table-leg connection. 2 / 5 2364, 2373 - 2377 (90 cm Breite) Keramik-, Glas-Platte ohne Frontauszug Änderungsdatum: 22.11.17...
- Page 3 12. Unpack the board and put it onto the middle 11. Turn the table right-side-up without using the of the frame. legs. Then put the table down on all 4 legs at once. 3 / 5 2364, 2373 - 2377 (90 cm Breite) Keramik-, Glas-Platte ohne Frontauszug Änderungsdatum: 22.11.17...
- Page 4 16. Check, if the table top is aprox 3 mm higher than the table-leg connections. If needed, loose the screws (q.v. p. 5), adjust the table- leg connections and finally tighten the screws again. 4 / 5 2364, 2373 - 2377 (90 cm Breite) Keramik-, Glas-Platte ohne Frontauszug Änderungsdatum: 22.11.17...
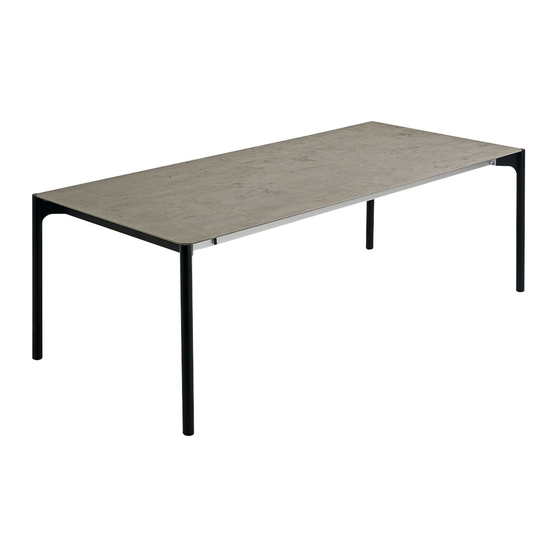
- Page 5 17. Fertiger Tisch. 17. Finished table. 5 / 5 2364, 2373 - 2377 (90 cm Breite) Keramik-, Glas-Platte ohne Frontauszug Änderungsdatum: 22.11.17...
- Page 6 2365 - 2366, 2376 - 2377 (100 cm Breite) Keramik-, Glas-Platte ohne Frontauszug / glass+ceramic top (100 cm width) without extension für 2364-, 2373-2375 (90 cm Breite) siehe weiter oben / for 2364-, 2373-2375 (90 cm width) see farther above! M10 x 575...
- Page 7 SW17 30 x 10,5 5. Die Tischbeine aufstecken und mit den 6. Je einen schwarzen Fuß-Stopfen in das Rohr Scheiben und den Muttern fixieren. Zum stecken. Schrauben der Mutter die mitgelieferte 6. Put a black plug connection into each table- Stecknuss nutzen.
- Page 8 14 x 43 M8 x 55 9. Die Platte mit den 6 Hülsen und 6 Schrauben 10. … die Platte gleichmäßig zu den Fuß- zunächst lose anschrauben ... Befestigungselementen ausrichten und erst 9. Fix the board with 6 sleeves and 6 screws in a dann ...
- Page 9 13. Fertiger Tisch. 13. Finished table. 4 / 4 2365 - 2366, 2376 - 2377 (100 cm Breite) Keramik-, Glas-Platte ohne Frontauszug Änderungsdatum: 21.11.17...
Need help?
Do you have a question about the 2364 and is the answer not in the manual?
Questions and answers