EINHELL TAURUS TITANIUM RT-PL 82 Instruction Manual
850w electric planer
Hide thumbs
Also See for TAURUS TITANIUM RT-PL 82:
- Operating instructions manual (73 pages) ,
- Original operating instructions (12 pages)

Subscribe to Our Youtube Channel
Related Manuals for EINHELL TAURUS TITANIUM RT-PL 82


Summary of Contents for EINHELL TAURUS TITANIUM RT-PL 82
- Page 1 850W ELECTRIC PLANER INSTRUCTION MANUAL MODEL NUMBER RT-PL 82 AFTER SALES SUPPORT TEL: 1300 922 271 N26704 EMAIL: service.australia@einhell.com...
-
Page 2: Table Of Contents
Pg. 8 Before Starting the Equipment Pg. 8 Operation Pg. 9 Replacing the Power Cable Pg. 9 Cleaning, Maintenance and Order of Spare Parts Pg. 9 10. Disposal and Recycling Pg. 10 After Sales Support TEL: 1300 922 271 EMAIL: service.australia@einhell.com... - Page 3 After Sales Support TEL: 1300 922 271 EMAIL: service.australia@einhell.com...
- Page 4 After Sales Support TEL: 1300 922 271 EMAIL: service.australia@einhell.com...
- Page 5 After Sales Support TEL: 1300 922 271 EMAIL: service.australia@einhell.com...
- Page 6 After Sales Support TEL: 1300 922 271 EMAIL: service.australia@einhell.com...
-
Page 7: General Safety Rules
Safety equipment such as dust those intended could result in a hazardous mask, non-skid safety shoes, hard hat, or hearing situation. protection used for appropriate conditions will reduce personal injuries. After Sales Support TEL: 1300 922 271 EMAIL: service.australia@einhell.com... -
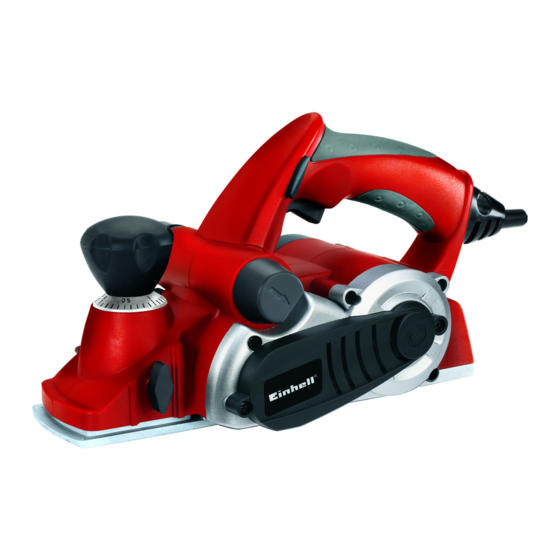
Page 8: Layout
Sparks generated during working Protection class: II / or splinters, chips and dust emitted Weight: 3.2 kg by the device can cause loss of sight. Important! When using equipment, a few safety precautions must be observed to avoid injuries and damage. Please read the complete operating manual with due care. Keep this manual in a safe place, so that the information is available at all times. If you give the equipment to any other person, give them these operating instructions as well. We accept no liability for damage or accidents which arise due to non-observance of these instructions and the safety information. After Sales Support TEL: 1300 922 271 EMAIL: service.australia@einhell.com... -
Page 9: Sound And Vibration
Always pull the power plug before making • Now connect the mount (d) to the slide of the adjustments to the equipment. parallel stop (13). IMPORTANT! • The guide rail must always be aligned in downward direction. For safety reasons, the electric planer must not • Fix the distance required between the be operated with the storage compartment for parallelstop and the edge of the workpiece. accessories (Fig. 2/Item 9) inserted. • Fasten the parts with the carriage bolt (b) and 6.1 Adjusting the chip depth (Fig. 4/Item 1) the wing nut (c). You can adjust the chip depth in steps of 0.1 mm from 0 to 3 mm by turning the setting knob for the chip depth (1). Turn the setting knob for the chip depth (1) in a clockwise direction to set a greater chip depth. After Sales Support TEL: 1300 922 271 EMAIL: service.australia@einhell.com... -
Page 10: Operation
7.2.3 Planing steps (Fig. 9/13) doing any work on the equipment. • The planing of steps is possible with the help of the parallel stop (13). To change the planing knives, use the supplied wrench (a). The wrench (a) is kept in the storage • Mount the parallel stop (13) on the left side of the compartment for accessories (9). If required, take tool (see section 6.3). the wrench (a) and the planing knife (b) out of the • To mount the depth stop fasten the step depth storage compartment for accessories (9) (see Fig. 14). scale (12) to the front right side of the plane housing with the locking screw (11) (see Fig. 13). IMPORTANT! • Release the locking screw (11) and position the For safety reasons, the electric planer must not step depth scale (12) so that the required step be operated with the storage compartment for depth is displayed. Tighten the locking screw accessories (9) inserted. (11) again. The hand-held electric planer comes with two carbide metal reversible knives. Reversible knives have two cutting edges and can be reversed. The guide slot on the reversible knives ensures the After Sales Support TEL: 1300 922 271 EMAIL: service.australia@einhell.com... -
Page 11: Disposal And Recycling
9.4 Replacing the drive belt (Fig. 17-18) • The belt should be replaced by a trained expert. • The drive belt (b) must be replaced if it is worn. • Undo the screws (a) and remove belt cover at the sides (6). • Remove the worn belt drive (b) and clean the two belt pulleys (c/d). Place the new drive belt on the small belt pulley (c) and pull the belt onto the large belt pulley (d) whilst turning the planing shaft. • Ensure that the longitudinal grooves on the drive belt are in the guide grooves on the drive wheels. • Fit the belt cover (6) and secure it with the screws (a). 9.5 Maintenance There are no parts inside the equipment which require additional maintenance. After Sales Support TEL: 1300 922 271 EMAIL: service.australia@einhell.com... - Page 12 06/2012 Art.Nr: 43.452.75_11012 After Sales Support TEL: 1300 922 271 EMAIL: service.australia@einhell.com...
Need help?
Do you have a question about the TAURUS TITANIUM RT-PL 82 and is the answer not in the manual?
Questions and answers