Table of Contents
Advertisement
Quick Links
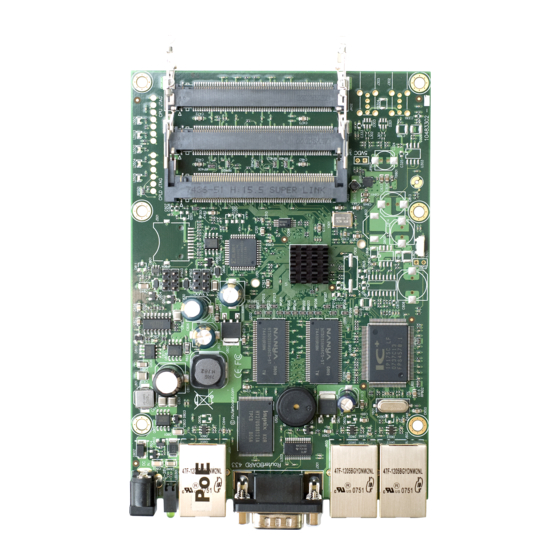
RouterBOARD 433/433AH
Quick Setup Guide and Warranty Information
Assembling the Hardware
First use of the board:
Insert the MiniPCI cards;
1.
Install the board in a case and connect antenna wires, if needed;
2.
Connect other peripherals and cables;
3.
Plug in power cable to turn on the board.
4.
Powering
The board accepts powering from either the power jack or the LAN1
Ethernet port:
direct-input power jack J801 (5.5mm outside and 2mm inside
1.
diameter, female, pin positive plug) accepts 10..28 V DC (overvoltage
protection starts at 30V).
LAN1 Ethernet port J601 accepts 10..28 V DC input (at the board;
2.
higher voltage needed to compensate for power loss on long cables;
at least 18V suggested) from non-standard (passive) Power over
Ethernet injectors (no power over datalines).
The maximum output of the power supply available for extension cards is normally 16W.
Booting process
Initial connection has to be done via the Ethernet cable. Open 192.168.88.1 in your web browser, and choose
"Webfig" for browser based configuration or "Winbox" for a Windows utility with the same functions. Username
is admin and there is no password. In case IP connection is not available, Winbox can be used to connect to the
MAC address of the device. More information here:
In case you wish to boot the device from network, for example to use MikroTik Netinstall, hold the RESET button
of the device when starting it until the LED light turns off, and the device will start to look for Netinstall servers.
It is also possible to connect with the onboard RS232C serial port. The serial port is set by default to 115200bit/s,
8 data bits, 1 stop bit, no parity, flow control off.
Extension Slots and Ports
Three Ethernet ports, supporting automatic cross/straight cable correction (Auto MDI/X), so you can use
1.
either straight or cross-over cables for connecting to other network devices. The first Ethernet port accepts
10..28V DC powering from a passive PoE injector. The other two Ethernet ports do not support PoE
powering.
Three MiniPCI Type IIIA/IIIB ports with 3.3V power signaling.
2.
DB9 RS232C asynchronous serial port.
3.
microSD card slot for storage expansion (only on RB433AH)
4.
See www.routerboard.com for more information. Contact support@mikrotik.com for support questions.
http://wiki.mikrotik.com/wiki/First_time_startup
31-Jan-2012
Advertisement
Table of Contents

Subscribe to Our Youtube Channel
Related Manuals for MikroTik RouterBOARD 433


Summary of Contents for MikroTik RouterBOARD 433
- Page 1 In case you wish to boot the device from network, for example to use MikroTik Netinstall, hold the RESET button of the device when starting it until the LED light turns off, and the device will start to look for Netinstall servers.
- Page 2 Hardware. MikroTik warrants all RouterBOARD series equipment for the term of fifteen (15) months from the shipping date to be free of defects in materials and workmanship under normal use and service, except in case of damage caused by mechanical, electrical or other accidental or intended damages caused by improper use or due to wind, rain, fire or other acts of nature.
Need help?
Do you have a question about the RouterBOARD 433 and is the answer not in the manual?
Questions and answers