Aqua Creek Products Ranger 2 Manual
Pool lift
Hide thumbs
Also See for Ranger 2:
- Instruction manual (18 pages) ,
- Manual (12 pages) ,
- Manual (16 pages)
Table of Contents
Advertisement
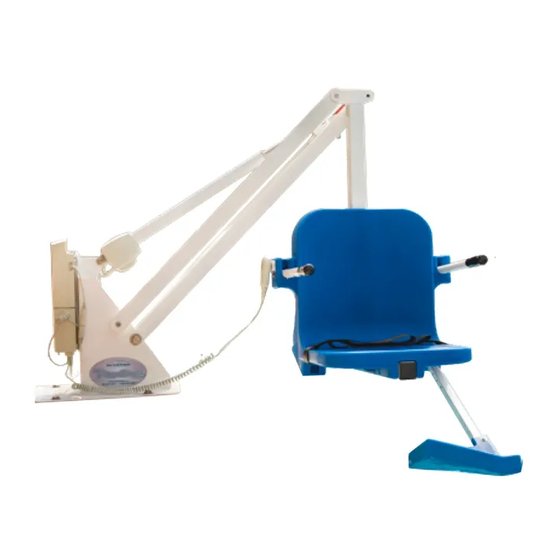
Ranger 2
Pool Lift
PART #: F-RNGR2-02
US PATENT NUMBER: [D507,769 S]
350 LB. [160 kg] MAXIMUM WEIGHT CAPACITY
FOR INDOOR OR OUTDOOR USE
MANDATORY
LEAVE THIS MANUAL WITH LIFT OWNER
ADA COMPLIANT
READ CAREFULLY
Check entire box and all packing materials for parts. Before beginning assembly, read the
instructions and identify parts using the fi gures and parts listed in this document.
It is critical that all parts be carefully inspected prior to installation. If any damage occurred in
transit, Aqua Creek Products, LLC must be notifi ed within three days of receipt of unit.
Proper installation cannot be overstressed, as an improper installation voids Aqua Creek's
warranty and may affect the safety of the user.
1
Copyright © 2019 Aqua Creek Products All Rights Reserved
Revised 6/17/19
Advertisement
Table of Contents

Related Manuals for Aqua Creek Products Ranger 2


Summary of Contents for Aqua Creek Products Ranger 2
- Page 1 It is critical that all parts be carefully inspected prior to installation. If any damage occurred in transit, Aqua Creek Products, LLC must be notifi ed within three days of receipt of unit. Proper installation cannot be overstressed, as an improper installation voids Aqua Creek’s warranty and may affect the safety of the user. Copyright © 2019 Aqua Creek Products All Rights Reserved Revised 6/17/19...
- Page 2 REDUCE THE RISK OF DROWNING! Supervise children at all times. No jumping or diving from the lift. Seat may be hot, use caution when entering. Keep covered when not in use. Inspect and clean before use. INDOOR BATTERY CHARGER: AMPERAGE = 0.65 FREQUENCY = 60 24 VOLT BATTERY AMPERAGE = 8 IP RATING = IPX5 Copyright © 2019 Aqua Creek Products All Rights Reserved Revised 6/17/19...
-
Page 3: Table Of Contents
3. VITO CHARGER 4. VITO HANDSET 5. SAFETY BELT 6. ANCHOR JIG PLATE (IF ORDERED WITH ANCHOR) 7. ANCHOR INSERT BAG - SET OF 4 (IF ORDERED WITH ANCHOR) 8. HARDWARE BAG (IF ORDERED WITH ANCHOR) 9. VITO BATTERY TEST CABLE Copyright © 2019 Aqua Creek Products All Rights Reserved Revised 6/17/19... - Page 4 Installation: ADA Guidelines ADA REQUIREMENTS: The Ranger 2 Pool Lift is ADA Compliant. The installation must meet the following requirements: • Clear deck space dimensions (see FIGURE 1) • Lift installed between 14.5-19 inches from the pool edge • Deck slope no greater than 1:48 •...
-
Page 5: Anchor Installation: Core-Drill Retro-Fit
You may need to saw cut a portion of your deck. See “Saw Cutting Retro-Fit Instructions” on page 7. Remove the nuts and the black protective coverings from the threaded anchor inserts. Copyright © 2019 Aqua Creek Products All Rights Reserved Revised 6/17/19... - Page 6 Once the epoxy has set up, remove the hardware and the anchor jig plate. Your lift is now ready to be mounted to the anchoring system. The anchor jig plate may be recycled or used to install other anchors. Copyright © 2019 Aqua Creek Products All Rights Reserved Revised 6/17/19...
-
Page 7: Anchor Installation: Saw-Cut Retro-Fit
9. Pour concrete and fi nish the pool deck surface. SEE FIGURE A 10. Once the concrete has cured, the lift is ready to be mounted to the anchoring system. Copyright © 2019 Aqua Creek Products All Rights Reserved Revised 6/17/19... - Page 8 DRILL & EPOXY INTO EXISTING SLAB (5" MIN EMBED) *SETBACK DIMENSIONS ARE FOR FLAT DECK APPLICATIONS. FOR SLOPED DECKS OR OTHER FEATURES, CONTACT AQUA CREEK BEFORE INSTALLATION. FIGURE C Copyright © 2019 Aqua Creek Products All Rights Reserved Revised 6/17/19...
-
Page 9: Ramger 2 Assembly Instructions
FOR EASY ACCESS SEE FIGURE D 2. Install the Ranger 2 pool lift onto the four (4) anchors using the supplied 1/2 inch x 1 1/2 inches stainless steel hex head bolts and 1/2 inch stainless steel washers. Make sure all bolts are tight before using the lift. -
Page 10: Footrest Installation Instructions
2. Using the supplied 1/4” hardware, fasten the legrest assembly to the 2 x 2 tubing using a 5/32” allen wrench. FOOTREST ASSEMBLY 1/4" FLAT WASHER 1/4" LOCK WASHER 1/4" X 1/2" BUTTON-HEAD FOOTREST IN FOOTREST OUT Copyright © 2019 Aqua Creek Products All Rights Reserved Revised 6/17/19... -
Page 11: Pinch Point Locations
Pinch Point Locations CAUTION! PINCH POINT AREA! CAUTION! PINCH POINT AREA! (BEHIND ACTUATOR) CAUTION! PINCH POINT AREA! (BOTH SIDES) Copyright © 2019 Aqua Creek Products All Rights Reserved Revised 6/17/19... -
Page 12: Field Reverse
FLANGE BUSHING SLEEVE BUSHING 3/8" SHOULDER BOLT REVERSE CHAIR CRADLE ASSEMBLY 3/8" SHOULDER BOLT CONTROL 5/16" NYLOCK 5/16" FLAT WASHER 1/4" BUTTON-HEAD BOLT 1/4" LOCK WASHER 1/4" FLAT WASHER Copyright © 2019 Aqua Creek Products All Rights Reserved Revised 6/17/19... -
Page 13: Basic Troubleshooting
Note: If you feel your lift is malfunctioning due to a faulty battery or connections, contact Aqua Creek Products for a testing kit. Copyright © 2019 Aqua Creek Products All Rights Reserved Revised 6/17/19... -
Page 14: Battery Test Cable Instructions
24V BATTERY BATTERY CONNECTOR MALE CONNECTOR BATTERY TEST CABLE INSERT TEST PROBES TO CHECK VOLTAGE Copyright © 2019 Aqua Creek Products All Rights Reserved Revised 6/17/19... -
Page 15: Proper Care Of Pool & Spa Lifts
To remove stubborn stains from finish, spray affected area with mild dish soap, rub briskly with a 3M Scotch Brite™ pad. Use white epoxy paint to touch up the finish. Apply wax to protect when dry. Copyright © 2019 Aqua Creek Products All Rights Reserved Revised 6/17/19... -
Page 16: Ranger 2 Parts List
1/2 X 3/8 X 3/8 WF 1/4 1/4 FLAT WASHER BRB SS-1216-6 BRONZE SLEEVE WL 1/4 1/4 LOCK WASHER F-UBC BATTERY COVER BH 5/16 X 4 1/2 5/16-18 X 4 1/2 HCS Copyright © 2019 Aqua Creek Products All Rights Reserved Revised 6/17/19...
Need help?
Do you have a question about the Ranger 2 and is the answer not in the manual?
Questions and answers