Advertisement
Quick Links
Advertisement

Subscribe to Our Youtube Channel
Related Manuals for BraunAbility Kit 6


Summary of Contents for BraunAbility Kit 6
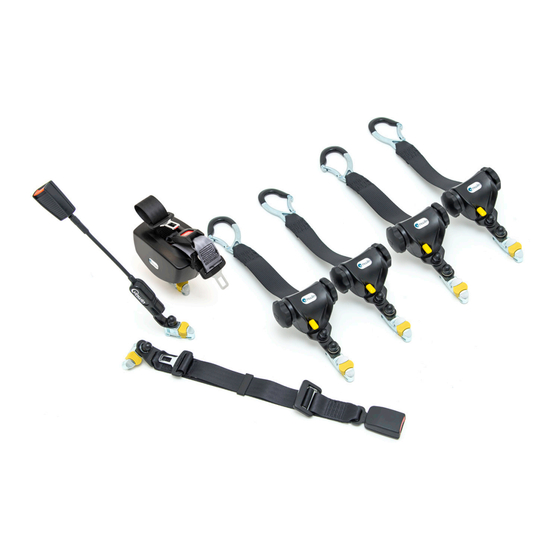
- Page 1 Kit 6, Kit 7 User Manual Instructions for fitting and use...
- Page 2 Kit 6 and Kit 7 Thank you for choosing Kit 6 or Kit 7 from BraunAbility! The following manual is an important part of the product, providing you with information on how to achieve maximum performance and safe operation. Keep the manual in a safe place so that you can refer to it when necessary.
- Page 3 Fitting the front wheelchair tie-down - Kit 6 Fitting the rear wheelchair tie-down - Kit 6 Fitting and using the occupant restraint - Kit 6 & Kit 7 Removing the occupant restraint - Kit 6 & Kit 7 Fitting the wheelchair tie-down - Kit 7...
-
Page 4: Safety Information
Kit 6 and Kit 7 Safety information Limitation of use The development of BraunAbility kits is a continuous process. Applications are added on a regular basis. For more detail contact BraunAbility or look on the BraunAbility website. - Page 5 Kit 6 and Kit 7 Kit 6 Kit 7...
- Page 6 Kit 6 and Kit 7 General guidance • Wheelchair Accessories that have not been approved by the Wheelchair Manufacturer must be removed from the wheelchair and secured in the vehicle during transport to reduce the potential for injury. Refer to ‘Instructions For Use in Transport’ provided with the wheelchair or contact wheelchair manufacturer for further guidance.
- Page 7 • The equipment has been tested in a configuration similar to that recommended by BraunAbility, and any deviation from the recommendations here is the responsibility of the installer/user. These instructions refer use with both BraunAbility rails and Solo anchors, however the equipment may be used with any BraunAbility proprietary rail product.
- Page 8 Kit 6 and Kit 7 Before installing and using the wheelchair & occupant restraint kits • Ensure that the wheelchair is correctly maintained and that the settings of any adjustable parts are made according to ‘Instructions for Use in Transport’.
- Page 9 Kit 6 and Kit 7 • Wheelchair users, their carers and family are advised to check vehicle specifications to ensure that sufficient floor space is available to accommodate the wheelchair and tie-down system. These distances are based upon the desire to maintain clear zones for potential head excursions of occupants provided with both upper and lower torso restraints.
- Page 10 Kit 6 and Kit 7 Fit and use Fitting and using the wheelchair and occupant restraint - Kit 6 Fitting the front wheelchair tie-down The rail will have been installed in the vehicle in accordance with our Removing the tie-downs own and the vehicle converter’s instruction.
- Page 11 Kit 6 and Kit 7 Figure 1 Figure 2 Figure 3 Figure 4...
- Page 12 Kit 6 and Kit 7 Fit and use Fitting and using the wheelchair and occupant restraint - Kit 6 Fitting the rear wheelchair tie-down Ensure that the rear Quattro restraints are fitted with the karabiner gates Removing the tie-downs facing outwards (Fig 5A).
- Page 13 Kit 6 and Kit 7 Figure 6 Figure 5 Figure 7...
- Page 14 Kit 6 and Kit 7 Fit and use Fitting and using the wheelchair and occupant restraint - Kit 6 & Kit 7 Fitting the occupant restraint • Before fitting the occupant restraint, ensure that the reversible stalk orange button is facing outside in relation •...
- Page 15 Kit 6 and Kit 7 Figure 10 Figure 8 Figure 9 Figure 11 Figure 12...
- Page 16 Kit 6 and Kit 7 Fit and use Removing the occupant restraint - Kit 6 & 7 Release the grey shoulder belt from the lap belt section, from the third point fixing and carefully allow the shoulder belt to return to the retractor.
- Page 17 Kit 6 and Kit 7 Fit and use Fitting and using the wheelchair and occupant restraint - Kit 7 Fitting the wheelchair tie-down Ensure that the front Quattro restraints are fitted with the karabiner gates Removing the tie-downs facing outwards (Fig 5A).
- Page 18 Kit 6 and Kit 7 Figure 13 Figure 5 Figure 3 Figure 4...
-
Page 19: Warranty
BraunAbility anchorage systems, SLR111. and our full warranty normally only applies to BraunAbility • Regularly inspect the BraunAbility Kit for damage, wear equipment when used or malfunction. If any problems are identified replace it with BraunAbility branded immediately. anchorages or as instructed. -
Page 20: Declaration Of Conformity
The Horseshoe Coat Road ISO 10542:2012 Martock, Somerset, UK RESNA WC-4 2012 Section 18 2007/46/EC Phone: +44 1935 827740 E-mail: sales.uk@braunability.eu www.braunability.eu Declares that the product / BraunAbility UK Ltd, Martock 19 February 2019 Kit 6, Kit 7 Rob Butcher Director of Engineering... - Page 21 Accredited by URS as testing laboratory in accordance with ISO/IEC 17025:2005 Quality system certified in accordance with ISO 9001:2008 Illustrations, descriptions and specifications in the user manual are based on current product information. BraunAbility UK Ltd reserves the right to make alterations without previous notice. © 2019 BraunAbility UK Ltd...
- Page 22 www.braunability.eu...
Need help?
Do you have a question about the Kit 6 and is the answer not in the manual?
Questions and answers