Table of Contents
Advertisement
Available languages
Available languages
Quick Links
Advertisement
Table of Contents

Related Manuals for Bresser 88-59491


Summary of Contents for Bresser 88-59491
- Page 1 Optischer Strahlengang Optical Path Art. No. 88-59491 Bedienungsanleitung ..4 Operating Instructions ..7 Mode d’emploi ....10 Istruzioni per l’uso .....13 Instrucciones de uso ..16...
- Page 2 Achtung! Attention! Opgelet! Attenzione! ¡Atención! Atenção! Dikkat! (DE) Achtung! Für Kinder unter 3 Jahren nicht geeignet! Erstickungsgefahr, da kleine Teile verschluckt oder eingeatmet werden können. Nur zum Gebrauch für Kinder über 8 Jahre. Benutzung unter Aufsicht von Erwachsenen. Anweisungen und Vorsichtsmaßnahmen vor Gebrauch lesen, befolgen und nachschlagebereit halten. Unbedingt außer Reichweite von Kindern unter 8 Jahren halten! Dieser Artikel ist kein Spielzeug! Bei diesem Produkt handelt es sich nicht um einen Artikel mit Spielzeugcharakter handelsüblicher Art, sondern um ein Lernmittel zur Unterstützung der pädagogischen Arbeit mit Kindern.
- Page 3 ...
- Page 4 Allgemeine Informationen Allgemeine Warnhinweise Das sind die Einzelteile deiner Experi- mentierkiste: Zu dieser Anleitung Lesen Sie bitte aufmerksam die Sicherheitshinweise GEFAHR von Körperschäden! Formen für Spiegelplatten in dieser Anleitung. Verwenden Sie dieses Produkt nur Schauen Sie mit diesem Gerät niemals direkt in die wie in der Anleitung beschrieben, um Schäden am Ge- Sonne oder in die Nähe (quadratisch, Typ A) (6 Stück)
- Page 5 hergestellt. Gewöhnliche Spiegel werden aus Glas mit Experiment 2 Schritt 2: Spiegelplatten einsetzen einer darunter liegenden Schicht aus Quecksilber her- gestellt. Wenn nun Licht auf einen flachen Spiegel trifft, wird es vom Spiegel zurückgeworfen (reflektiert). Das ist so als wenn ein Ball auf eine Wand trifft und davon ab- prallt.
-
Page 6: Hinweise Zur Reinigung
Du benötigst drei Formen mit Spiegelfläche für dieses Experiment 5 Zum Schluss kannst du deine Formen mit Spiegelflächen für Experiment (siehe Bilder 9 und 10). ein Experiment mit den runden Aufklebern (5) benutzen. Wie siehst du den Junior-Professor, wenn du drei For- men wie in der Abbildung zusammenschiebst und wie A) Klebe zuerst runde Aufkleber jeweils auf die Rück- gezeigt in einen der Spiegel schaust? - Page 7 General Information General Warning These are the parts of your experiment box: About this Instruction Manual Please read the safety instructions in this manual care- RISK of bodily injury! Blocks for mirrors (quadratic, type A) (6 pcs.) fully. To avoid damage to the unit and the risk of injury, Never use this device to look directly at the sun or in the Block for mirrors (rectangular, type B) only use this product as described in the manual.
- Page 8 Step 2: Inserting the mirror plates Experiments You need two assembled blocks for your experiment (as shown in Figure 8). When 2 blocks are used your for experiment, can you Experiment 1 see what the direction of the Junior Professor in the mirror is? Please mark the correct image from the 3 images below (A, B or C).
-
Page 9: Notes On Cleaning
Experiment 4 Experiment 5 Using the blocks for a reflection experiment with round stickers (5). A) First, stick the round stickers on the back of four blocks, on the left and right, at the bottom (as shown in Figure 15). B) Put the four blocks with the stickers together as shown in Figure 16. -
Page 10: Informazioni Generali
Informazioni generali Avvertenze di sicurezza generali Il tuo kit per esperimenti è composto dai seguenti oggetti: Informazioni sul presente manuale Leggere con attenzione le avvertenze di sicurezza ri- PERICOLO di danni alla persona! Forme per lastre di specchio (quadrate, tipo A) (6 portate nel manuale. - Page 11 Operazione 2: inserimento della lastra di specchio dalla superficie liscia. I comuni specchi vengono prodotti Esperimento 2 usando una lastra di vetro sotto la quale viene applicato uno strato di mercurio. Quando la luce incontra la super- ficie piana di uno specchio, viene respinta (riflessa) dallo specchio.
- Page 12 Per questo esperimento hai bisogno di tre forme con Esperimento 5 Infine, puoi utilizzare le tue forme con superfici a spec- superficie a specchio (figure 9 e 10). chio per un esperimento con gli adesivi rotondi (5). Se congiungi tre forme come nella figura e guardi uno degli A) Incolla dapprima un adesivo rotondo sul retro, sul specchi come mostrato, come ti appare il giovane professore? lato sinistro, sul lato destro e sul fondo di quattro for-...
- Page 13 IT ES Informaciones de carácter general Advertencias de carácter general Partes incluidas en el experimento: Sobre este manual Tipos de paneles de espejo (cuadrados, tipo A) (6 Lea atentamente las indicaciones de seguridad recogi- ¡PELIGRO de lesiones corporales! unidades) das en este manual. Emplee este producto exclusiva- No mire nunca directamente al sol o cerca de él con Formas de paneles de espejos (rectangular, tipo B) mente de la forma descrita en el manual, con el fin de...
- Page 14 Paso 2: Inserte los discos espejo Es como cuando una bola golpea una pared y rebota de Experimento 2 distancia. La luz se refleja de nuevo en el mismo ángulo que golpea. Experimento Experimento 1 Figura 8 Figura 3 Figura 4 Observe desde aquí...
-
Page 15: Notas Sobre La Limpieza
Tendrá tres formas con una superficie reflectante para Experimento 5 Por último, usted puede crear sus formas con superfi- este experimento (ver figuras 9 y 10). cies de espejo para un experimento usando con pega- Como se puede ver al profesor más pequeño sumando tinas redondas (5) . -
Page 16: Informations Générales
Informations générales Consignes générales de sécurité Les éléments de votre boîte d’expérience: A propos de ce manuel Blocs pour miroirs (quadratique, type A) (6 pcs.) Veuillez lire attentivement les consignes de sécurité RISQUE de dommages corporels ! Bloc pour miroirs (rectangulaire type B) présentées dans ce manuel. - Page 17 Etape 2: Insérez les miroirs plans contre un mur. La lumière est réfléchie avec le même an- Expérience 2 gle que l'angle entrant de la lumière originelle. Expériences Expérience 1 Figure 8 Figure 3 Figure 4 Vue d'ici Vous avez besoin de deux blocs assemblés pour votre expérience (comme illustré...
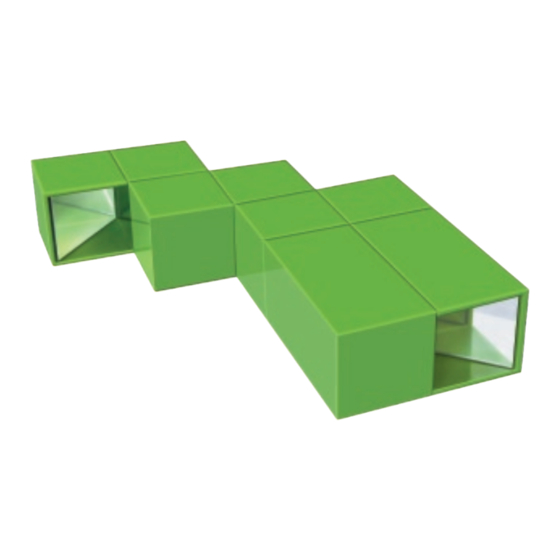
- Page 18 Expérience 3 Expérience 4 Expérience 5 Figure 9 Figure 10: Vue d'ici Figure11 Figure 12: Vue d'ici Figure 13 Figure 14: Vue d'ici Vous avez besoin de trois blocs assemblés pour vo- Vous avez besoin de huit blocs assemblés pour votre Vous avez besoin de sept blocs assemblés pour votre tre expérience (comme illustré...
- Page 19 En utilisant les blocs pour une expérience de réflexion avec les autocollants ronds (5). A) Collez tout d'abord, les autocollants ronds sur le dos de quatre blocs, à gauche et à droite, en bas (comme montré dans la Figure 15). B) Mettre ensemble les quatre blocs avec les autocol- lants comme montré...
- Page 20 Meade Instruments Europe GmbH & Co. KG Gutenbergstr. 2 DE-46414 Rhede Germany www.bresser-junior.de...
Need help?
Do you have a question about the 88-59491 and is the answer not in the manual?
Questions and answers