Advertisement
Quick Links
Installing a G2916A Sampler Tray on a
5890 Series II Gas Chromatograph
G2916A Kit
This procedure assumes that the Gas Chromatograph (GC) is either
• A 5890A GC which has been fully upgraded to a 5890 Series II instrument
("fully" means that both electronic and mechanical upgrades have been
performed; a printed circuit board-only upgrade does not qualify).
• OR a 5890 Series II GC which was purchased as such.
and that the G2916-61000 injector bracket has already been installed.
Agilent Technologies
Advertisement

Related Manuals for Agilent Technologies G2916A


Summary of Contents for Agilent Technologies G2916A
- Page 1 Installing a G2916A Sampler Tray on a 5890 Series II Gas Chromatograph G2916A Kit This procedure assumes that the Gas Chromatograph (GC) is either • A 5890A GC which has been fully upgraded to a 5890 Series II instrument (“fully” means that both electronic and mechanical upgrades have been performed;...
-
Page 2: Parts Supplied
Parts supplied The kit contents are listed in Table 1. Table 1 Parts supplied Part number Description Quantity 18596-40015 Tray quadrants, pkg of 4 G2614-60610 Cable, main tray G2916-60000 5890 Tray module 0100-1501 Tee, ¼-inch hose, for quadrant temperature control G2916-80510 Tray screw kit. -
Page 3: Installing The Tray
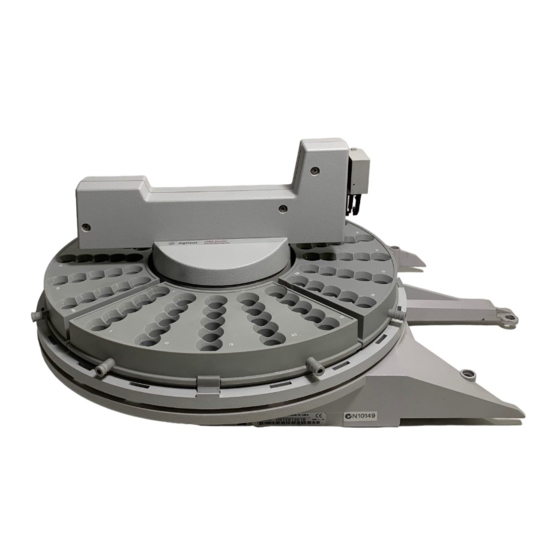
Installing the tray Do not move or manipulate the robotic arm or gripper. Moving the arm or gripper back and CAU TI O N forth can cause damage. If necessary, rotate the arm assembly a few degrees until there is enough clearance. - Page 4 3 Insert four screws with washers where shown. Tighten the screws to secure the tray to the bracket. Second alignment pin Set tray on this alignment pin first Tray post Figure 1 Installing the tray 4 Install the tray quadrants (Figure 2). Be sure to match the numbers on the quadrants with the tray base numbers.
- Page 5 5 Slide the leading edge of each quadrant under the guides on the tray, then snap the front tab into the slot on the tray. Guide Tray quadrant Front tab * Tray base numbers Slot Figure 2 Install the tray quadrants 6 Connect the tray cable from the back of the tray (near the drain fitting) to the Tray connector on the back of the G2912A Controller.
-
Page 6: Agilent Technologies
No part of this manual may be reproduced in any form or by any means (including electronic storage and retrieval or translation into a foreign language) without prior agreement and written consent from Agilent Technologies, Inc. as governed by United States and international copyright laws.