Advertisement
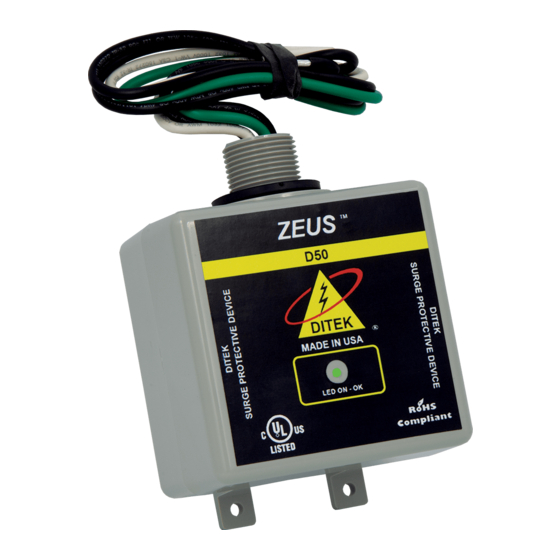
This Surge Protective Device (SPD) is a high performance device, designed to provide protection for
sensitive electronic loads connected to service panels, fire panels, or where the SPD is directly connected
to the electronic device. Maximum protection will only be achieved if the SPD is properly installed.
DITEK Corporation
ONE DITEK CENTER
Please read and follow the installation instructions carefully.
1720 Starkey Road
Largo, FL 33771
NOTICE: This SPD should be installed by a licensed contractor in accordance with the National
and Local Electrical Codes and the following instructions.
APPLICATION
Type 1 SPD, Type 2 SPD for hardwired parallel installations on 347/600 VAC 3 phase Wye circuits.
INSTRUCTIONS:
Caution: Measure all voltages to insure applied voltage does not exceed the voltage rating of
NOTE: Suitable for use on a circuit capable of delivering not more than 100,000 rms symmetrical
Amperes.
This SPD Contains no serviceable parts.
1. Turn off the power at the circuit breaker or main disconnect before beginning installation.
2. Remove front cover from the panel.
3. Remove 3/4" knockout on side of panel box.
4. Make sure the leads are as short as possible with the ground wire being the shortest of all.
5. Unscrew locknut "A" from the Push-On Connector. The flexible conduit between the connectors can be cut
down to size as necessary. See the Illustrations Page on the back side of this document for more information.
6. Feed all wires and the nipple through knockout hole then through nut, tighten nut securing the unit.
7. Connect the Ground wire (Green) to the Ground bus making sure the ground wire is as short as
possible.
Ground Resistance Rule: Max ground resistance is 25 ohms, 5 ohms or less is optimum.
This cannot be an assumed value and must be measured to assure proper grounding.
8. Connect the Neutral wire (White) to the Neutral bus of the panel.
9. Connect the Phase wires (Black) to the line side or load side of the Phase A, Phase B and
Phase C, 3 pole breaker.
10. Securely mount the enclosure using the mounting feet located at each corner
11. After all connections have been made and no hazards exist, replace panel cover and restore power.
12. This device features an internal protection that will disconnect the surge protective component but will
maintain power to the load - now unprotected. If this situation is undesirable for the application, follow the
manufacturer's instructions for replacing the device.
Dry Contact Connection: This is a Form C Dry Contact Circuit, 0.9A, 240VAC maximum input.
Normally Open (NO)=Black Wire, Common (COM)= Red Wire, Normally Closed (NC)=White Wire.
Note: Remote Alarm Wires To Be Connected To Class 1 Circuits Only.
3 POLE BREAKER
Drawn By: B. Aycock 5-17-16
Approved By: R. Mitchell 4-15-2020
INSTALL INSTRUCTIONS
the unit. Improper installation voids the warranty.
BREAKER PANEL
WHITE WIRE
NEUTRAL BUS
BLACK WIRE
GROUND BUS
1-888-472-6100 www.diteksurgeprotection.com
D200-347/6003Y
LOCKNUT "A"
D200-347/6003Y
GREEN WIRE
120V Single Ø
240V Single Ø
120/240V Split Ø
120/240V Hi Leg Δ
120/208V 3 Ø Wye
277/480V 3 Ø Wye
347/600V 3 Ø Wye
240V 3 Ø Δ
480V 3 Ø Δ
600V 3 Ø Δ
DITEK Technical Support Available 24/7
Expected System Voltages
L - L HiL-G,N
L - G
L - N
NA
NA
120
NA
NA
240
240
NA
120
240
240
120
208
NA
120
480
NA
277
600
NA
347
NA
240
240
Max
NA
480
480
Max
NA
600
600
Max
Doc # INT-100140-001
Part No. 191562 Rev. 4
N - G
120
0
240
0
120
0
120
0
120
0
277
0
347
0
NA
0
NA
0
NA
0
Advertisement
Table of Contents

Subscribe to Our Youtube Channel
Related Manuals for Ditek D200-347/6003Y


Summary of Contents for Ditek D200-347/6003Y
- Page 1 347/600V 3 Ø Wye 240V 3 Ø Δ 480V 3 Ø Δ GROUND BUS 600V 3 Ø Δ DITEK Technical Support Available 24/7 Drawn By: B. Aycock 5-17-16 Doc # INT-100140-001 1-888-472-6100 www.diteksurgeprotection.com Approved By: R. Mitchell 4-15-2020 Part No. 191562 Rev. 4...
- Page 2 LOCKNUT “A” STEP 4 TO REMOVE CONDUIT, UNSCREW THIS CONNECTOR AND PULL THE CONDUIT AWAY FROM CONNECTOR BASE. TO REPLACE, REPEAT THE PREVIOUS STEPS. DITEK Technical Support Available 24/7 Drawn By: B. Aycock 5-17-16 Doc # INT-100140-001 1-888-472-6100 www.diteksurgeprotection.com Approved By: R. Mitchell 4-15-2020...
Need help?
Do you have a question about the D200-347/6003Y and is the answer not in the manual?
Questions and answers